How to Deadlift: Complete Guide to Proper Deadlift Form
Why the Deadlift Is the King of All Lifts
The deadlift is the most fundamental strength exercise you can perform. You pick a loaded barbell up off the ground and stand up with it. No other movement recruits as much total muscle mass, builds as much full-body strength, or carries over to real-world activities as directly as the deadlift.
The lift trains your entire posterior chain -- hamstrings, glutes, spinal erectors, traps, and lats -- while simultaneously demanding grip strength, core stability, and mental toughness. It is the heaviest lift most people will ever perform, and that is precisely why it is so effective at building strength [1].
Whether your goal is to build a stronger back, increase athletic performance, or simply be able to pick heavy things up off the floor without getting injured, learning how to deadlift with proper form is essential. This guide covers everything you need to know: conventional technique, setup cues, grip options, breathing and bracing, common mistakes, deadlift variations, and programming recommendations.
The Conventional Deadlift: Step-by-Step Technique
The conventional deadlift is the standard version of the lift and the one most people should learn first. Here is how to perform it with proper form.
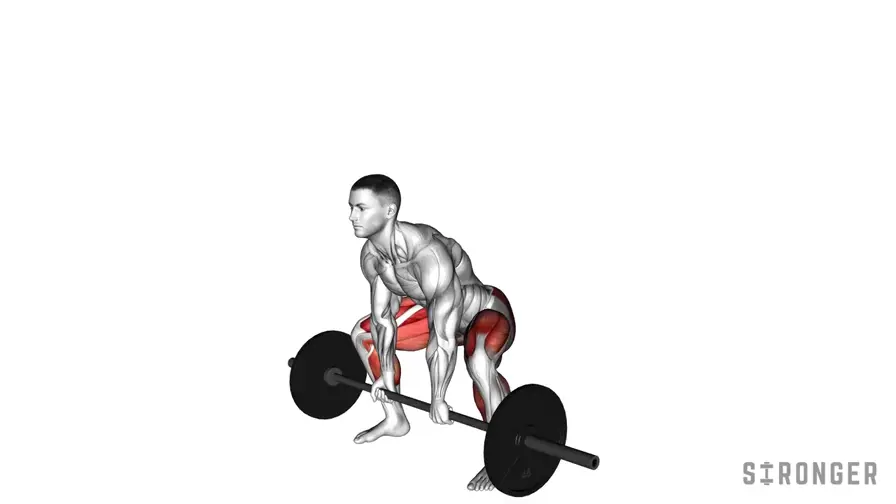
Step 1: The Setup
Your setup determines whether the rep will be successful before you even pull. A sloppy setup leads to a sloppy pull.
- Foot position: Stand with your feet hip-width apart (roughly 8-12 inches between heels). The bar should be over your mid-foot -- about one inch from your shins. Most people stand too far from the bar.
- Toe angle: Point your toes slightly outward, about 15-30 degrees. This allows your knees to track over your toes naturally.
- Shin position: When you bend down to grip the bar, your shins should touch or nearly touch the bar. Do not push the bar forward with your shins.
Step 2: The Grip
Reach down and grip the bar just outside your legs. Your arms should hang straight down from your shoulders, perpendicular to the floor.
There are three primary grip options:
Double overhand grip: Both palms face you. This is the safest and most natural grip but limits the weight you can hold as loads get heavier. Use this for all warm-up sets and lighter working sets.
Mixed grip (over-under): One palm faces you, the other faces away. This prevents the bar from rolling out of your hands and allows you to hold significantly more weight. Alternate which hand is supinated (palm up) between sets to prevent muscle imbalances.
Hook grip: Both palms face you, but your thumb is trapped between the bar and your fingers. This provides the security of a mixed grip without the asymmetry. It is uncomfortable at first but becomes tolerable with practice. Most competitive weightlifters and many powerlifters use the hook grip.
Step 3: Setting Your Back
With your hands on the bar, drop your hips until your shins touch the bar, then squeeze your chest up without dropping your hips further. You should feel your back tighten and flatten. Think about pulling your shoulder blades into your back pockets.
Your back should be in a neutral position -- not rounded, not hyperextended. A slight natural curve in the lower back is correct. If you cannot achieve a flat back in this position, the weight is too heavy or you need to work on hip mobility.
Step 4: Generating Tension
Before you pull, remove all the slack from the bar and your body:
- Pull your lats tight by imagining you are bending the bar around your shins
- Push your feet into the floor
- Take a deep breath and brace your core (more on this below)
- You should feel like a loaded spring -- everything tight, ready to explode
Step 5: The Pull
The deadlift is not actually a pull -- it is a push. Think about pushing the floor away from you with your legs. The bar leaves the ground as a consequence of your leg drive.
Off the floor to knee height: Drive through your legs. Your hips and shoulders should rise at the same rate. If your hips shoot up faster than your shoulders, the lift turns into a stiff-leg deadlift and puts excessive stress on your lower back.
Knee height to lockout: Once the bar passes your knees, drive your hips forward aggressively. Squeeze your glutes at the top to lock out. Your hips and knees should reach full extension simultaneously.
The lockout: Stand tall with your shoulders back and your hips fully extended. Do not hyperextend your lower back or lean backward at the top. A straight, vertical torso is the correct end position.
Step 6: The Descent
Lower the bar by reversing the movement. Push your hips back first, then bend your knees once the bar passes them. Keep the bar close to your body throughout the descent. Do not just drop the bar -- a controlled descent builds strength and muscle on the eccentric portion of the lift.
Ready to Get Stronger?
Join 2,000,000+ lifters tracking their workouts with Stronger. Available on iOS and Android.
Breathing and Bracing
Proper breathing is the most underrated aspect of deadlift technique. It is also the most important factor in protecting your spine under heavy loads [2].
The Valsalva Manoeuvre
Before every rep, take a deep breath into your belly (not your chest) and brace your core as if you were about to be punched in the stomach. This creates intra-abdominal pressure that stabilises your spine like a natural weightlifting belt.
How to do it:
- Before gripping the bar, take a deep diaphragmatic breath -- your belly should expand, not your chest
- Close your glottis (hold your breath) and push out against your abdominal wall
- Maintain this brace throughout the entire rep
- Exhale at the top, then rebrace before the next rep
For sets of 3 or fewer reps, rebrace at the top of each rep. For higher rep sets, you may need to take a quick breath at the top while maintaining some core tension.
Should You Wear a Belt?
A lifting belt amplifies the Valsalva manoeuvre by giving your core something to push against. It does not replace bracing -- it enhances it.
When to use a belt:
- Working sets above 80% of your 1RM
- Sets where you need maximum spinal stability
- After you have already developed the ability to brace properly without one
When not to use a belt:
- Warm-up sets
- Lighter working sets where you are practising technique
- If you have not yet learned how to brace without a belt
Common Deadlift Mistakes
1. Rounding the Lower Back
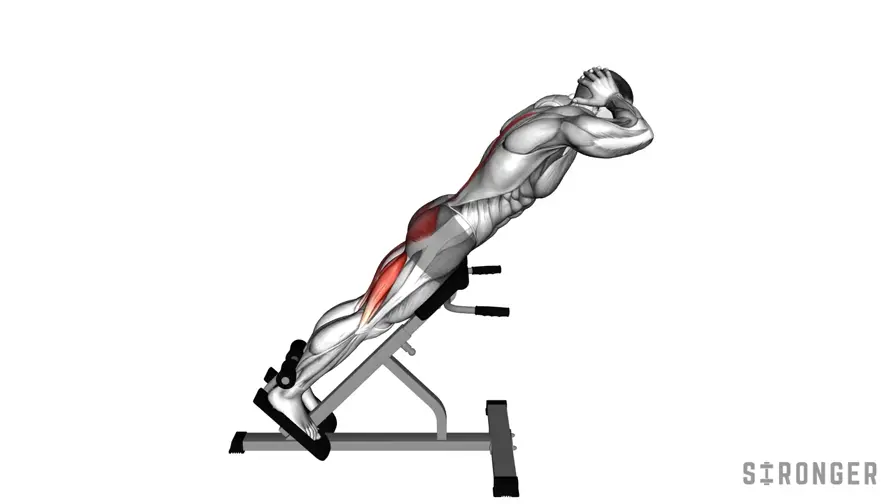
This is the most dangerous deadlift mistake. A rounded lower back places shear forces on the spine that can lead to disc injuries. Some upper back rounding is acceptable (and sometimes unavoidable) at maximal loads, but the lower back must remain flat or slightly arched.
Fix: Lower the weight and focus on setting your back properly during setup. Strengthen your spinal erectors with exercises like rack pulls and back extensions.
2. Hips Shooting Up
If your hips rise faster than your shoulders off the floor, you are not using your legs effectively. This turns the lift into a Romanian deadlift and places excessive strain on the lower back.
Fix: Think about pushing the floor away with your legs. Strengthen your quads with barbell squats and leg presses.
3. Bar Drifting Away From the Body
The farther the bar drifts from your centre of gravity, the harder the lift becomes and the more stress is placed on your lower back. The bar should travel in a straight vertical line, scraping or nearly scraping your shins and thighs throughout the lift.
Fix: Wear long socks or tracksuit bottoms to protect your shins. Actively pull the bar back into your body using your lats.
4. Hyperextending at the Top
Many lifters lean back excessively at lockout, especially when trying to emphasise the "squeeze" at the top. This hyperextension compresses the lumbar vertebrae and serves no purpose.
Fix: Stand tall and squeeze your glutes. Your shoulders, hips, and ankles should form a straight vertical line at lockout.
5. Jerking the Bar Off the Floor
Yanking the bar violently increases injury risk and is actually slower than a controlled pull. The initial pull should be smooth and progressive -- squeeze the bar off the floor, do not rip it.
Fix: Pull the slack out of the bar before initiating the lift. Build tension gradually, then drive.
Deadlift Variations
Sumo Deadlift
The sumo deadlift uses a wide stance (feet outside the hands) and a more upright torso. It places more emphasis on the quads and adductors while reducing the range of motion.
Who should use it:
- Lifters with long torsos and short arms
- Those who struggle to maintain a flat back in conventional
- Lifters with hip anatomy that favours a wide stance
- Competitive powerlifters who pull more weight sumo
Key differences from conventional:
- Stance is 1.5-2x shoulder width
- Toes pointed out 45 degrees
- Hands grip inside the legs
- More upright torso position
- Greater quad and adductor involvement
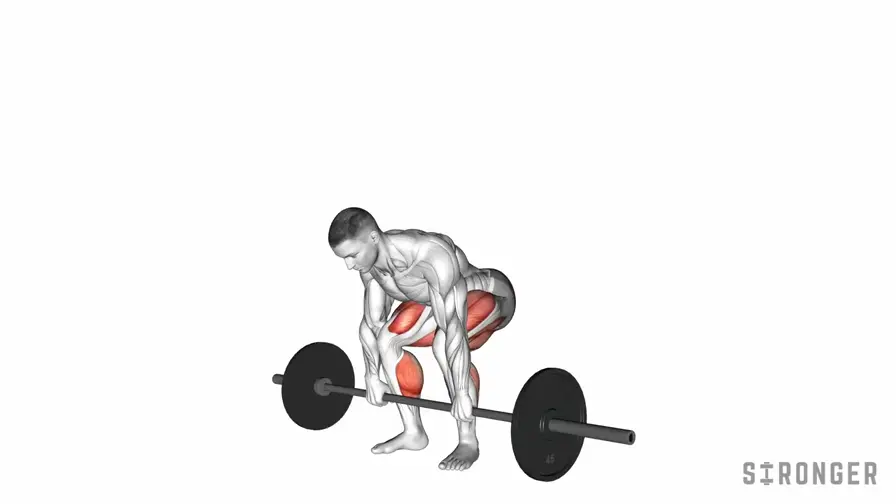
Romanian Deadlift (RDL)
The Romanian deadlift starts from the top (standing position) and uses a controlled eccentric to lower the bar to approximately shin height. The knees stay slightly bent throughout, and the movement is driven entirely by the hip hinge.
Best for: Hamstring and glute development, improving hip hinge mechanics, and as an accessory lift for the conventional deadlift.
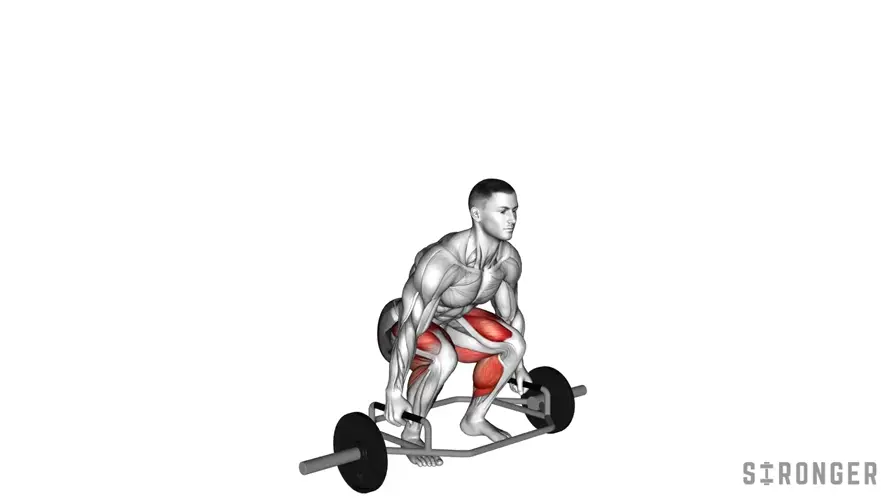
Trap Bar Deadlift
The trap bar deadlift uses a hexagonal bar that allows you to stand inside it and grip handles at your sides. This shifts the load closer to your centre of gravity and creates a more squat-like movement pattern.
Best for: Athletes, beginners learning the hip hinge, and anyone with lower back issues who still wants to deadlift heavy. Research suggests the trap bar deadlift produces less spinal stress while allowing similar or greater loads [3].
Rack Pull
The rack pull is a partial-range deadlift performed from elevated pins in a power rack. Starting the bar at knee height or above reduces the range of motion and allows you to lift significantly more weight.
Best for: Overloading the lockout portion of the deadlift, building upper back and trap strength, and getting accustomed to heavy loads.
Sumo vs. Conventional: Which Should You Choose?
This is one of the most debated topics in strength training, and the honest answer is: it depends on your anatomy and what feels strongest.
Choose conventional if:
- You have proportionally long arms relative to your torso
- You feel stronger with a narrow stance
- You want to develop your posterior chain (hamstrings, glutes, back) maximally
- You are new to deadlifting and want to learn the most transferable hip hinge pattern
Choose sumo if:
- You have proportionally short arms or a long torso
- You feel more comfortable and powerful in a wide stance
- You have limited hip hinge mobility that makes conventional difficult
- You want to reduce stress on the lower back
Many experienced lifters train both variations. Use your stronger variation for heavy work and the other as an accessory movement. There is no evidence that either variation is inherently better for building strength -- the best deadlift style is the one that allows you to move the most weight safely [4].
Deadlift Programming
Beginner Programme (0-12 Months)
Beginners should deadlift 1-2 times per week using linear progression:
| Week | Day 1 | Day 2 (optional) |
|---|---|---|
| 1 | 60 kg 3x5 | Romanian Deadlift 3x8 |
| 2 | 65 kg 3x5 | Romanian Deadlift 3x8 |
| 3 | 70 kg 3x5 | Romanian Deadlift 3x8 |
| 4 | 75 kg 3x5 | Romanian Deadlift 3x8 |
Add 5 kg per week to your working sets. When you stall, deload by 10% and work back up. This approach is similar to what you would use in a 5x5 programme or 3-day split.
Intermediate Programme (1-3 Years)
Intermediate lifters benefit from weekly undulating periodisation:
| Day | Focus | Sets x Reps | Intensity |
|---|---|---|---|
| Monday | Heavy | 5x3 | 85-90% 1RM |
| Thursday | Volume | 4x6 | 70-75% 1RM |
Increase the heavy day by 2.5 kg every 1-2 weeks. Periodically test your 1RM every 8-12 weeks. Incorporate accessory work like barbell rows, pull-ups, and farmers walks to strengthen supporting muscle groups.
Advanced Programming Considerations
Advanced lifters (2+ years of consistent training) typically need more sophisticated programming. Consider block periodisation with dedicated accumulation (high volume), intensification (heavy singles and doubles), and peaking phases. A structured training approach using progressive overload across mesocycles becomes essential at this level.
Deadlift Warm-Up Protocol
Never deadlift heavy without warming up. Here is a recommended warm-up sequence:
- General warm-up (5 minutes): Light rowing, cycling, or walking to raise your core temperature
- Hip mobility (3 minutes): Hip circles, leg swings, deep bodyweight squats
- Activation (2 minutes): Glute bridges, kettlebell swings, or banded pull-throughs
- Warm-up sets: Progressively load the bar toward your working weight
Example warm-up sets for a 140 kg working weight:
| Set | Weight | Reps |
|---|---|---|
| 1 | 60 kg | 5 |
| 2 | 80 kg | 5 |
| 3 | 100 kg | 3 |
| 4 | 120 kg | 2 |
| 5 | 130 kg | 1 |
| Working sets | 140 kg | 3x5 |
Frequently Asked Questions
How often should I deadlift?
Most lifters benefit from deadlifting 1-2 times per week. Because the deadlift is extremely taxing on the central nervous system, recovery demands are high. Beginners following a full body programme can deadlift every session (2-3 times per week) at lower intensities, while advanced lifters often deadlift heavy only once per week.
Will deadlifts hurt my back?
When performed with proper technique, deadlifts strengthen your back and reduce injury risk. The deadlift is a therapeutic exercise used in physiotherapy for lower back rehabilitation [5]. Back injuries occur when technique breaks down -- specifically when the lower back rounds under heavy load. Start light, learn proper form, and progress gradually.
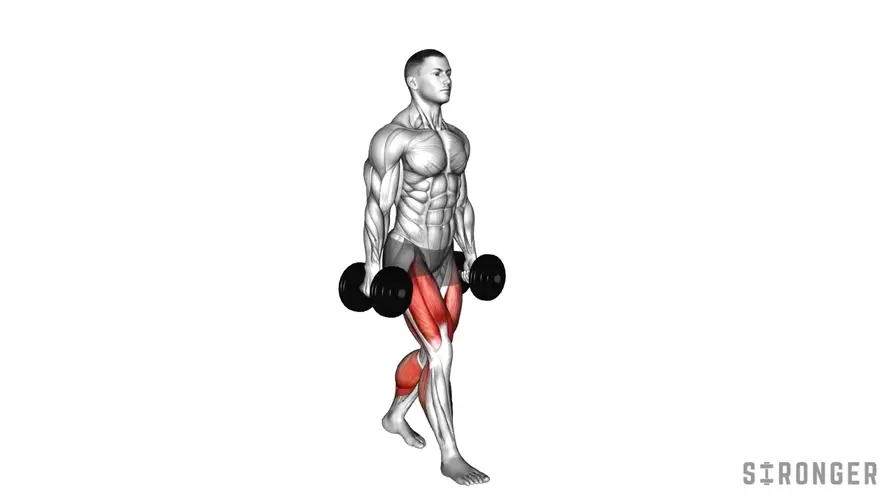
Should I use straps?
Use straps sparingly. Your grip should be trained, not bypassed. Use straps only when your grip fails before your back and legs on your heaviest sets. For all other sets, use double overhand or hook grip to build grip strength. Farmers walks are an excellent accessory exercise for developing grip strength.
What is a good deadlift for a beginner?
Strength standards vary by bodyweight, but general benchmarks for a conventional deadlift one-rep max (1RM) after 6-12 months of training are:
- Men: 1.25-1.5x bodyweight
- Women: 1.0-1.25x bodyweight
These are guidelines, not rules. Focus on progressing your own numbers rather than comparing to averages.
Should I deadlift in a full body or split routine?
Both work. In a full body workout programme, you deadlift alongside squats and pressing movements 2-3 times per week. In a split routine like push pull legs, deadlifts typically fall on pull day. The best approach depends on your schedule, recovery capacity, and overall training volume.
Summary
The deadlift is the single best exercise for building total-body strength. Learning proper form is not complicated, but it requires attention to detail and consistent practice.
Key takeaways:
- Set up with the bar over mid-foot, shins touching the bar, and a flat back
- Use a double overhand grip for most sets; switch to mixed or hook grip for heavy work
- Brace hard using the Valsalva manoeuvre before every rep
- Push the floor away with your legs -- do not yank the bar off the ground
- Keep the bar close to your body throughout the entire lift
- Choose conventional or sumo based on your anatomy and what feels strongest
- Deadlift 1-2 times per week and use progressive overload to add weight over time
Track every deadlift session so you know exactly when to add weight, when to deload, and how your strength is progressing over months and years.
Ready to Get Stronger?
Join 2,000,000+ lifters tracking their workouts with Stronger. Available on iOS and Android.
Sources
- Martín-Fuentes, I., Oliva-Lozano, J. M., & Muyor, J. M. (2020). Electromyographic activity in deadlift exercise and its variants. A systematic review. PLOS ONE, 15(2), e0229507.
- Hackett, D. A., & Chow, C. M. (2013). The Valsalva maneuver: Its effect on intra-abdominal pressure and safety issues during resistance exercise. Journal of Strength and Conditioning Research, 27(8), 2338-2345.
- Camara, K. D., et al. (2016). An Examination of Muscle Activation and Power Characteristics While Performing the Deadlift Exercise With Straight and Hexagonal Barbells. Journal of Strength and Conditioning Research, 30(5), 1183-1188.
- Cholewa, J. M., et al. (2019). Anthropometrical Determinants of Deadlift Variant Performance. Journal of Sports Science & Medicine, 18(3), 448-453.
- Berglund, L., et al. (2015). Which Patients With Low Back Pain Benefit From Deadlift Training? Journal of Strength and Conditioning Research, 29(7), 1803-1811.
Exercises in this guide
Stronger Editorial Team
Certified strength & conditioning specialists with 10+ years of coaching experience
The Stronger editorial team produces evidence-based training content for lifters of all levels.
Ready to Get Stronger?
Join 2,000,000+ lifters tracking their workouts with Stronger. Available on iOS and Android.