10 Best Lat Pulldown Alternatives (No Cable Needed)
You've got your pull-up bar bolted to the door frame, a pair of adjustable dumbbells on the rack, a resistance band looped around the railing — and yet every time back day rolls around, there's that nagging awareness: I don't have a cable machine. The lat pulldown was a staple of your gym routine. Now you're stuck wondering whether any of these alternatives actually deliver the same lat engagement, or whether you're just doing "general back work" and hoping for the best.
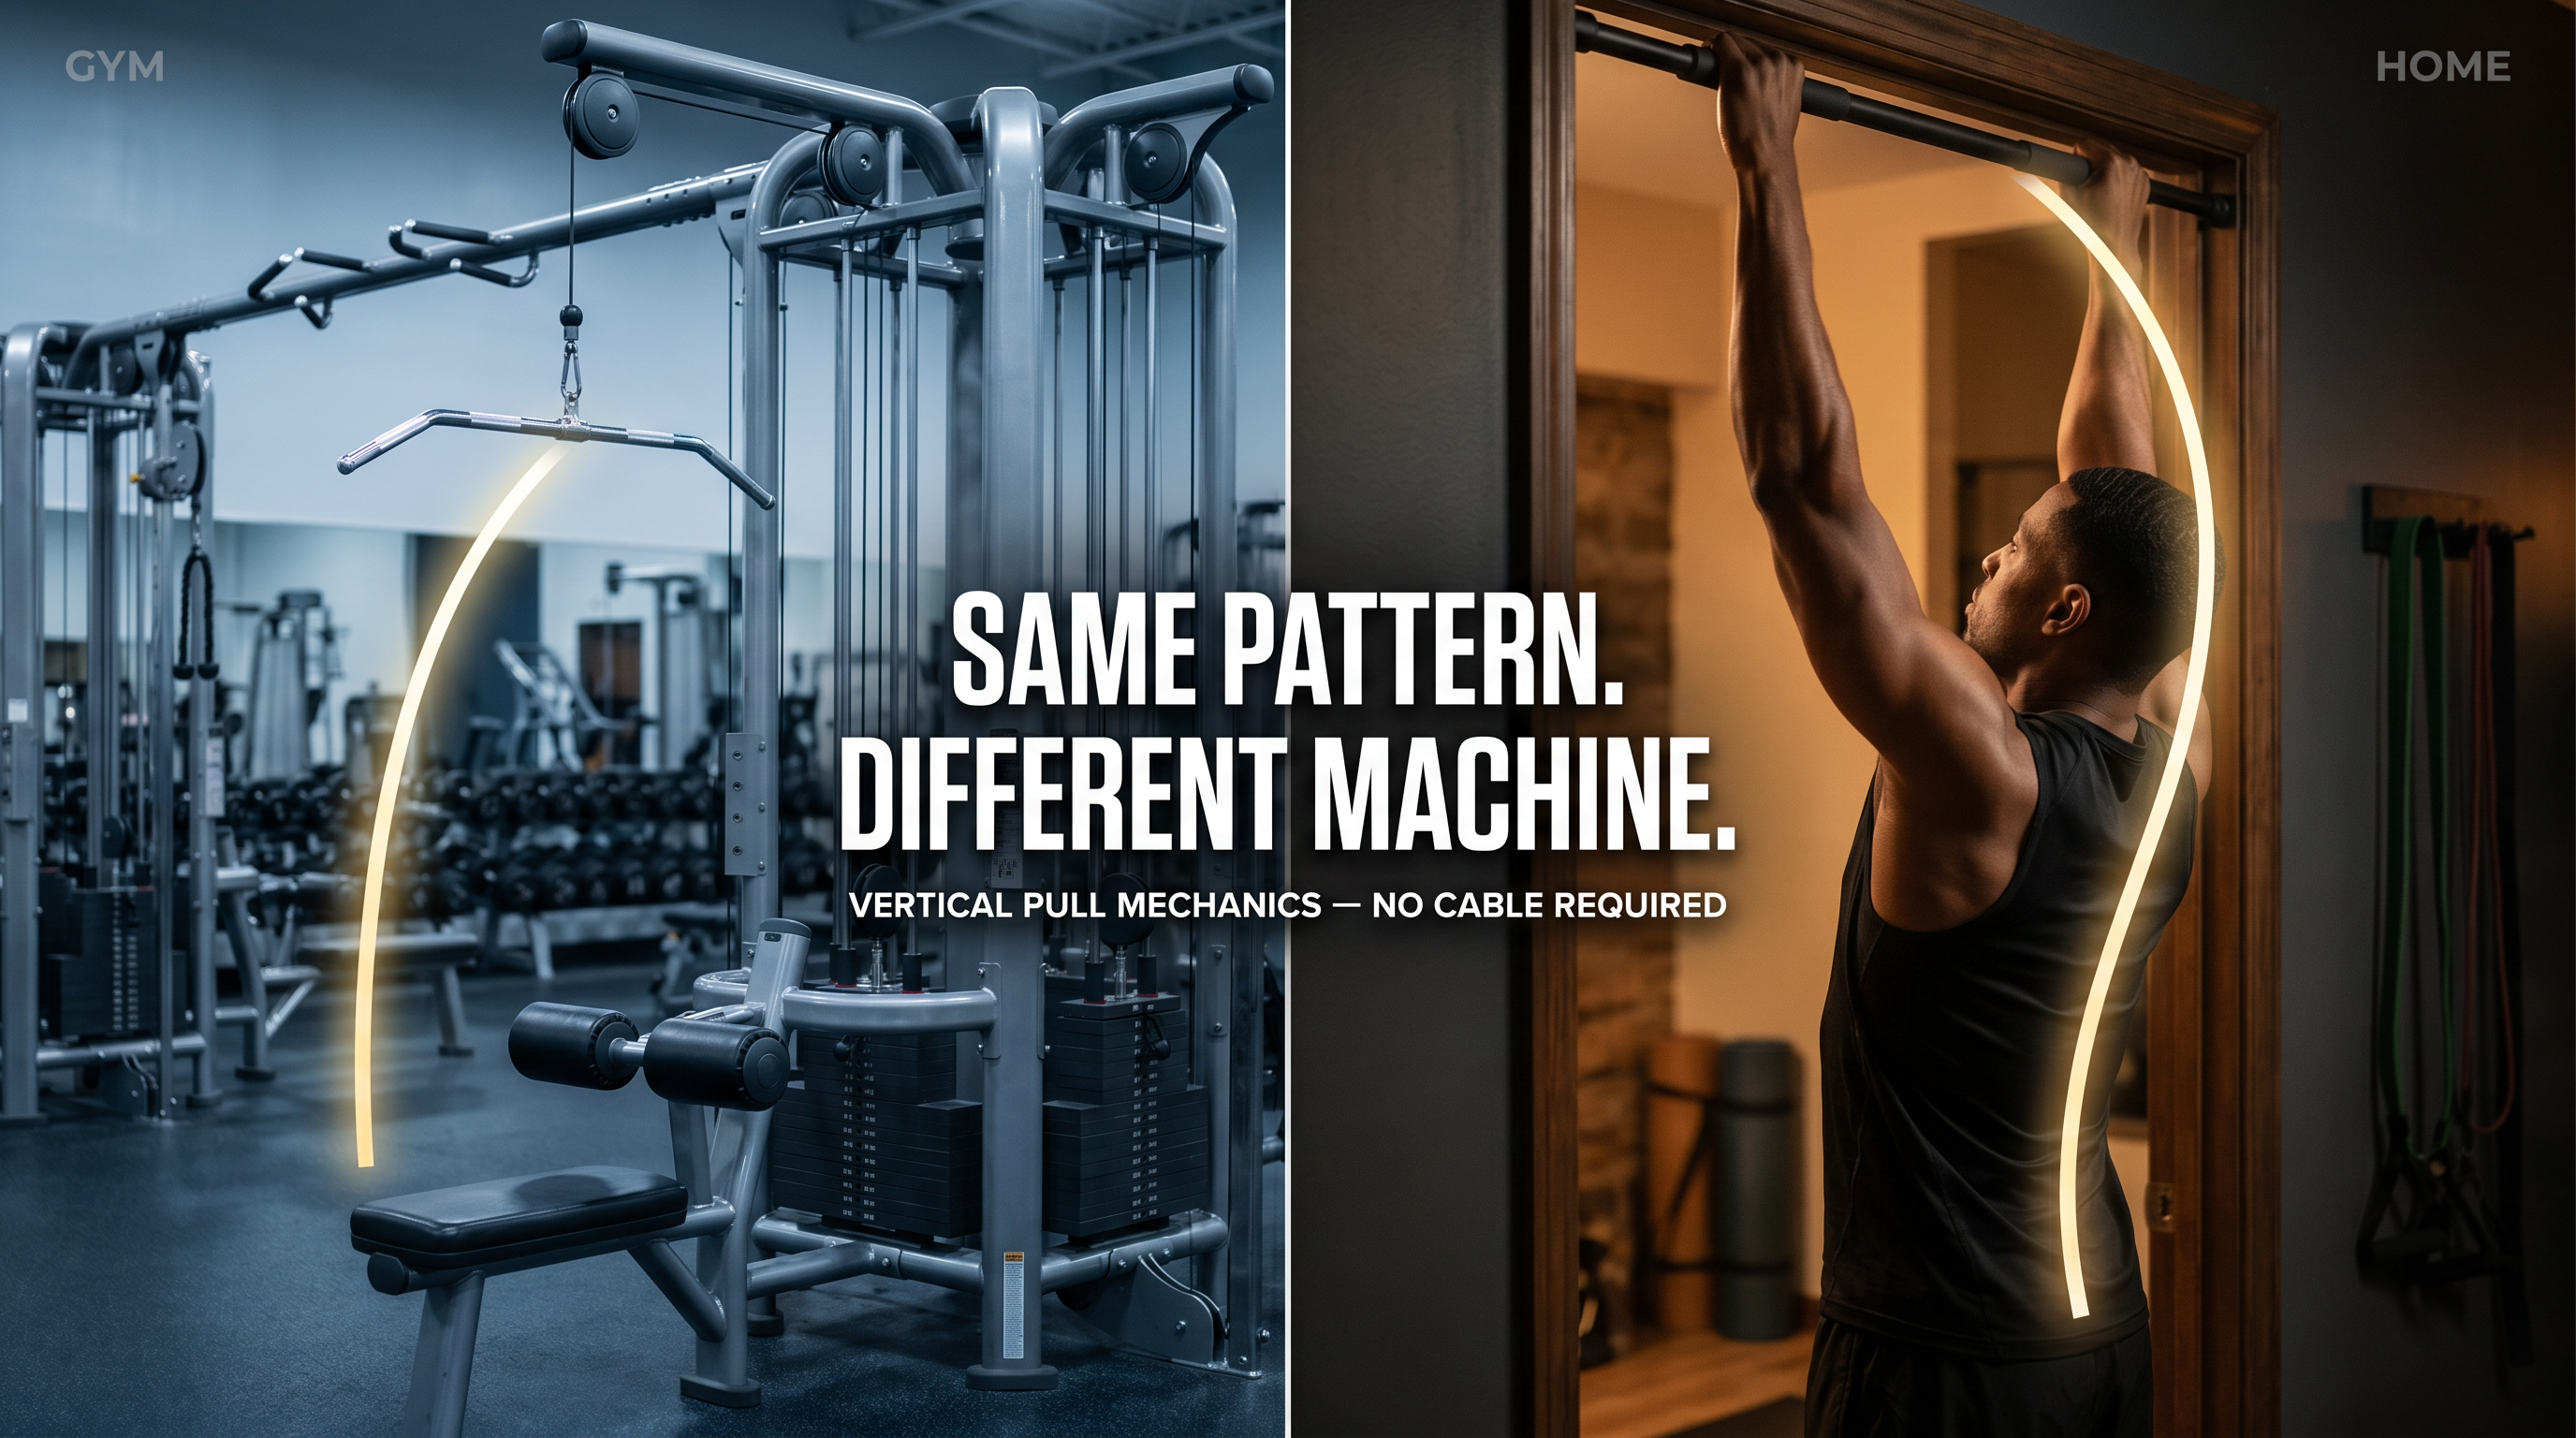
Here's the reframe that changes everything: the lat pulldown machine isn't magic. The movement pattern it produces is. Strip away the cable stack and the padded seat, and what you're left with is a simple mechanical idea — a vertical pulling motion that loads the lats through shoulder extension and scapular depression. Replicate that pattern, and you replicate the result.
In this guide, we've ranked 10 exercises by how closely they replicate the pulldown pattern — not just "exercises that train your back," but exercises that genuinely reproduce vertical pulling mechanics. We use these exact alternatives with home gym athletes tracking their training on Stronger, and every one of them can be logged, progressed, and benchmarked just as systematically as any cable exercise. Let's start with the mechanics, then get to the exercises.
What Makes a True Lat Pulldown Alternative?
Most "lat pulldown alternative" articles fail at this step. They list exercises like barbell rows, face pulls, and cable pullovers — all great movements, but not true replicants of the pulldown pattern. Here's why that distinction matters.
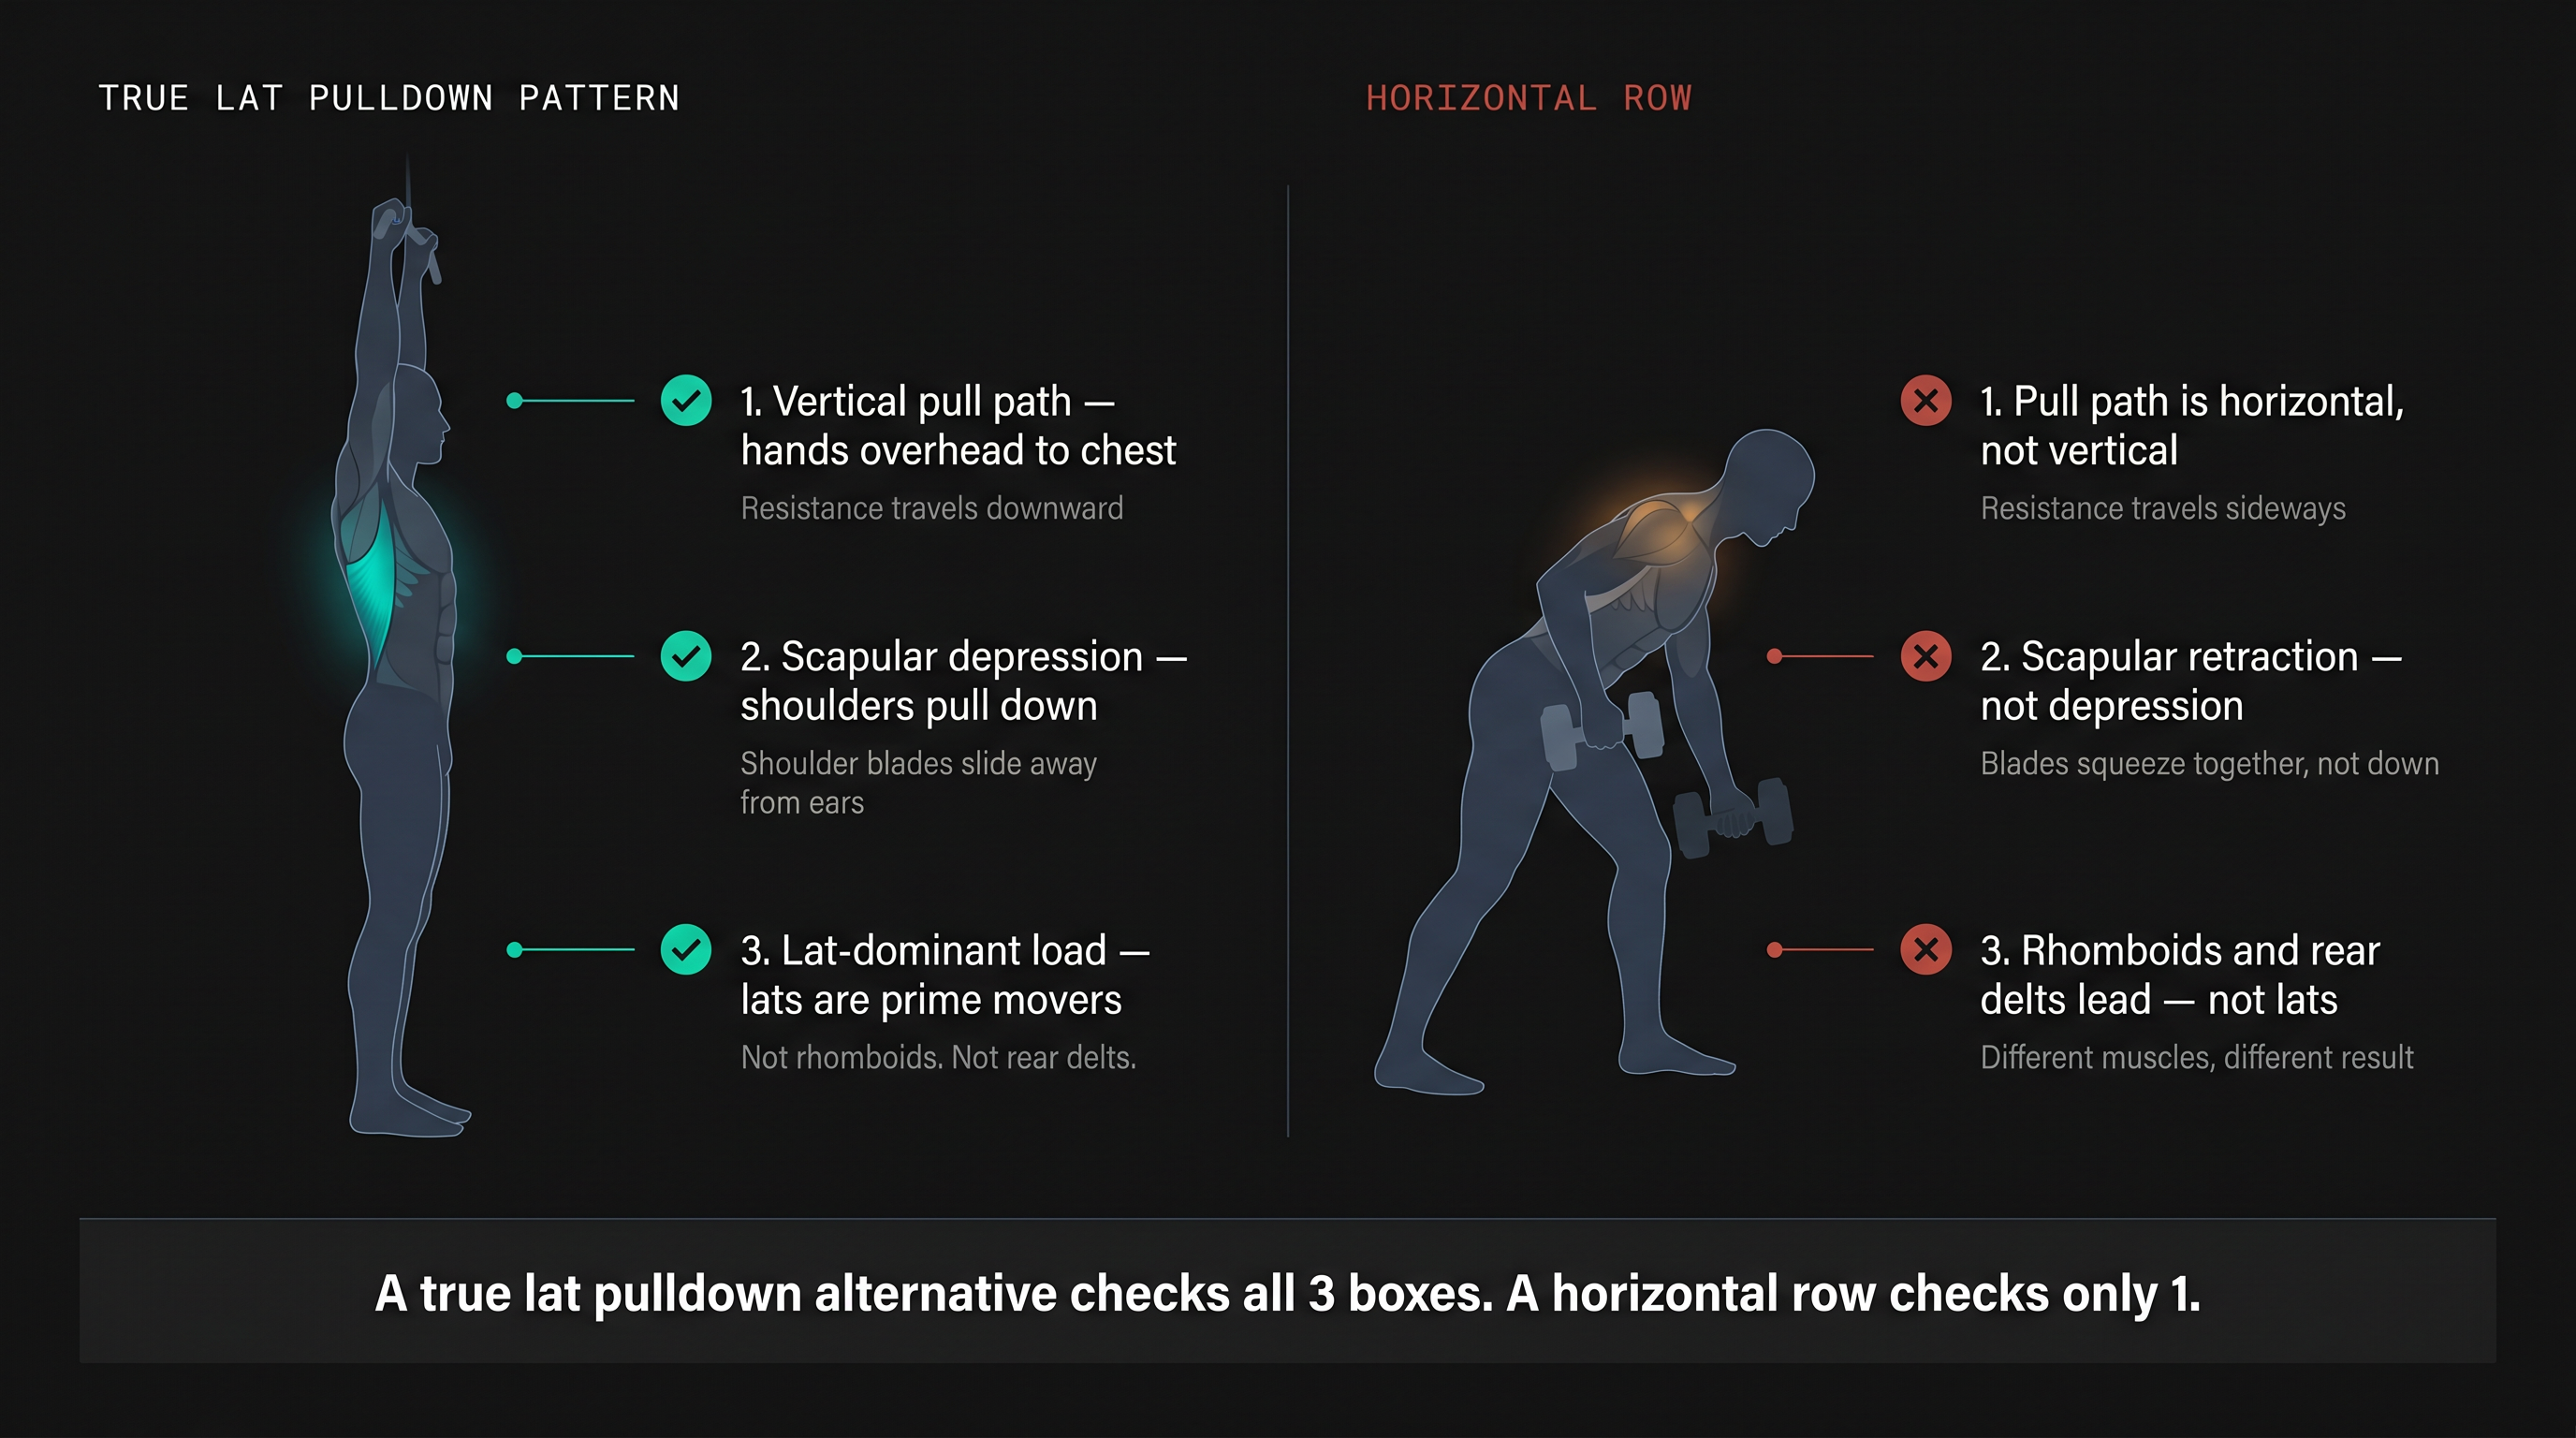
The lat pulldown works the way it works because of three things happening together:
- Vertical pull path — your hands start overhead and finish near your chest or collarbone. The resistance travels downward in a roughly vertical line.
- Scapular depression — as you pull, your shoulder blades slide downward. This is what gives lat pulldowns their distinctive feel: you're not just bending your elbows, you're actively pulling your shoulders down and away from your ears.
- Lat-dominant load — because the pull is vertical, the lats are the prime movers. Horizontal rows shift recruitment significantly toward the rhomboids, mid-traps, and rear delts. Not bad muscles to train — but a different job.
A true lat pulldown alternative checks all three boxes. A horizontal row only checks one. That's the standard we're holding every exercise on this list to.
Equipment used in this guide: pull-up bars, resistance bands, dumbbells, barbells, TRX/suspension trainers, and a sturdy door with a towel. No cables, no machines. These are all genuine compound pulling movements — the kind that build functional back strength across multiple muscle groups simultaneously.
All 10 exercises are ranked from most to least similar to the lat pulldown pattern. If you can only do one, start with #1.
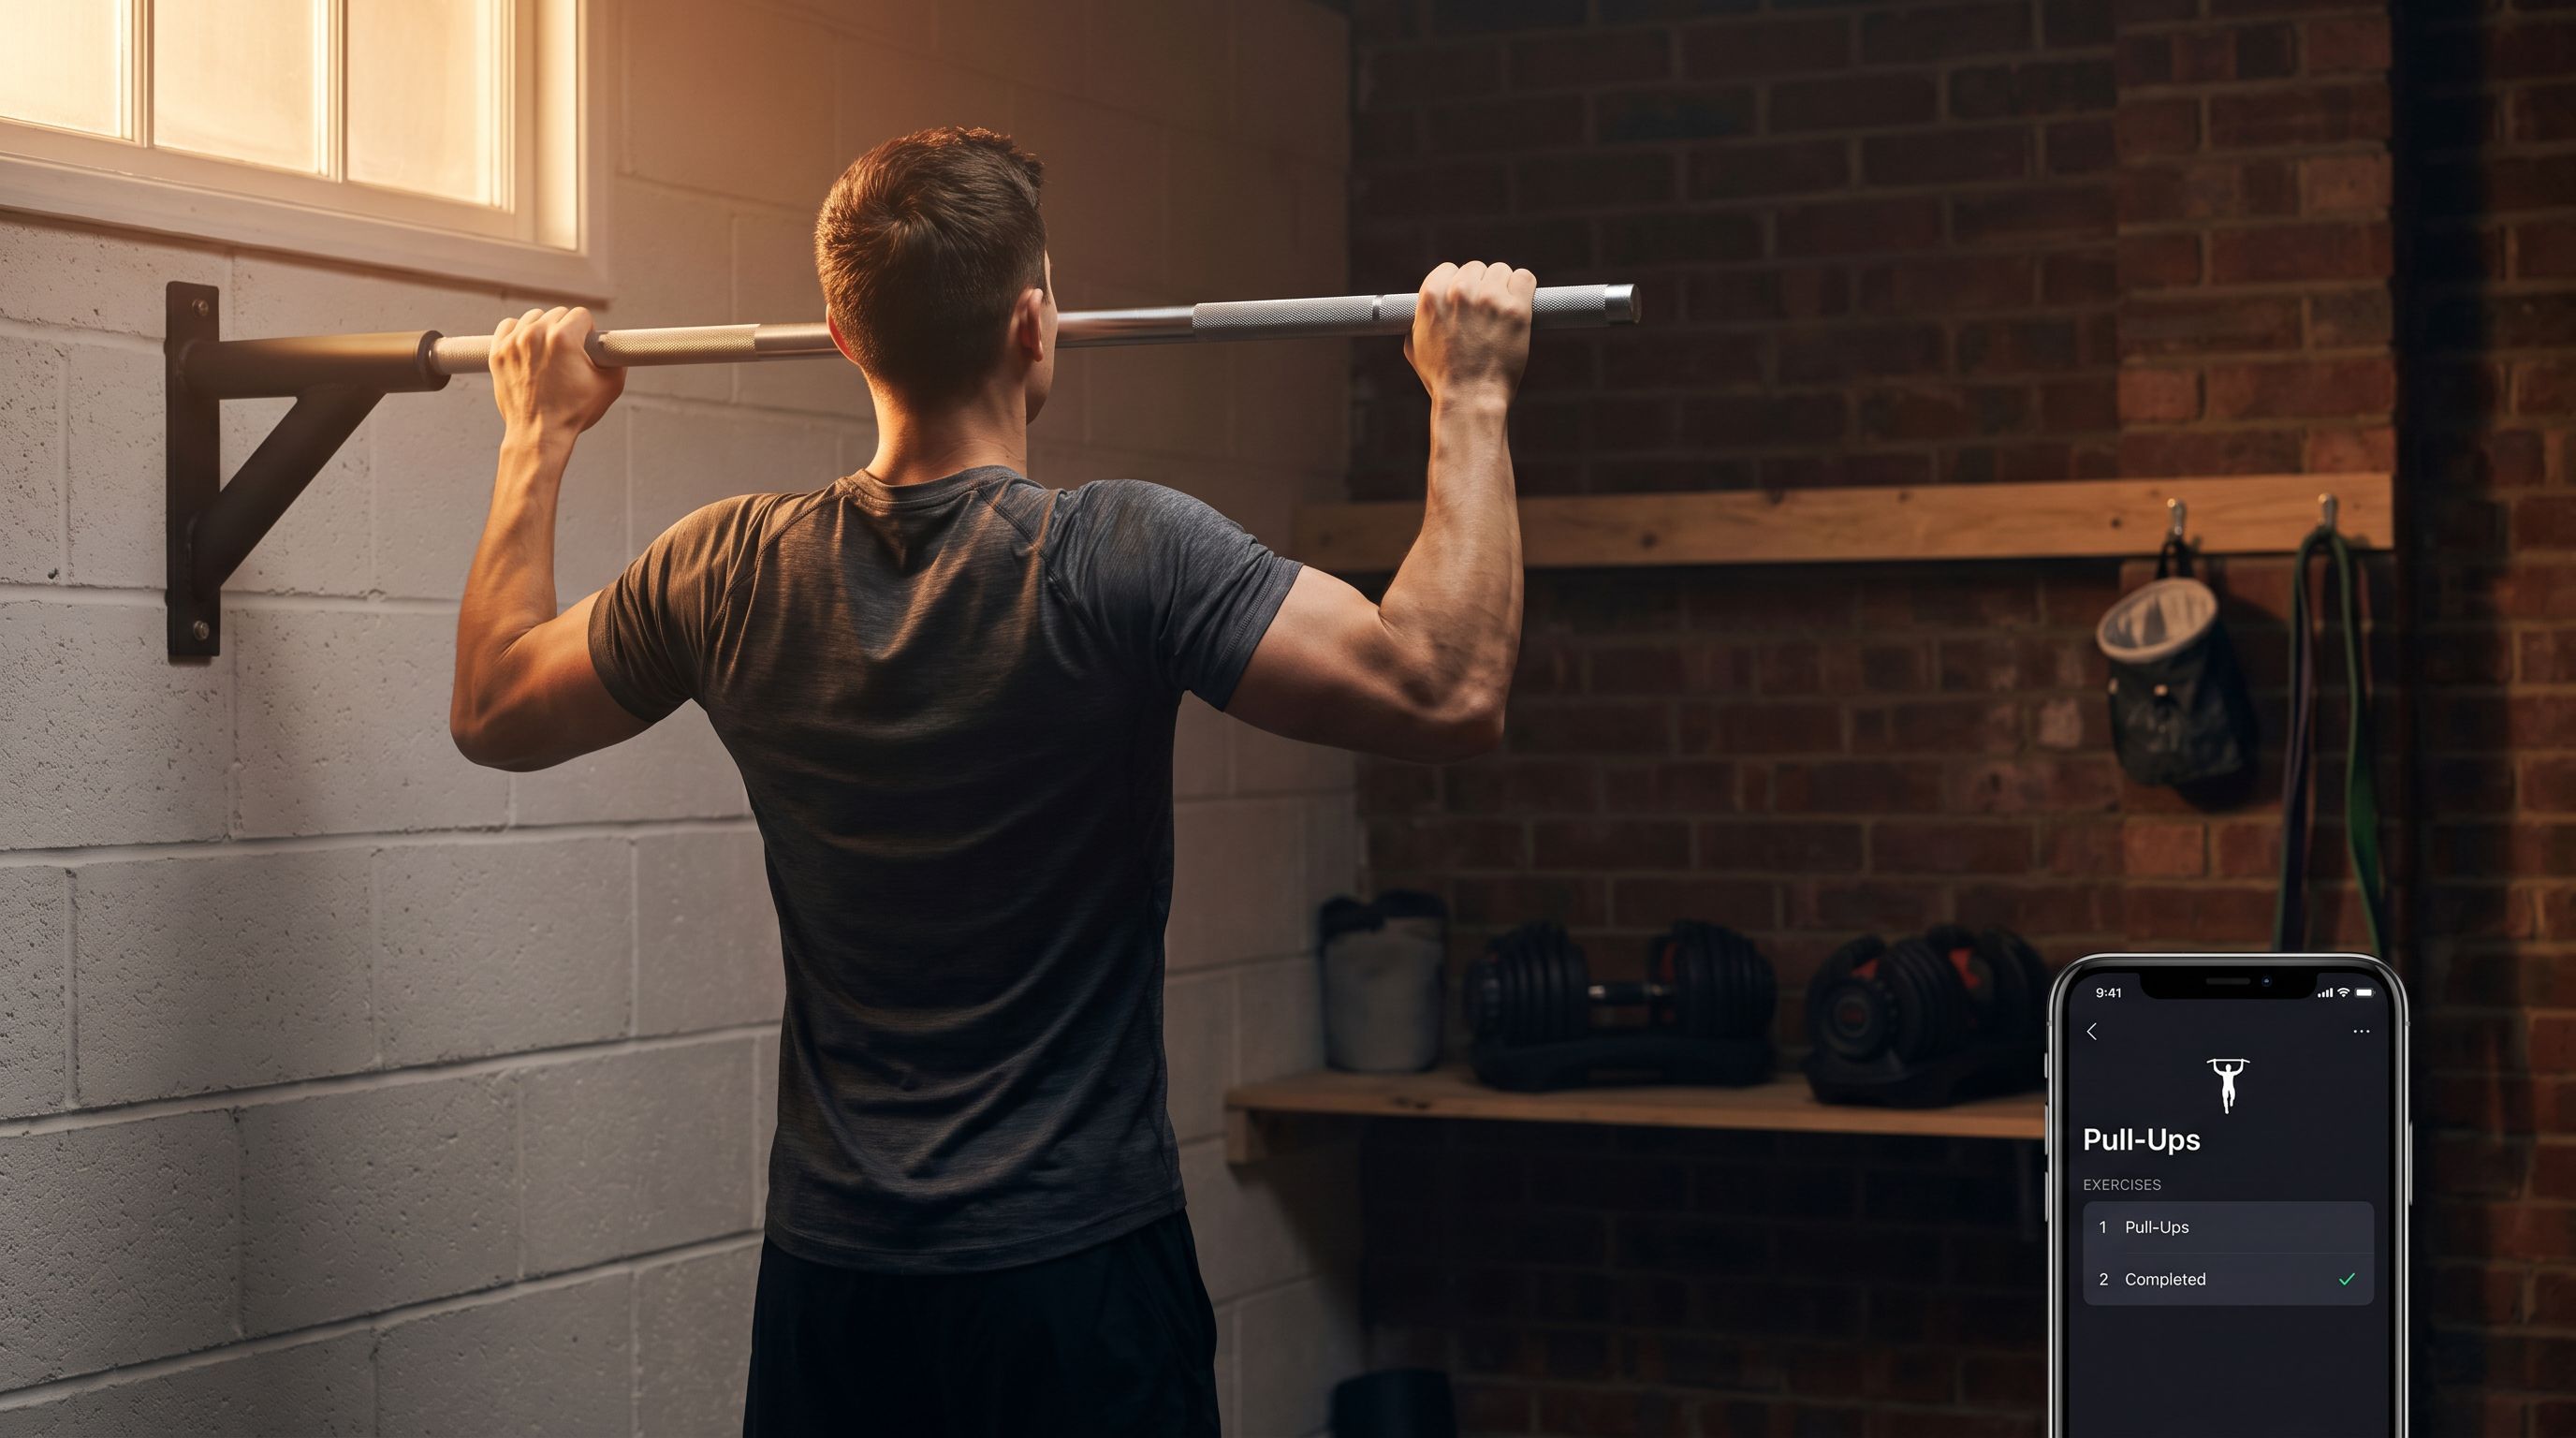
1. Pull-Ups and Chin-Ups (Best Overall)
Equipment: Pull-up bar (doorframe, wall-mounted, or standalone)
If you could only pick one lat pulldown alternative, this is it. Pull-ups and chin-ups are mechanically nearly identical to the cable lat pulldown — the movement path is a true vertical pull, shoulder depression occurs under load, and the lats are the primary driver throughout the full range of motion.
How to Do It:
- Grip the bar with hands just outside shoulder width (overhand for pull-ups, underhand for chin-ups)
- Hang with arms fully extended, letting the shoulder blades rise slightly at the bottom
- Initiate the pull by depressing the shoulder blades — think "pull your shoulder blades into your back pockets"
- Pull your chest to the bar or as high as you can control
- Lower with control back to full extension — don't rush the negative
Muscles Worked: Lats (primary), biceps, rear deltoids, rhomboids, brachialis
Why It Works: The vertical pull path is identical to a lat pulldown. Your body moves relative to a fixed point (the bar) rather than the bar moving relative to your body — functionally the same stimulus, different perspective. EMG research consistently shows lat activation in pull-ups is comparable to the cable lat pulldown.
Key Cue: Initiate by depressing the shoulder blades first — think "pull your shoulder blades into your back pockets" — before you bend your elbows.
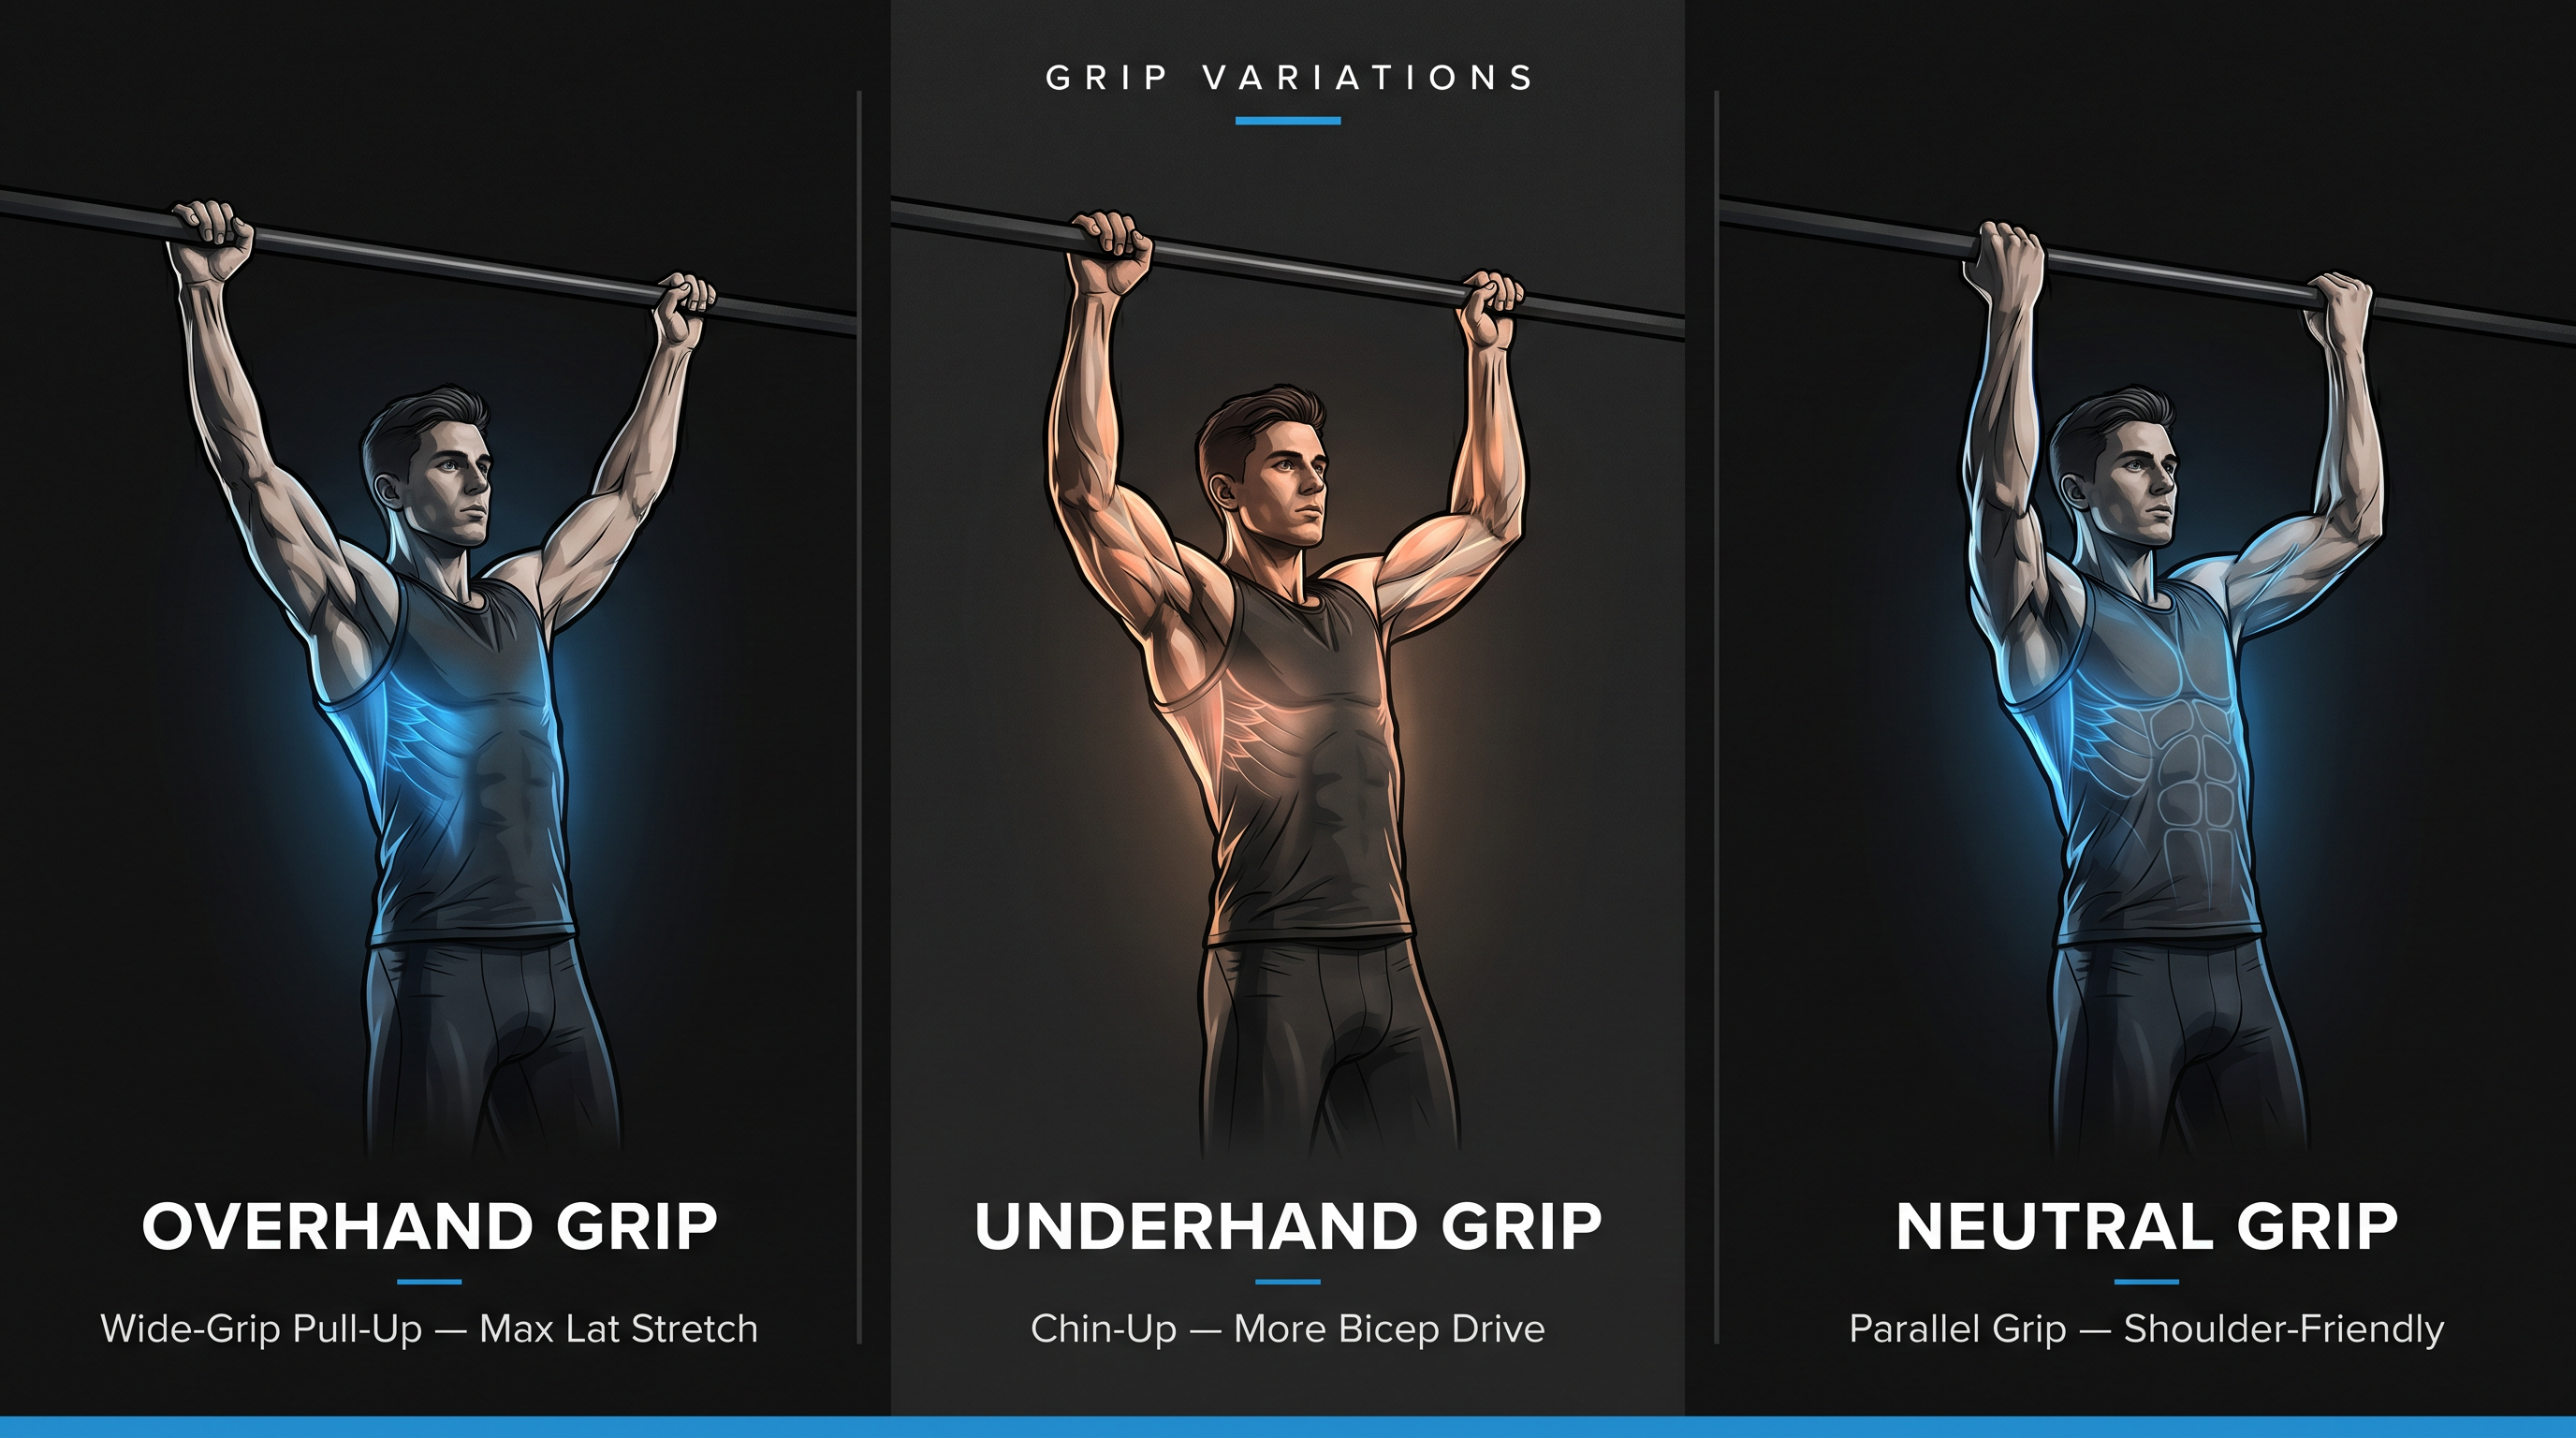
Grip Variations & Progressions:
▸ Overhand (pronated) grip: greater lat stretch, slightly harder, more external shoulder rotation — closest to a wide-grip lat pulldown
▸ Underhand (supinated) grip — chin-up: more bicep involvement, allows you to pull slightly higher, easier for most beginners; similar to an underhand lat pulldown
▸ Neutral grip (parallel): shoulder-friendly option if you have any impingement; excellent lat activation
▸ Can't do one yet? See exercise #10 (Negative Pull-Ups) — it's specifically designed to build you toward this
If you're already doing pull-ups, add weight with a belt or vest. The lat pulldown's main advantage is incremental loading; a weighted pull-up eliminates that advantage entirely.
2. Resistance Band Lat Pulldown
Equipment: Resistance band + anchor point (pull-up bar, door anchor, sturdy banister)
The band lat pulldown is the closest you'll get to the cable machine experience without a cable machine. The movement path is mechanically identical — you're doing a lat pulldown. The only difference is the resistance curve: a cable provides consistent tension throughout, while a band builds resistance as it stretches (meaning you'll feel it most at the bottom of the movement, where the pulldown is most challenging anyway).
How to Do It:
- Anchor the resistance band overhead — a pull-up bar works perfectly; so does a door anchor at the top of a door frame
- Kneel or sit on the floor beneath the anchor point
- Grip the band with both hands, palms facing forward (or use a handle attachment if you have one)
- Sit tall, chest up, slight arch in the lower back
- Pull the band down toward your upper chest, leading with your elbows pulling back and down
- Squeeze the lats at the bottom before slowly returning to the start
Muscles Worked: Lats (primary), biceps, rear deltoids, rhomboids
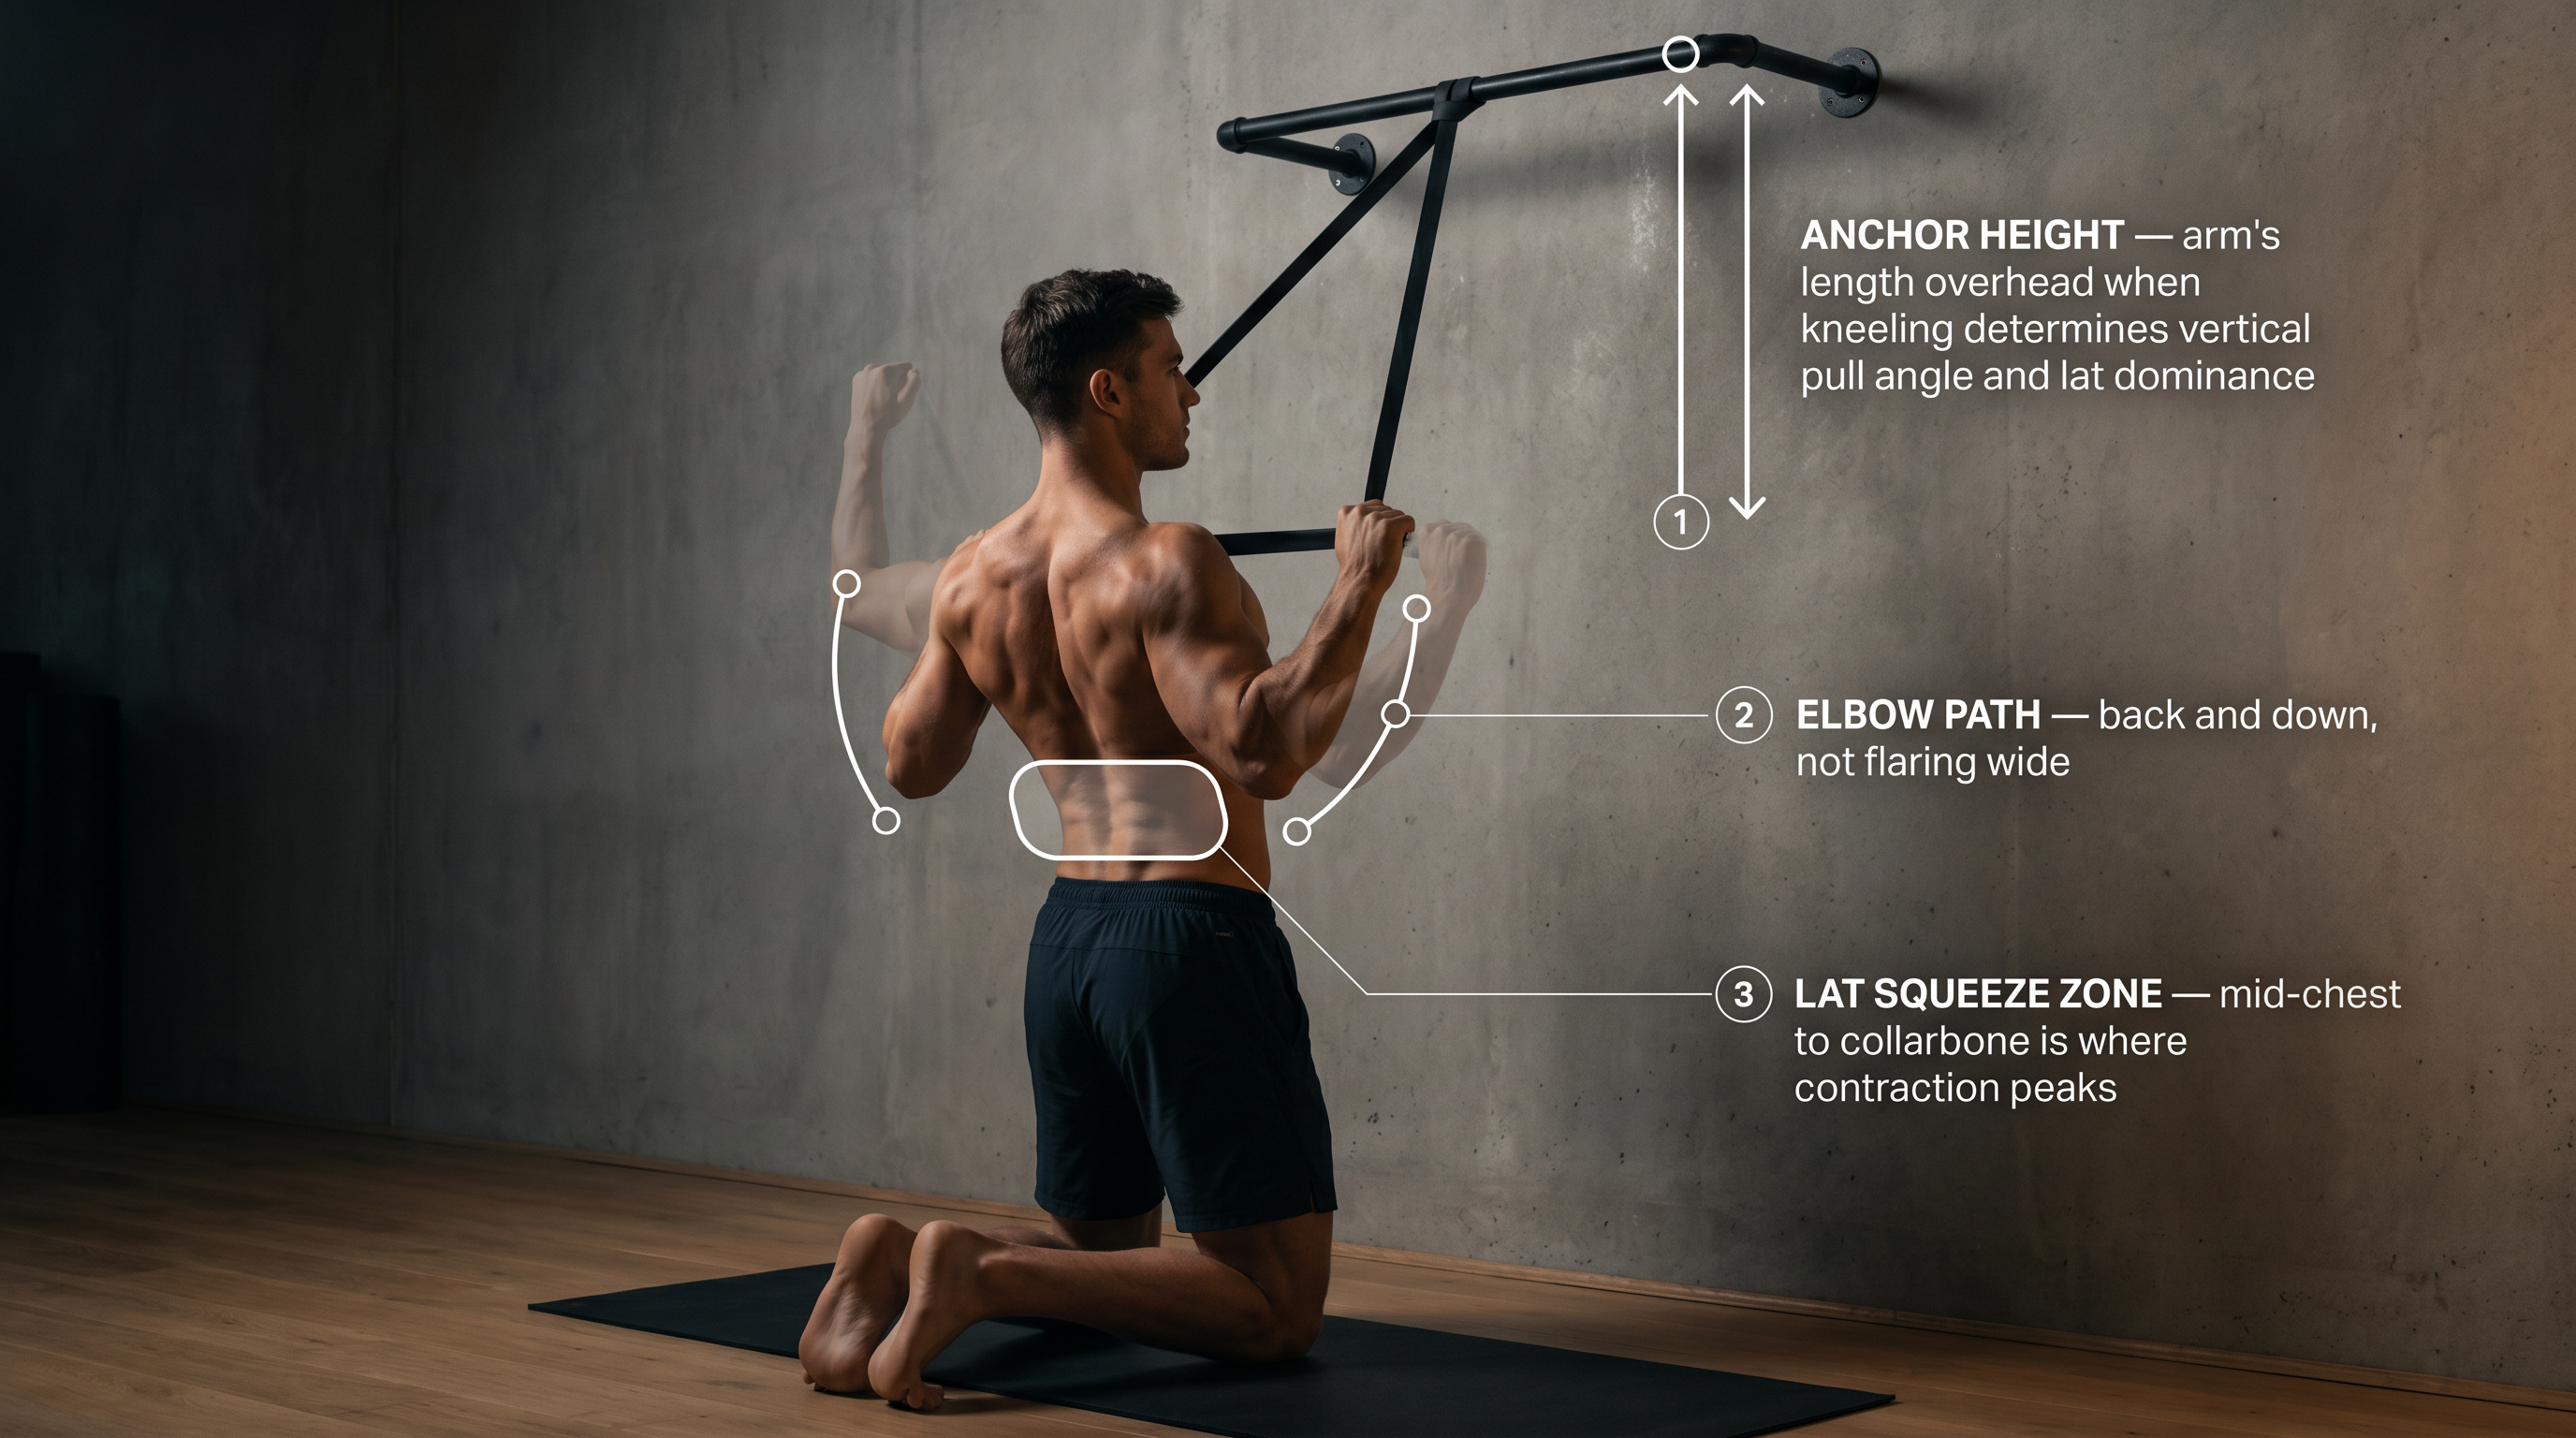
Why It Works: This isn't an approximation of the pulldown — it is the pulldown, executed with a band instead of a cable. Every element of the movement pattern is preserved: overhead start, vertical pull, elbow-back-and-down, shoulder depression, lat squeeze at the bottom.
Key Cue: Slow the last few inches down — from mid-chest to collarbone is where the lat squeeze lives. Don't shortcut it.
Pro Tips:
▸ Anchor height matters — the higher the anchor, the more vertical the pull and the more lat-dominant the movement. Aim for anchor height that puts you under load at roughly arm's length overhead when seated/kneeling.
▸ Double up bands or use a heavier band to progress load. Fold a lighter band in half through the anchor for quick resistance increase.
▸ For a unilateral version, try single-arm band pulldowns and compare sides — useful for identifying and correcting lat dominance imbalances.
3. TRX / Suspension Trainer Lat Pulldown
Equipment: TRX, gymnastic rings, or any suspension trainer with an overhead anchor
The suspension trainer offers something bands and dumbbells can't: a natural arc of resistance combined with full bodyweight loading. The straight-arm suspension pulldown in particular is as close as you can get to the lat isolation of a cable pulldown without the cable.
How to Do It (Straight-Arm Variation — Best for Lat Isolation):
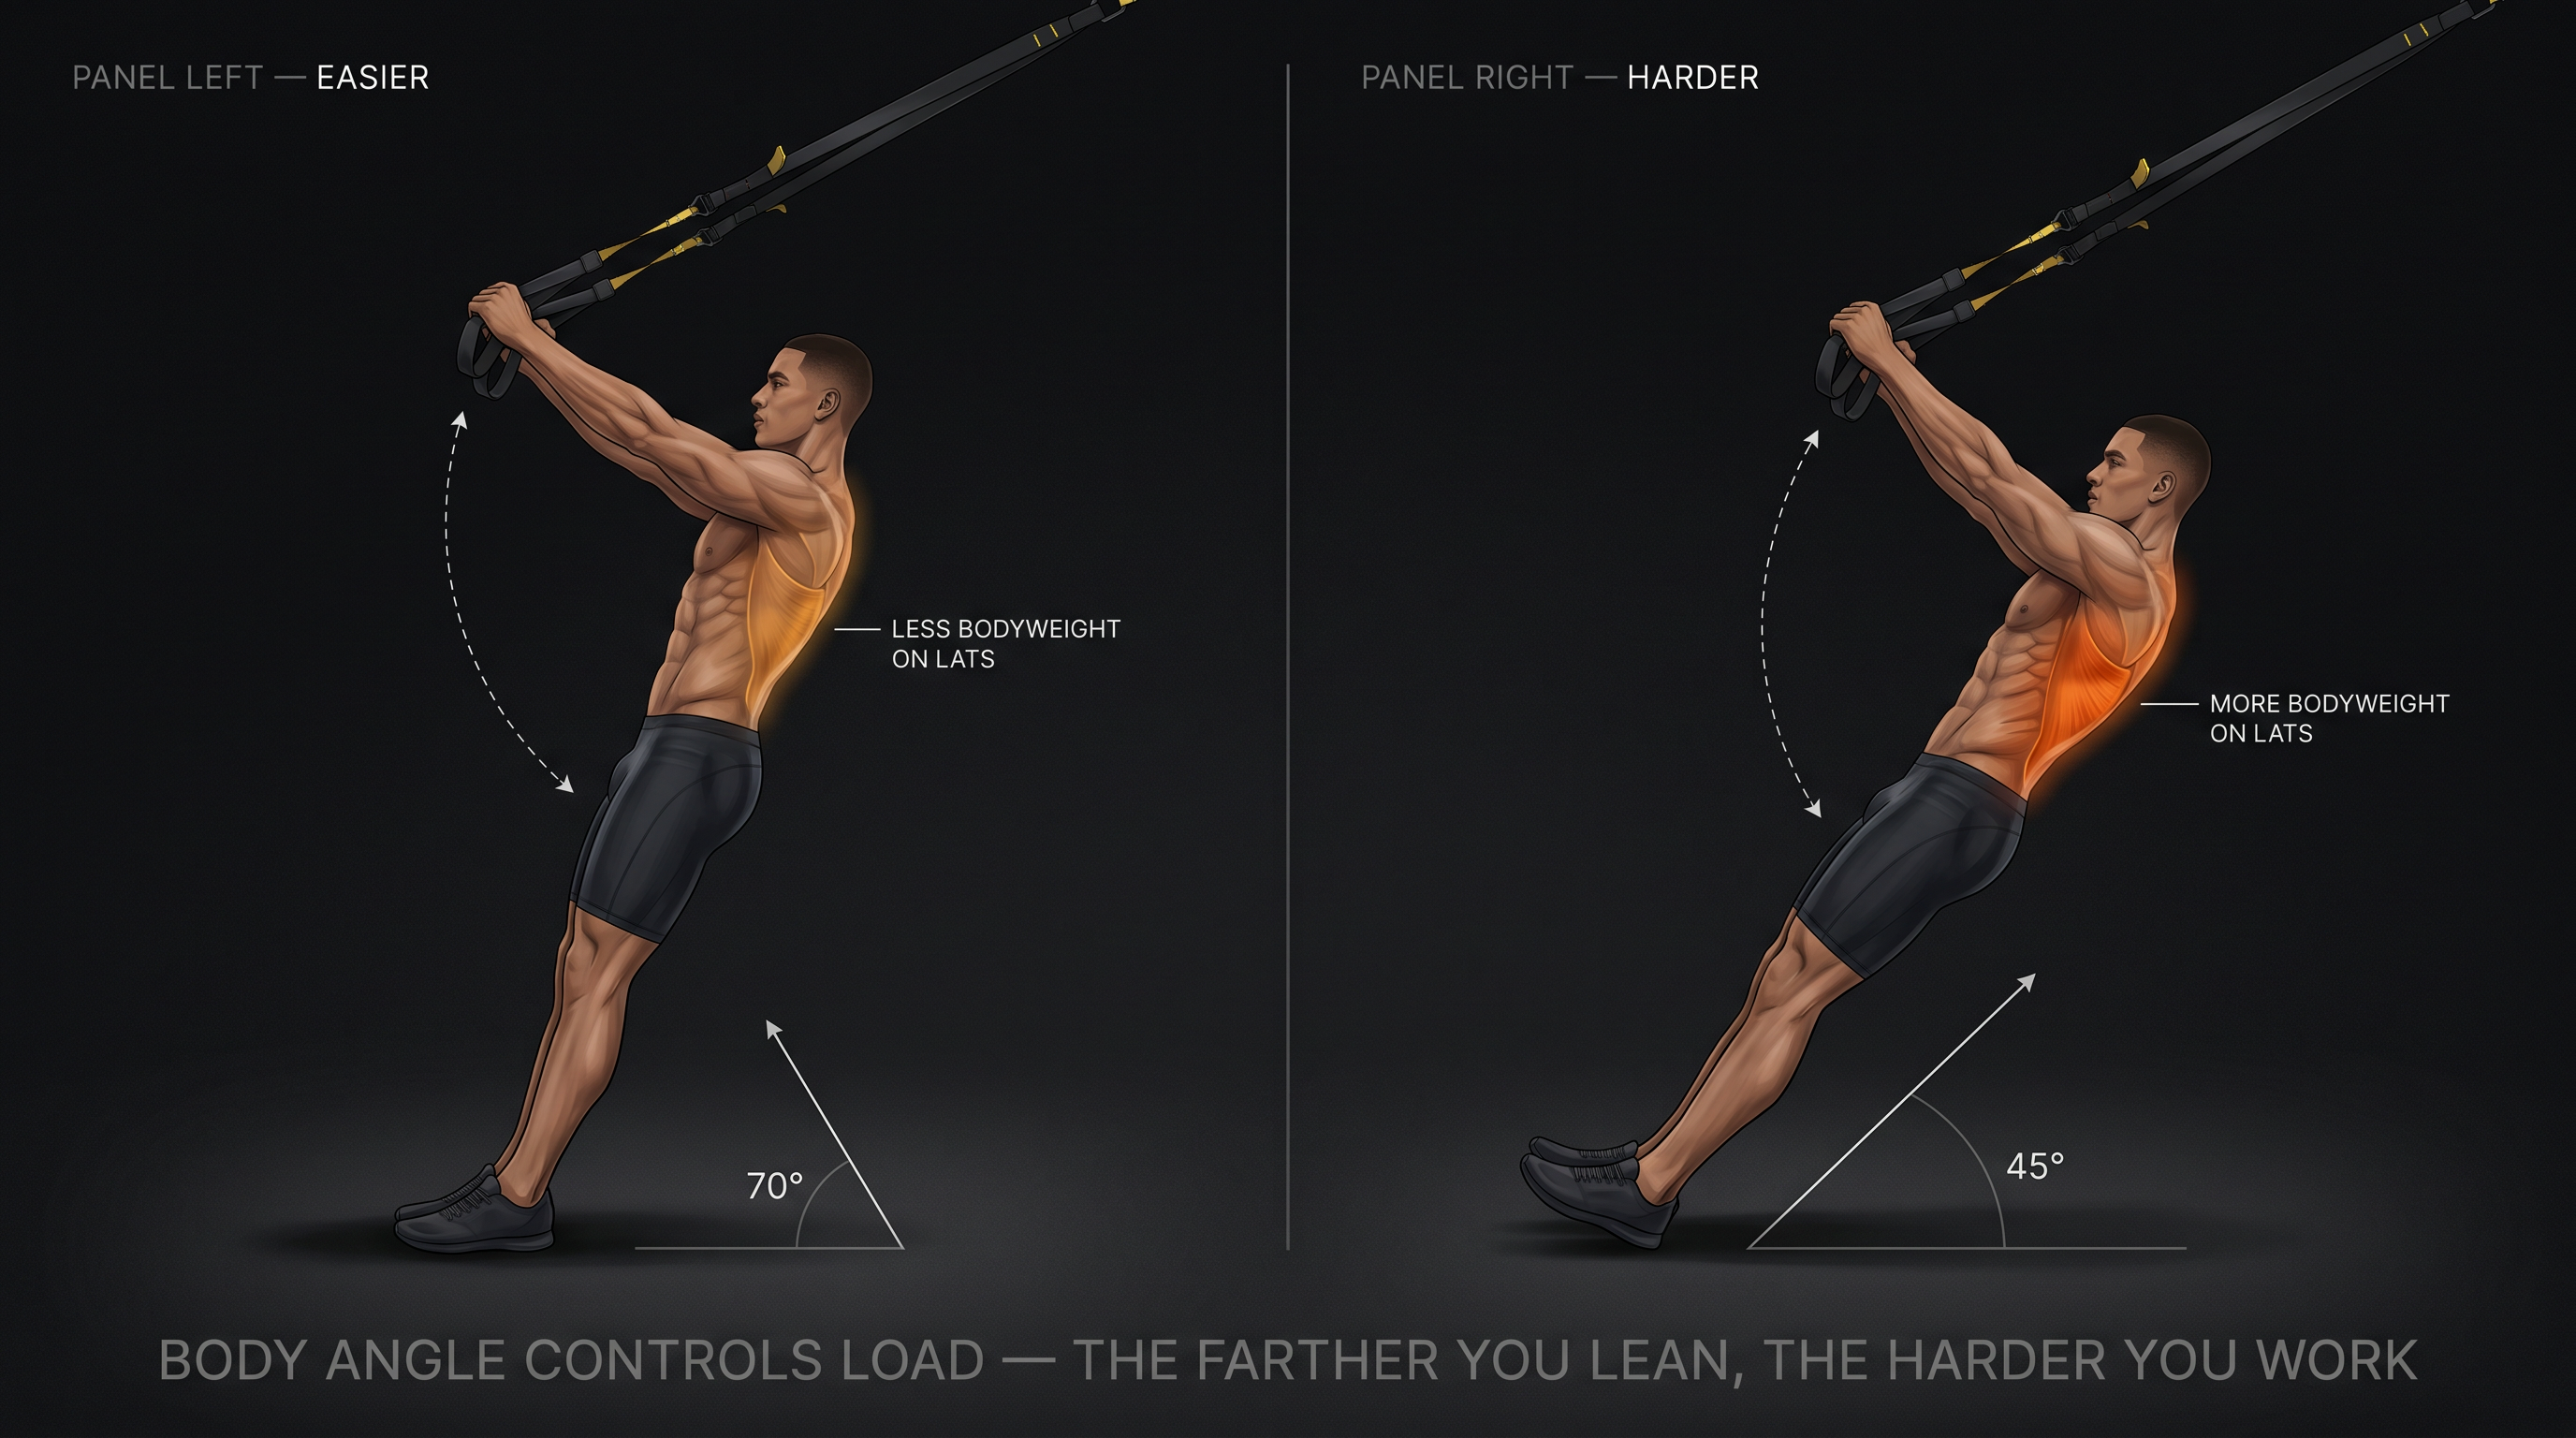
- Anchor the suspension trainer at roughly shoulder height or slightly above (the higher, the harder)
- Stand facing the anchor point, grip the handles with arms extended overhead, palms facing down
- Lean back so your body is at an angle — the farther back you lean, the more bodyweight you load onto the movement
- Keeping arms nearly straight (a soft elbow bend is fine), pull the handles down toward your hips
- Feel the lats contract as your arms reach your sides
- Slowly return to the start with arms overhead
For the bent-arm version (more like a traditional pulldown): Same setup, but bend elbows as you pull and bring the handles toward your chest or upper abs.
Muscles Worked: Lats (primary), serratus anterior, core (stabilization throughout), rear deltoids
Why It Works: The overhead-to-hip arm path directly replicates the pulldown pattern. The body angle acts as load adjustment — the more you recline, the more of your bodyweight the lats handle. The straight-arm version isolates the lats particularly well because the biceps (being straight) can't assist the movement, leaving the lats to do all the work.
Key Cue: Keep your hips elevated throughout — this keeps the movement vertical rather than letting it drift into a horizontal row.
Pro Tips:
▸ Walk your feet forward (toward the anchor) to make it harder — more bodyweight, steeper angle
▸ Suspension trainers are worth the investment for home gym users — they add a cable-machine-like feel to dozens of exercises
Ready to Get Stronger?
Join 2,000,000+ lifters tracking their workouts with Stronger. Available on iOS and Android.
4. Dumbbell Pullover for Lats
Equipment: One dumbbell + a bench, box, or sturdy elevated surface (can also be done on the floor)
The dumbbell pullover is one of the most underrated exercises in a home gym setup, and it specifically targets the lats through a long, stretched position that no row variation can match. Arnold Schwarzenegger famously used it to build his lat width — and the biomechanics explain exactly why.
How to Do It:
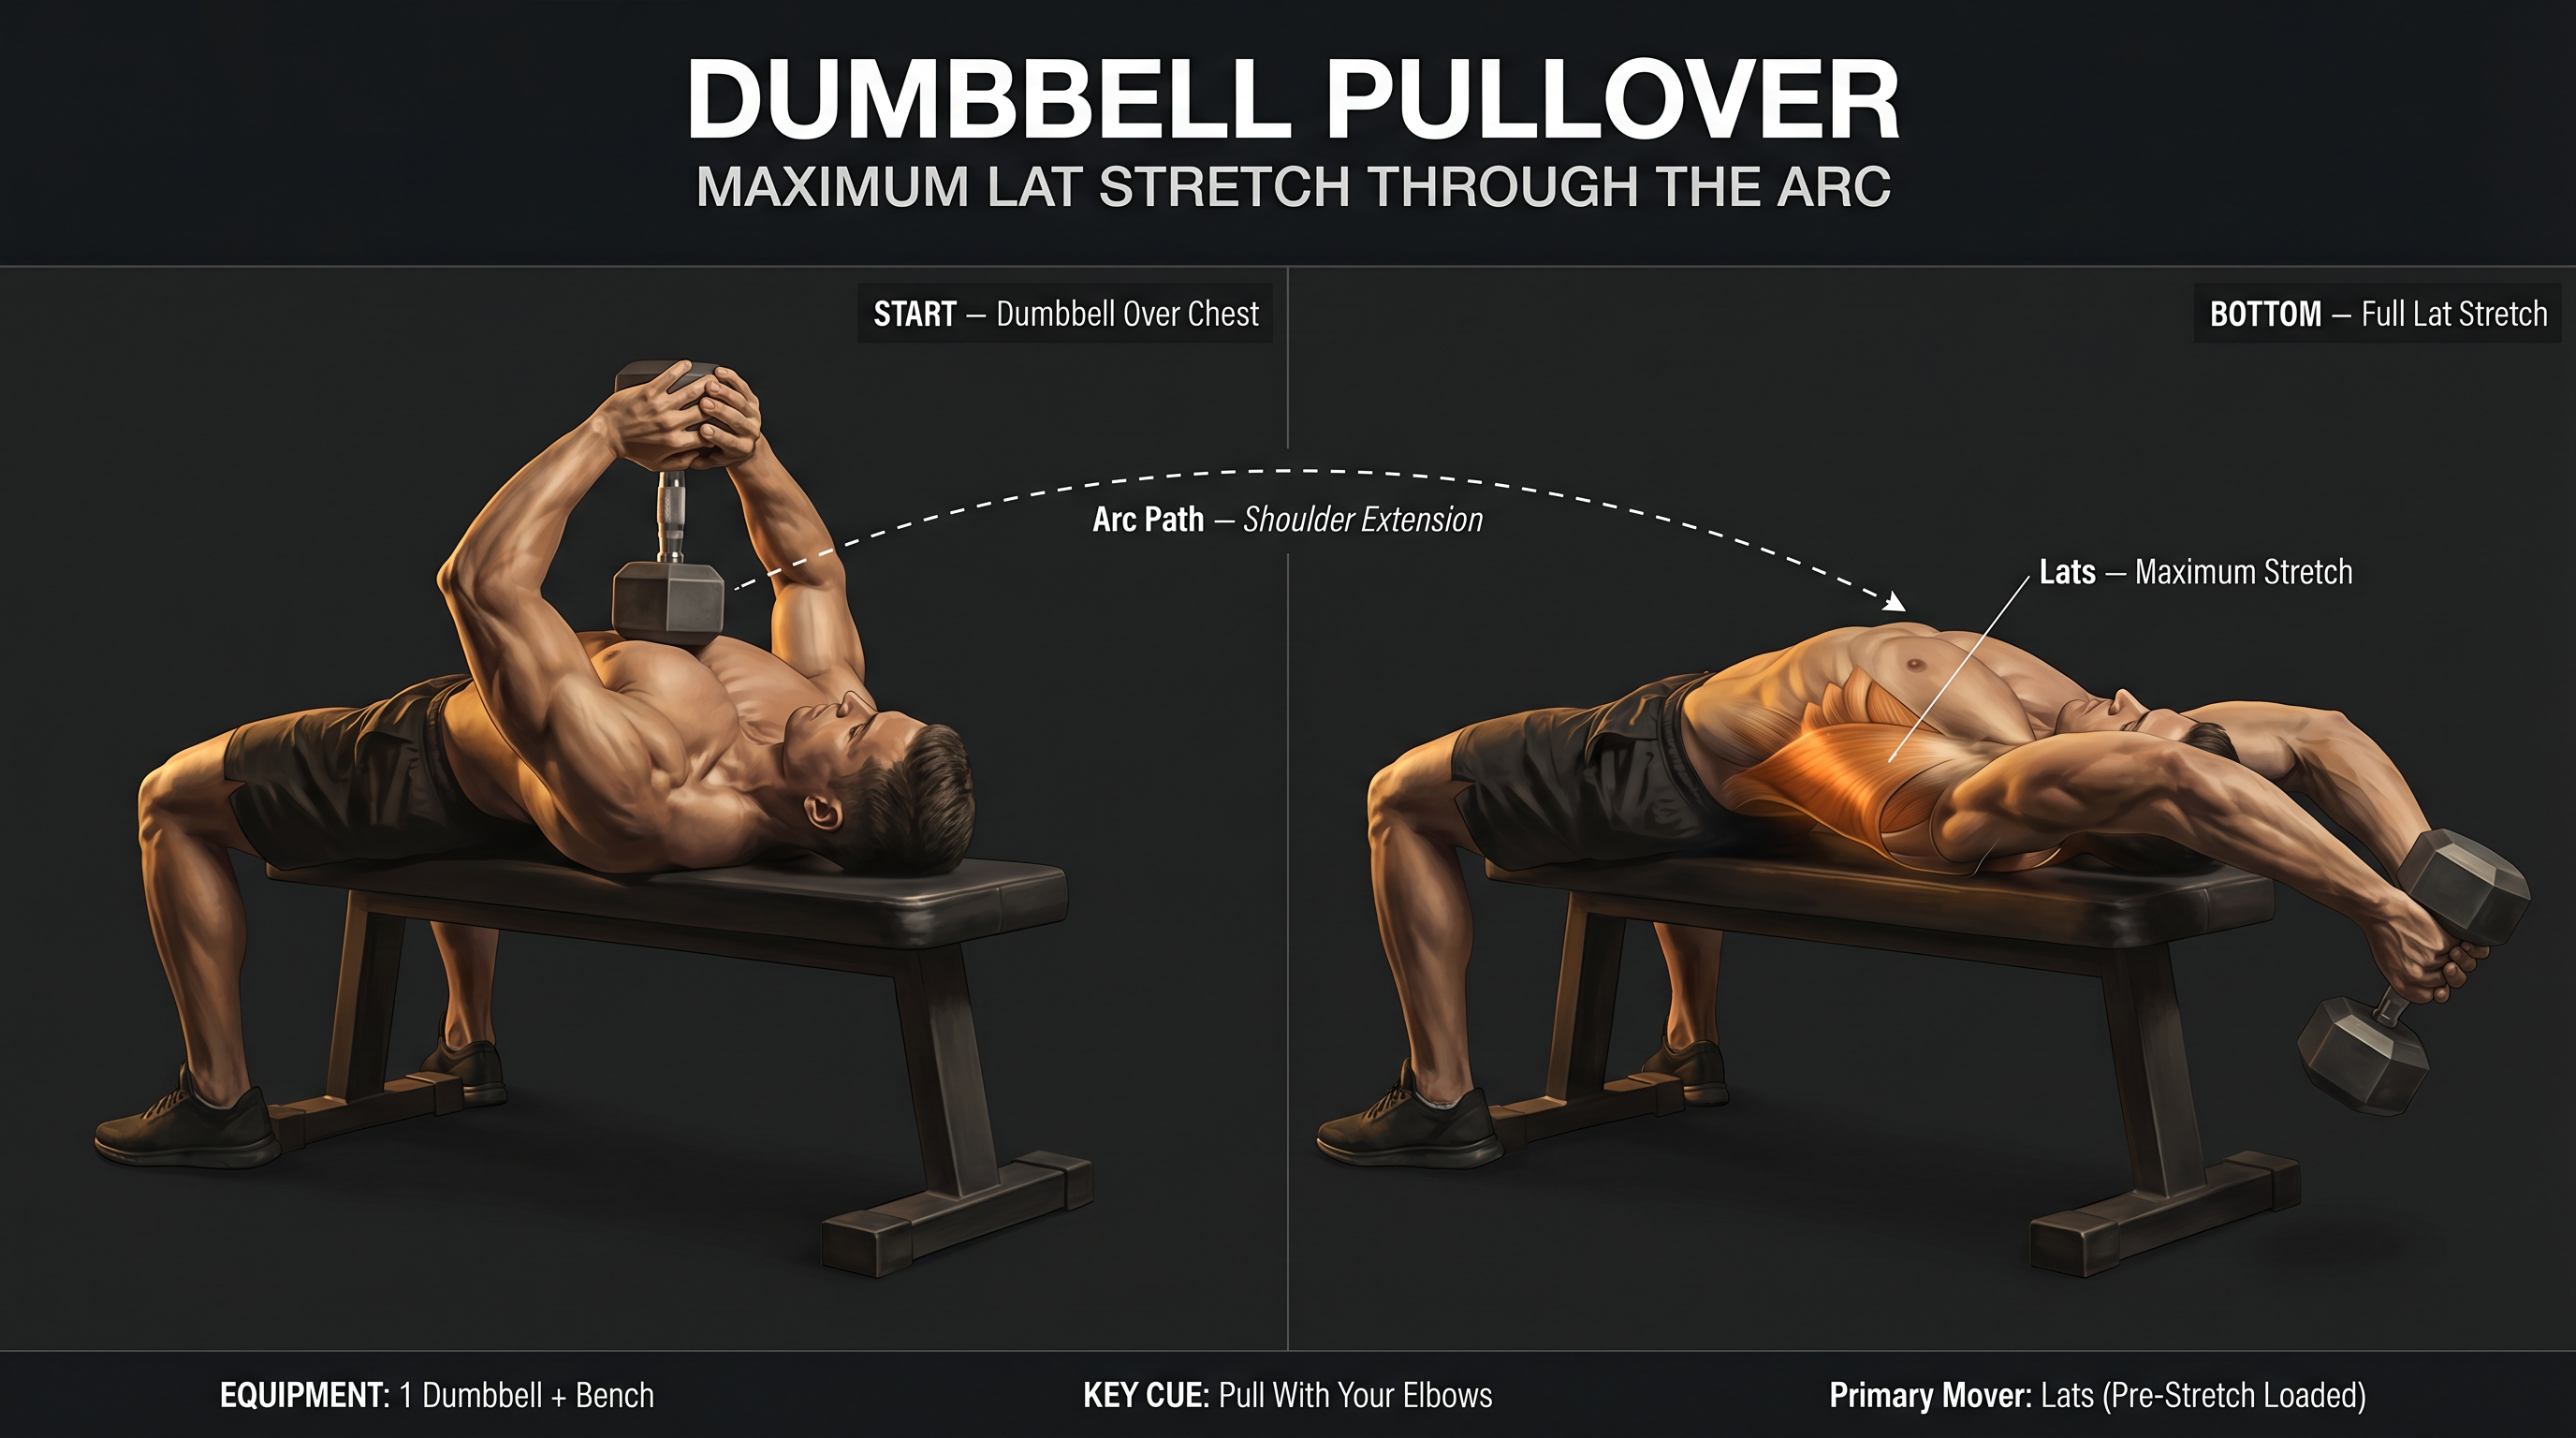
- Lie perpendicular to a bench with your upper back across the bench, hips lower and feet flat on the floor (or lie flat on the floor if no bench)
- Hold a single dumbbell with both hands, palms cupped under one end of the weight
- Press the dumbbell over your chest with a slight bend in the elbows
- Lower the dumbbell back and down toward the floor in an arc behind your head — feel the stretch through your lats and chest
- Pull the dumbbell back over your chest, driving through the lats (think "pull your elbows toward your hips")
- Stop at chest level — don't swing past it
Muscles Worked: Lats (primary, especially at the stretched position), chest (pectorals), serratus anterior, triceps long head
Why It Works: The arc of the pullover places the lats under a long stretch at the bottom — very similar to the top position of a lat pulldown where the lats are pre-stretched before initiating the pull. If you've ever focused on the stretch at the top of a pulldown and found that's where you feel it most, the pullover directly targets that same sensation.
Key Cue: Think "pull with your elbows" as you bring the weight back up, not "press with your hands" — this keeps the lats as the driver rather than the chest.
Pro Tips:
▸ Keep a slight bend in the elbows throughout to reduce joint stress
▸ Focus on the stretch — don't rush through the bottom portion of the movement
▸ For extra lat isolation, drive the elbow toward the hip on the return arc, not just "lift the weight up"
Track your dumbbell pullover sets, weights, and PRs directly in Stronger — add it to your custom routine and watch your loading progress over weeks.
5. Straight-Arm Band Pulldown
Equipment: Resistance band anchored at head height or slightly above
If you want pure lat isolation — no biceps, no rear delts stealing credit — the straight-arm band pulldown delivers it better than almost any exercise in this list. This is the cable equivalent of what serious bodybuilders use to "feel" their lats and build the mind-muscle connection before heavier back work.
How to Do It:
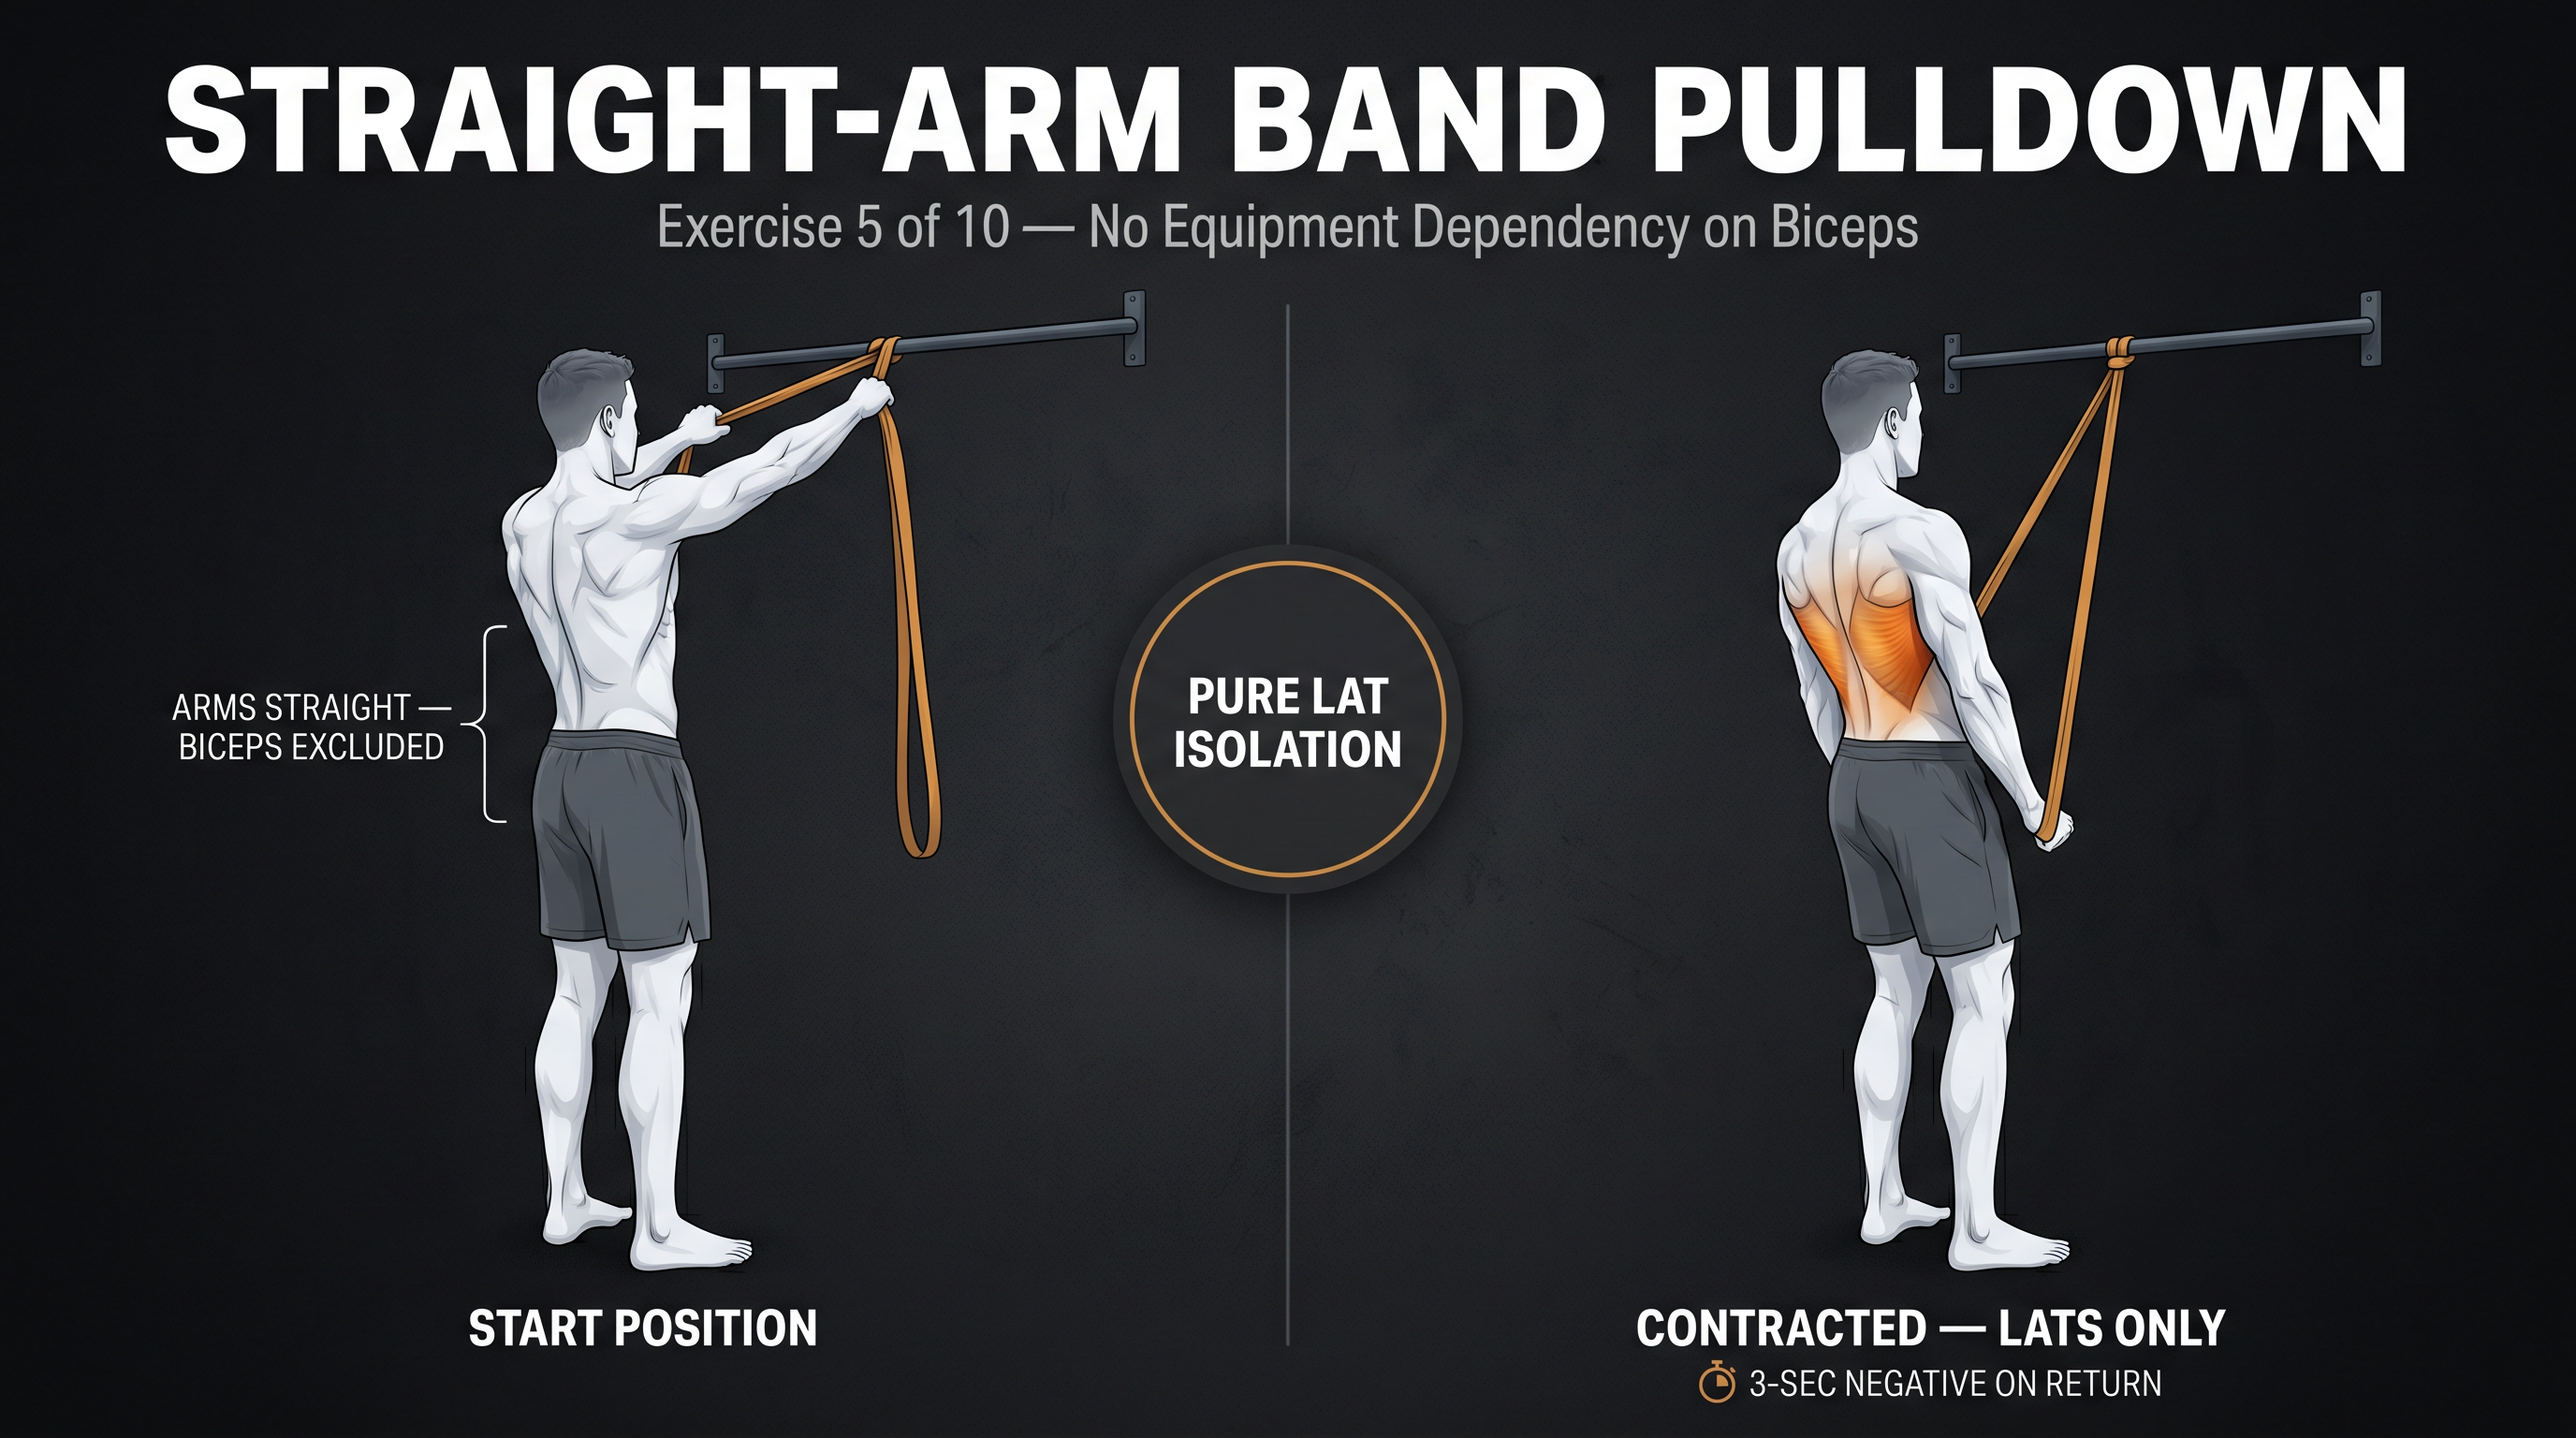
- Anchor a resistance band at approximately head height (a pull-up bar or door anchor works well)
- Stand facing the anchor, about 2-3 feet back, arms extended in front of you and slightly overhead gripping the band
- Keeping your arms nearly straight (just a soft bend to protect the elbow joint), pull the band down toward your thighs
- Hinge slightly at the hips as you pull — this increases the range of motion at the bottom
- Squeeze hard when the band reaches your thighs, holding for a beat before slowly returning
Muscles Worked: Lats (primary and almost exclusively), serratus anterior, triceps long head
Why It Works: Because the arms stay straight, the biceps are mechanically unable to assist the movement — the lats have to do everything. This is the lat pulldown pattern in its most distilled form: the lat is the engine that pulls the load through the arc from overhead to hip. No muscle confusion, no secondary movers compensating.
Key Cue: Tempo is everything here — try a 3-second negative on every rep. Fast reps on straight-arm work let the momentum do the job your lats should be doing.
Pro Tips:
▸ Hinge forward slightly at the hips at the bottom to extend your range of motion and get a full lat contraction
▸ Excellent as a warm-up before heavier back work (activates the lat and establishes mind-muscle connection) or as a burnout finisher after your main pulling sets
6. Incline Dumbbell Row (Lat-Biased)
Equipment: Dumbbells + incline bench (or any surface propped at 30-45 degrees)
Standard dumbbell rows are a mid-back staple, but with one simple adjustment — where you pull the elbow toward — you can shift significant emphasis onto the lats. This is one of the most accessible dumbbell back exercises once you understand the elbow-path principle.
How to Do It:
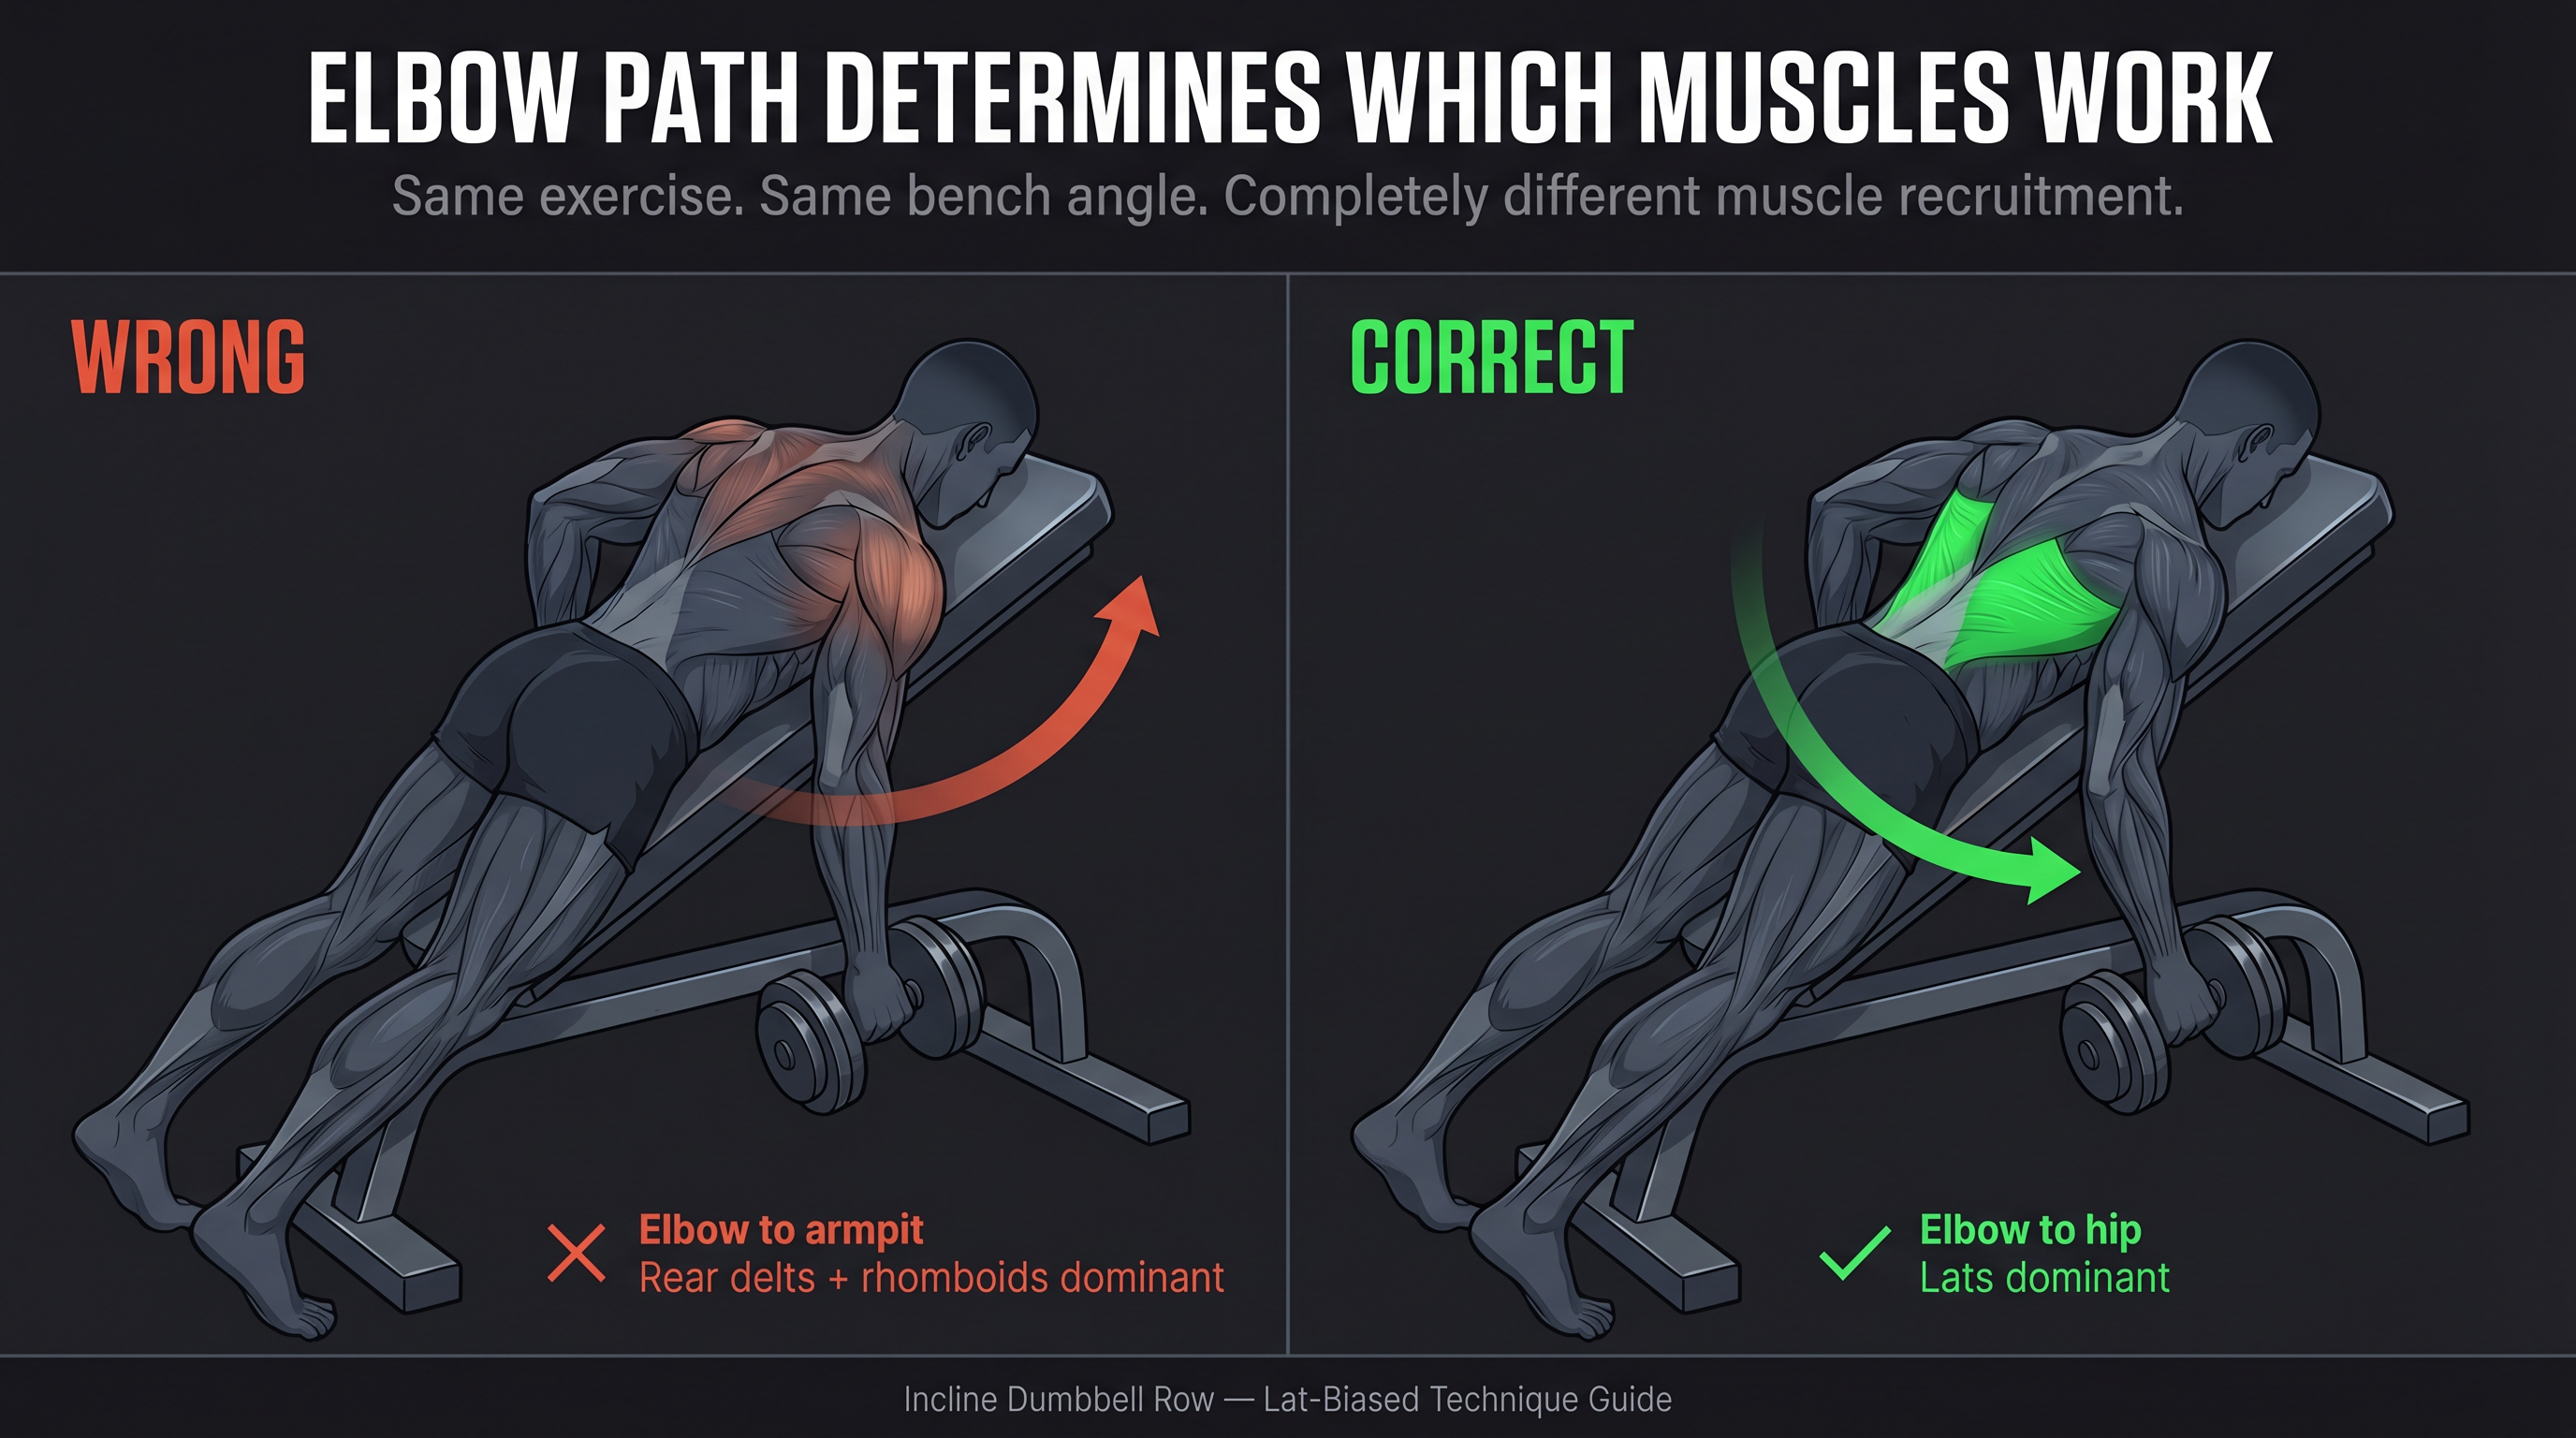
- Set an incline bench to about 30-45 degrees and lie face-down on it, chest against the pad
- Hold a dumbbell in each hand hanging straight down
- Instead of pulling your elbows up toward your armpits (which biases the rear delts and rhomboids), pull your elbows back toward your hips
- Squeeze at the top when your elbows are even with your torso or slightly behind it
- Lower with control to full extension
Muscles Worked: Lats (primary when elbows track toward hips), rhomboids, rear deltoids, biceps
Why It Works: The lat's primary function is shoulder extension — pulling the upper arm from out in front of the body, down and back toward the hip. When you row to your hip rather than your armpit, you're asking the lat to perform exactly that movement. The incline dumbbell row angle reduces lower-back involvement and lets you focus entirely on the pull.
Key Cue: "Elbow to hip" — this single cue separates a lat-dominant row from a general back row. If your elbow is flaring wide toward your armpit, you've lost the lat bias.
Pro Tips:
▸ Let the shoulder blades move naturally — don't lock them in place; allow some protraction at the bottom for a full lat stretch
▸ Slow the negative — the eccentric (lowering) phase builds as much lat tissue as the concentric
▸ For a variation that eliminates any lower-back load, the chest-supported dumbbell row delivers the same lat-biased pull without any lower-back involvement
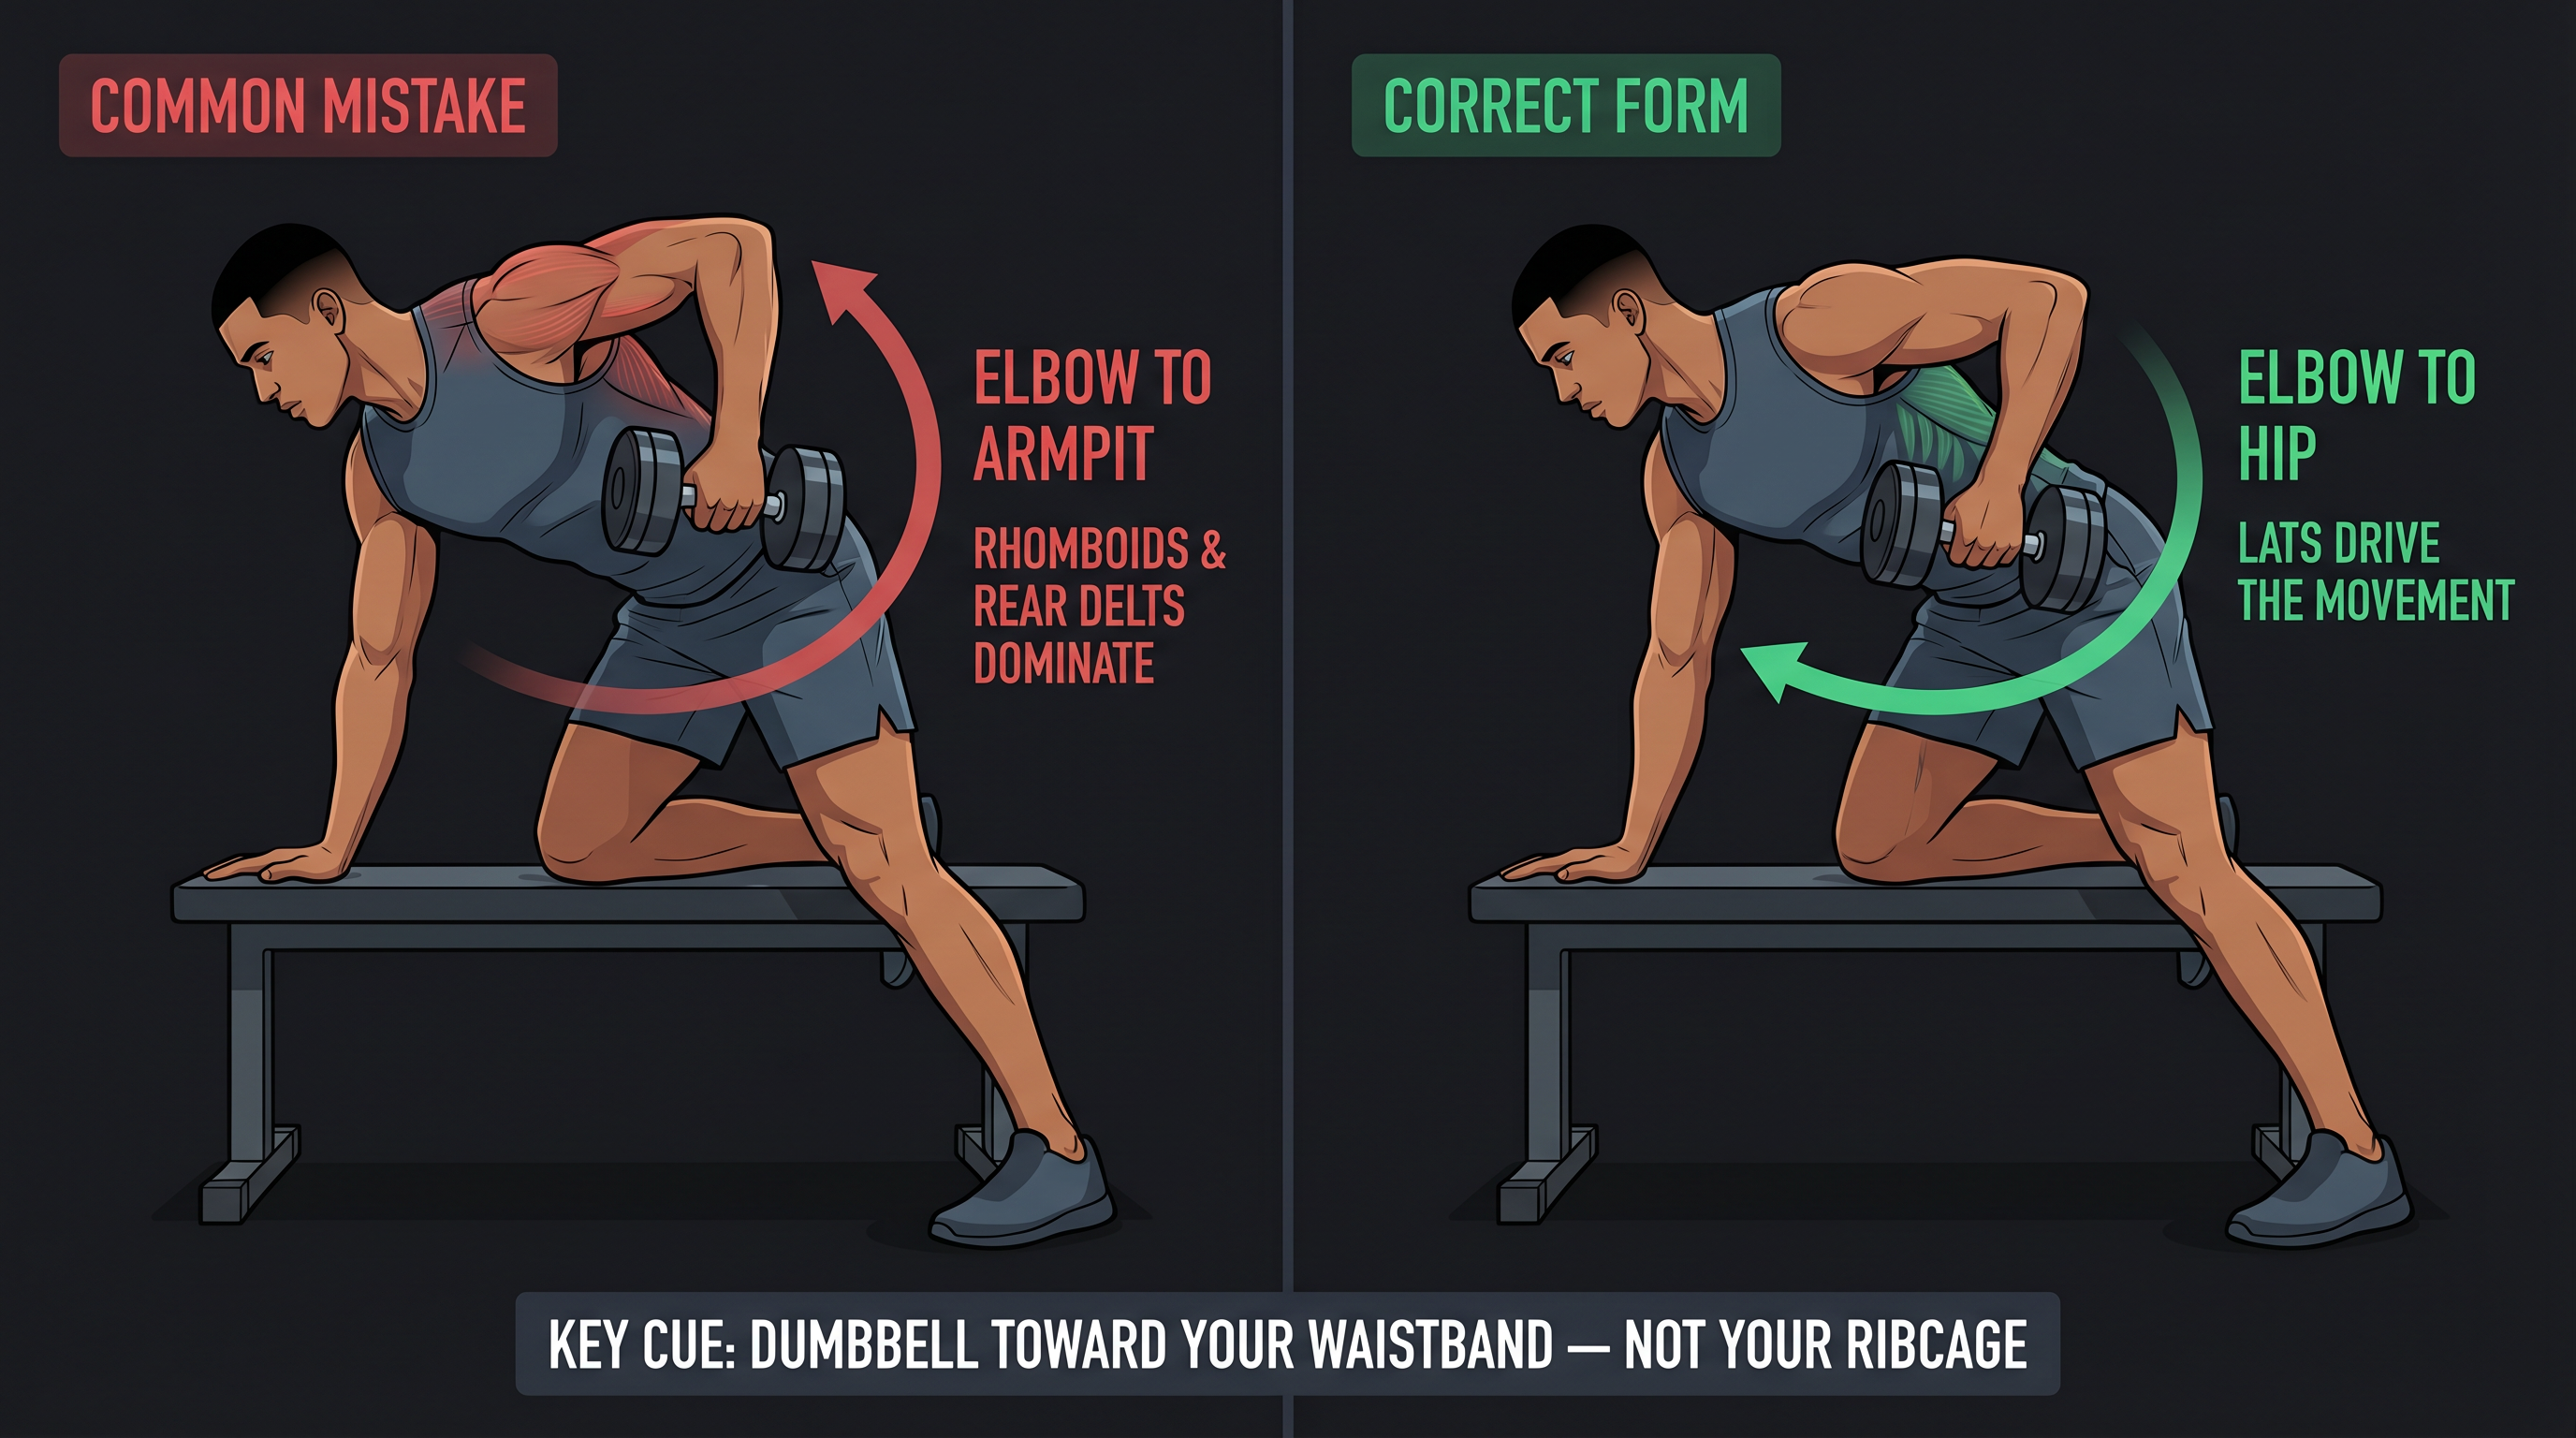
7. Single-Arm Dumbbell Row (Hip-Pull for Lats)
Equipment: One dumbbell + a bench or sturdy surface for support
The single-arm dumbbell row is a gym classic — but most people are doing it in a way that trains the rhomboids and rear delts more than the lats. A simple change to the pull direction transforms this into a lat-dominant exercise.
How to Do It:
- Plant one hand and one knee on a bench, opposite leg on the floor
- Hold a dumbbell in your working hand, arm hanging straight down
- Instead of rowing the dumbbell up toward your armpit (the default), pull your elbow toward your hip — the dumbbell should travel toward your waistband, not your ribcage
- At the top, your elbow should be just slightly behind your hip, with full shoulder extension
- Lower slowly to full extension, letting your shoulder blade roll forward for a full lat stretch at the bottom
Muscles Worked: Lats (primary with hip-pull), biceps, rear deltoids, rhomboids (secondary)
Why It Works: The lat's job during a pulldown is to extend the shoulder (pull the arm from overhead, down toward the hip) and adduct it (pull it in toward the body). The hip-pull row positions the dumbbell exactly in that motion path. Most people row to their armpit because it feels more natural — but that path runs the elbow wide of the body, putting the rear delts and rhomboids in charge.
Key Cue: The dumbbell should travel toward your waistband, not your ribcage. If it's ending up near your armpit, your lat is barely working.
Pro Tips:
▸ Chest position matters — if your chest is too parallel to the floor, the pull becomes more horizontal than needed. Stay slightly more upright to maintain a downward pull angle.
▸ Full range of motion: from a full lat stretch at the bottom (shoulder rolls forward, scapula protracts) to full contraction at the top (elbow behind hip line). For detailed technique guidance on this foundational dumbbell row pattern, see our exercise library entry.
▸ The unilateral nature makes this excellent for identifying side-to-side imbalances
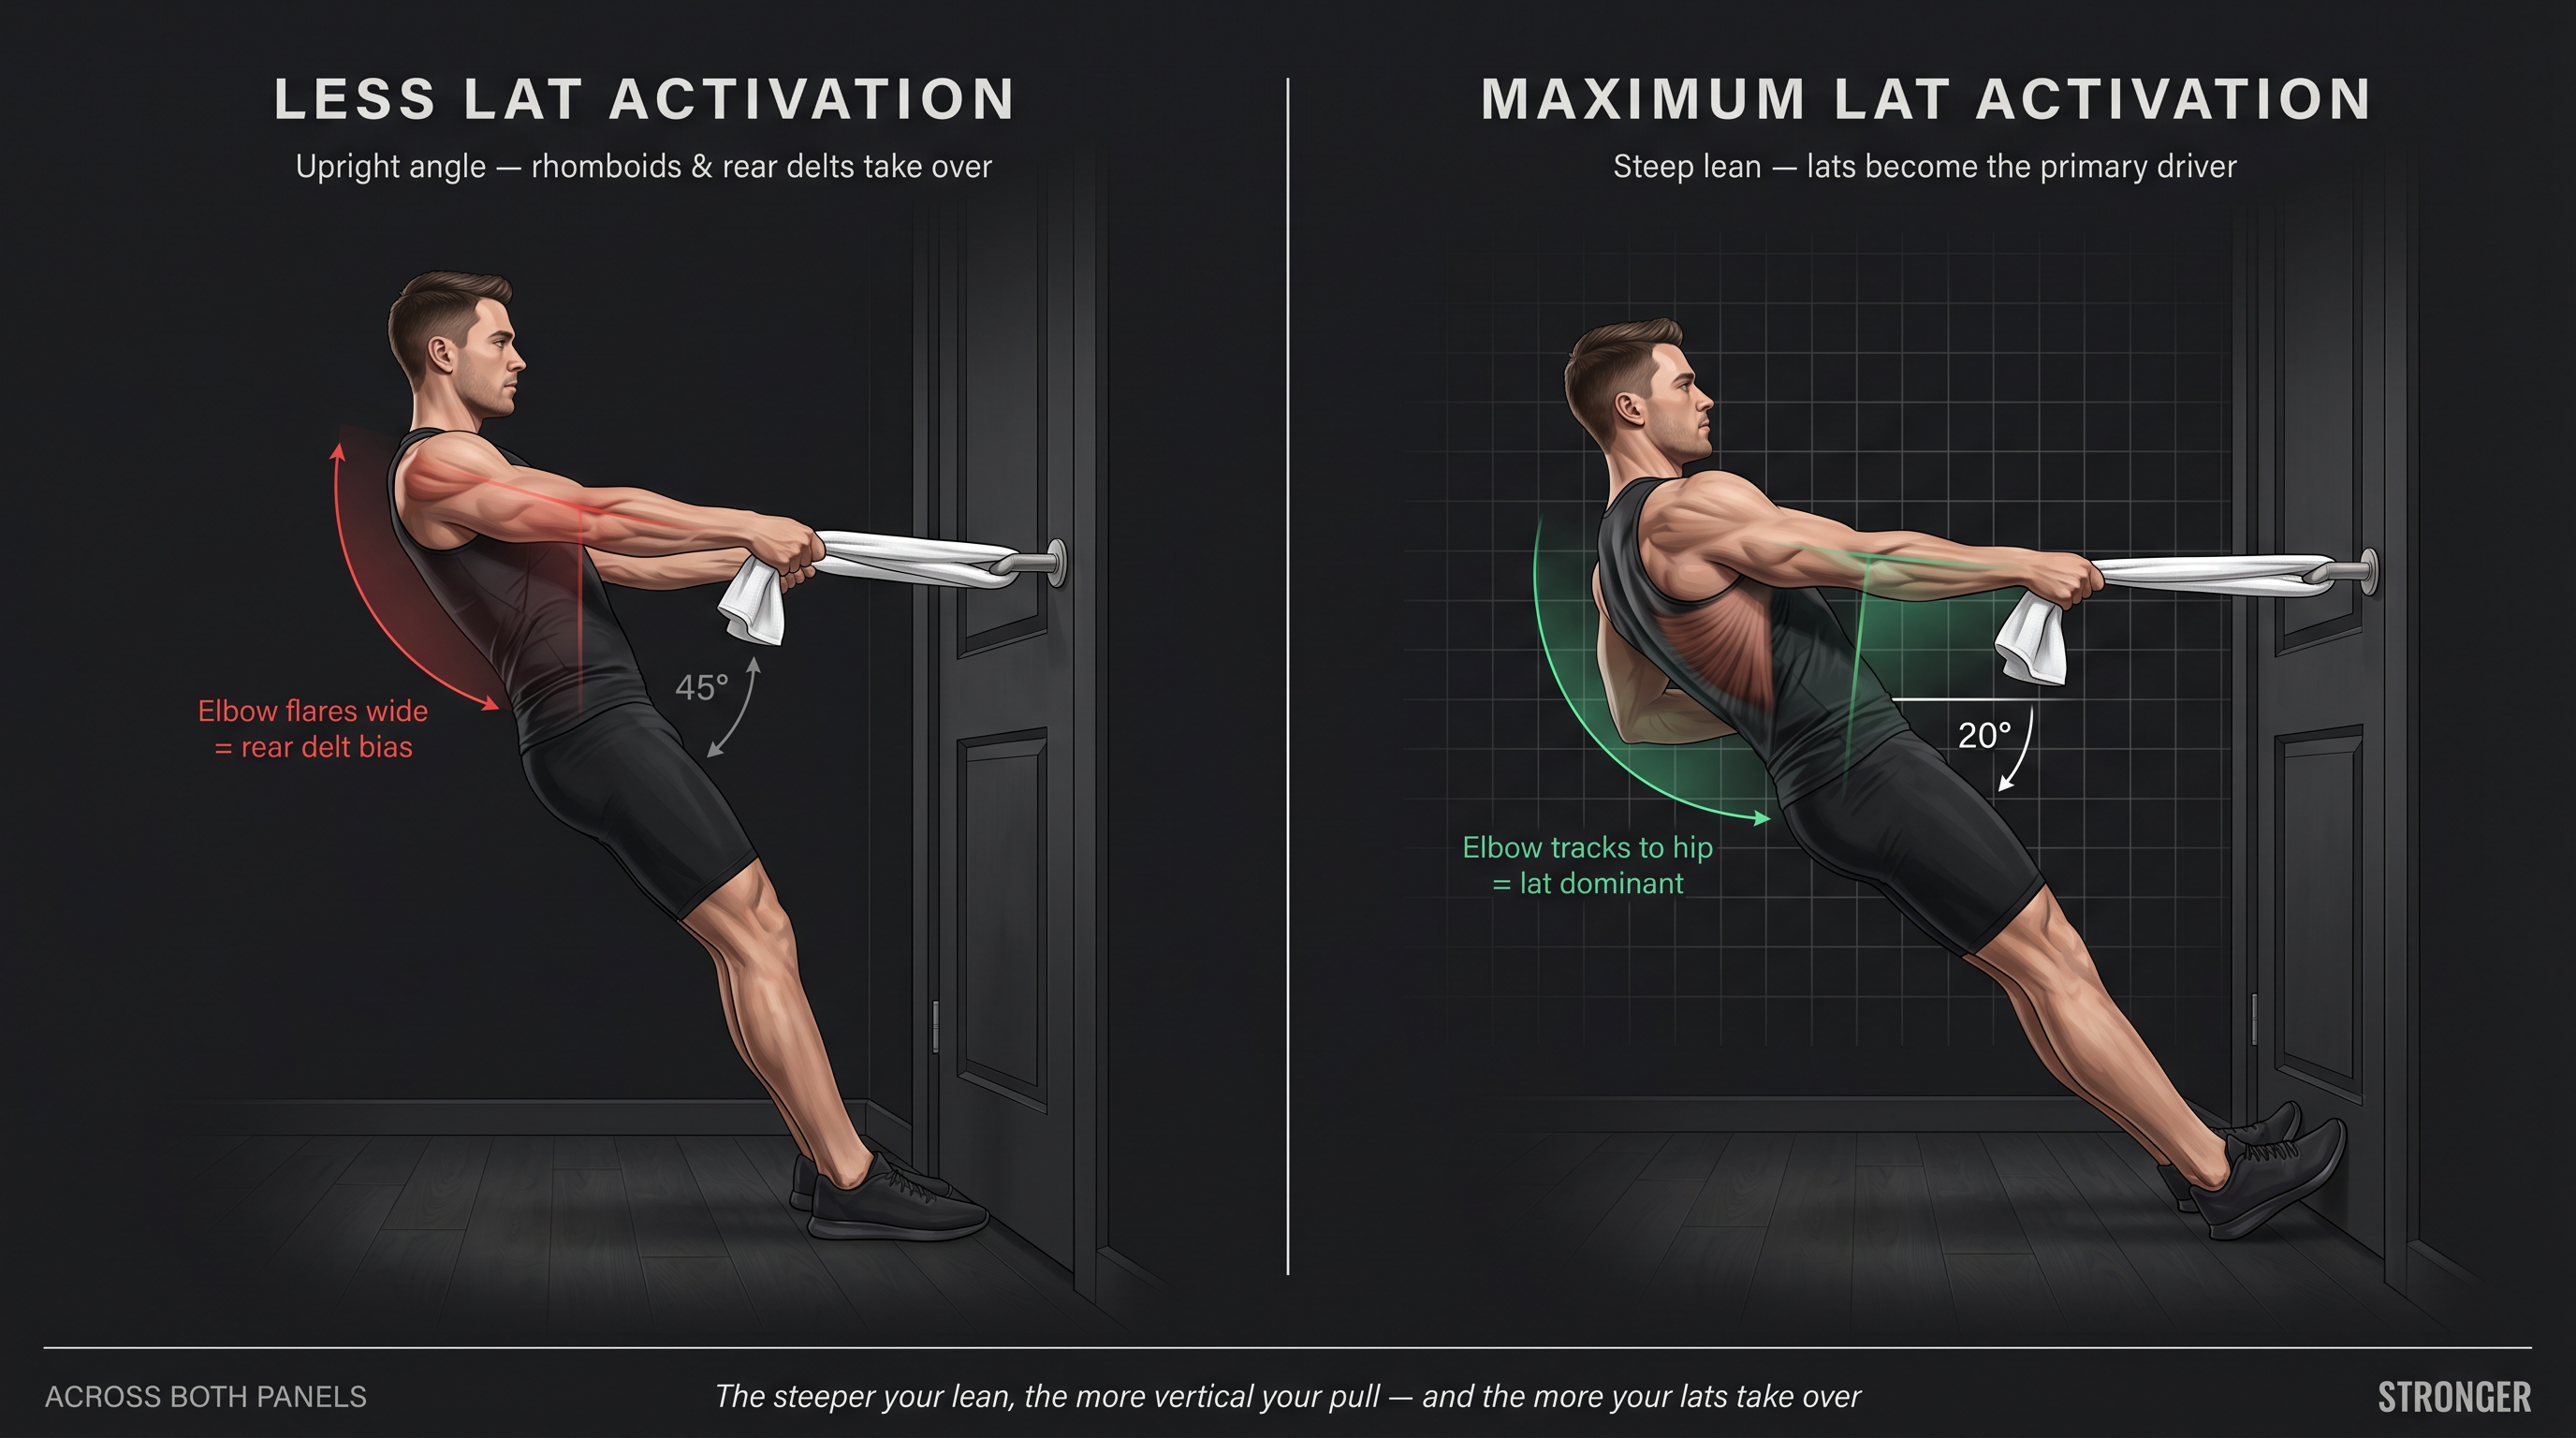
8. Door Row With a Towel (No Equipment Needed)
Equipment: A sturdy door + a towel or bedsheet
No pull-up bar, no bands, no dumbbells? This option requires nothing more than a door and a towel — and done correctly, it becomes one of the most lat-effective bodyweight exercises you can do at home.
How to Do It:
- Open a door halfway and tie (or loop) a towel through both sides of the door handle, or around the edge of the door at handle height. Make sure the door won't move.
- Face the edge of the door, feet planted on either side of the door base
- Grip the towel ends, lean back until arms are extended, and lower yourself to near-horizontal
- Pull your chest to the door, keeping your body as a rigid plank
- Lower yourself with control back to the starting position
Muscles Worked: Lats, biceps, rhomboids, rear deltoids (ratio depends on your body angle)
Why It Works: Body angle determines everything here. The more you lean backward (the more your torso approaches horizontal), the more vertical your pull becomes — and the more your lats take over from your rhomboids. At a steep lean with your chest nearly parallel to the floor, you're executing something close to an inverted row.
Key Cue: Lean farther back to load the lats more — and pull toward your chin/upper chest rather than your lower chest. These two adjustments together dramatically increase lat involvement.
Pro Tips:
▸ Progression: start with a more upright angle (easier), gradually walk your feet farther toward the door for a steeper lean (harder)
▸ If the door feels unstable, use a heavy piece of furniture as the anchor point instead
If you have access to a barbell, the next exercise lets you load this movement pattern heavily.
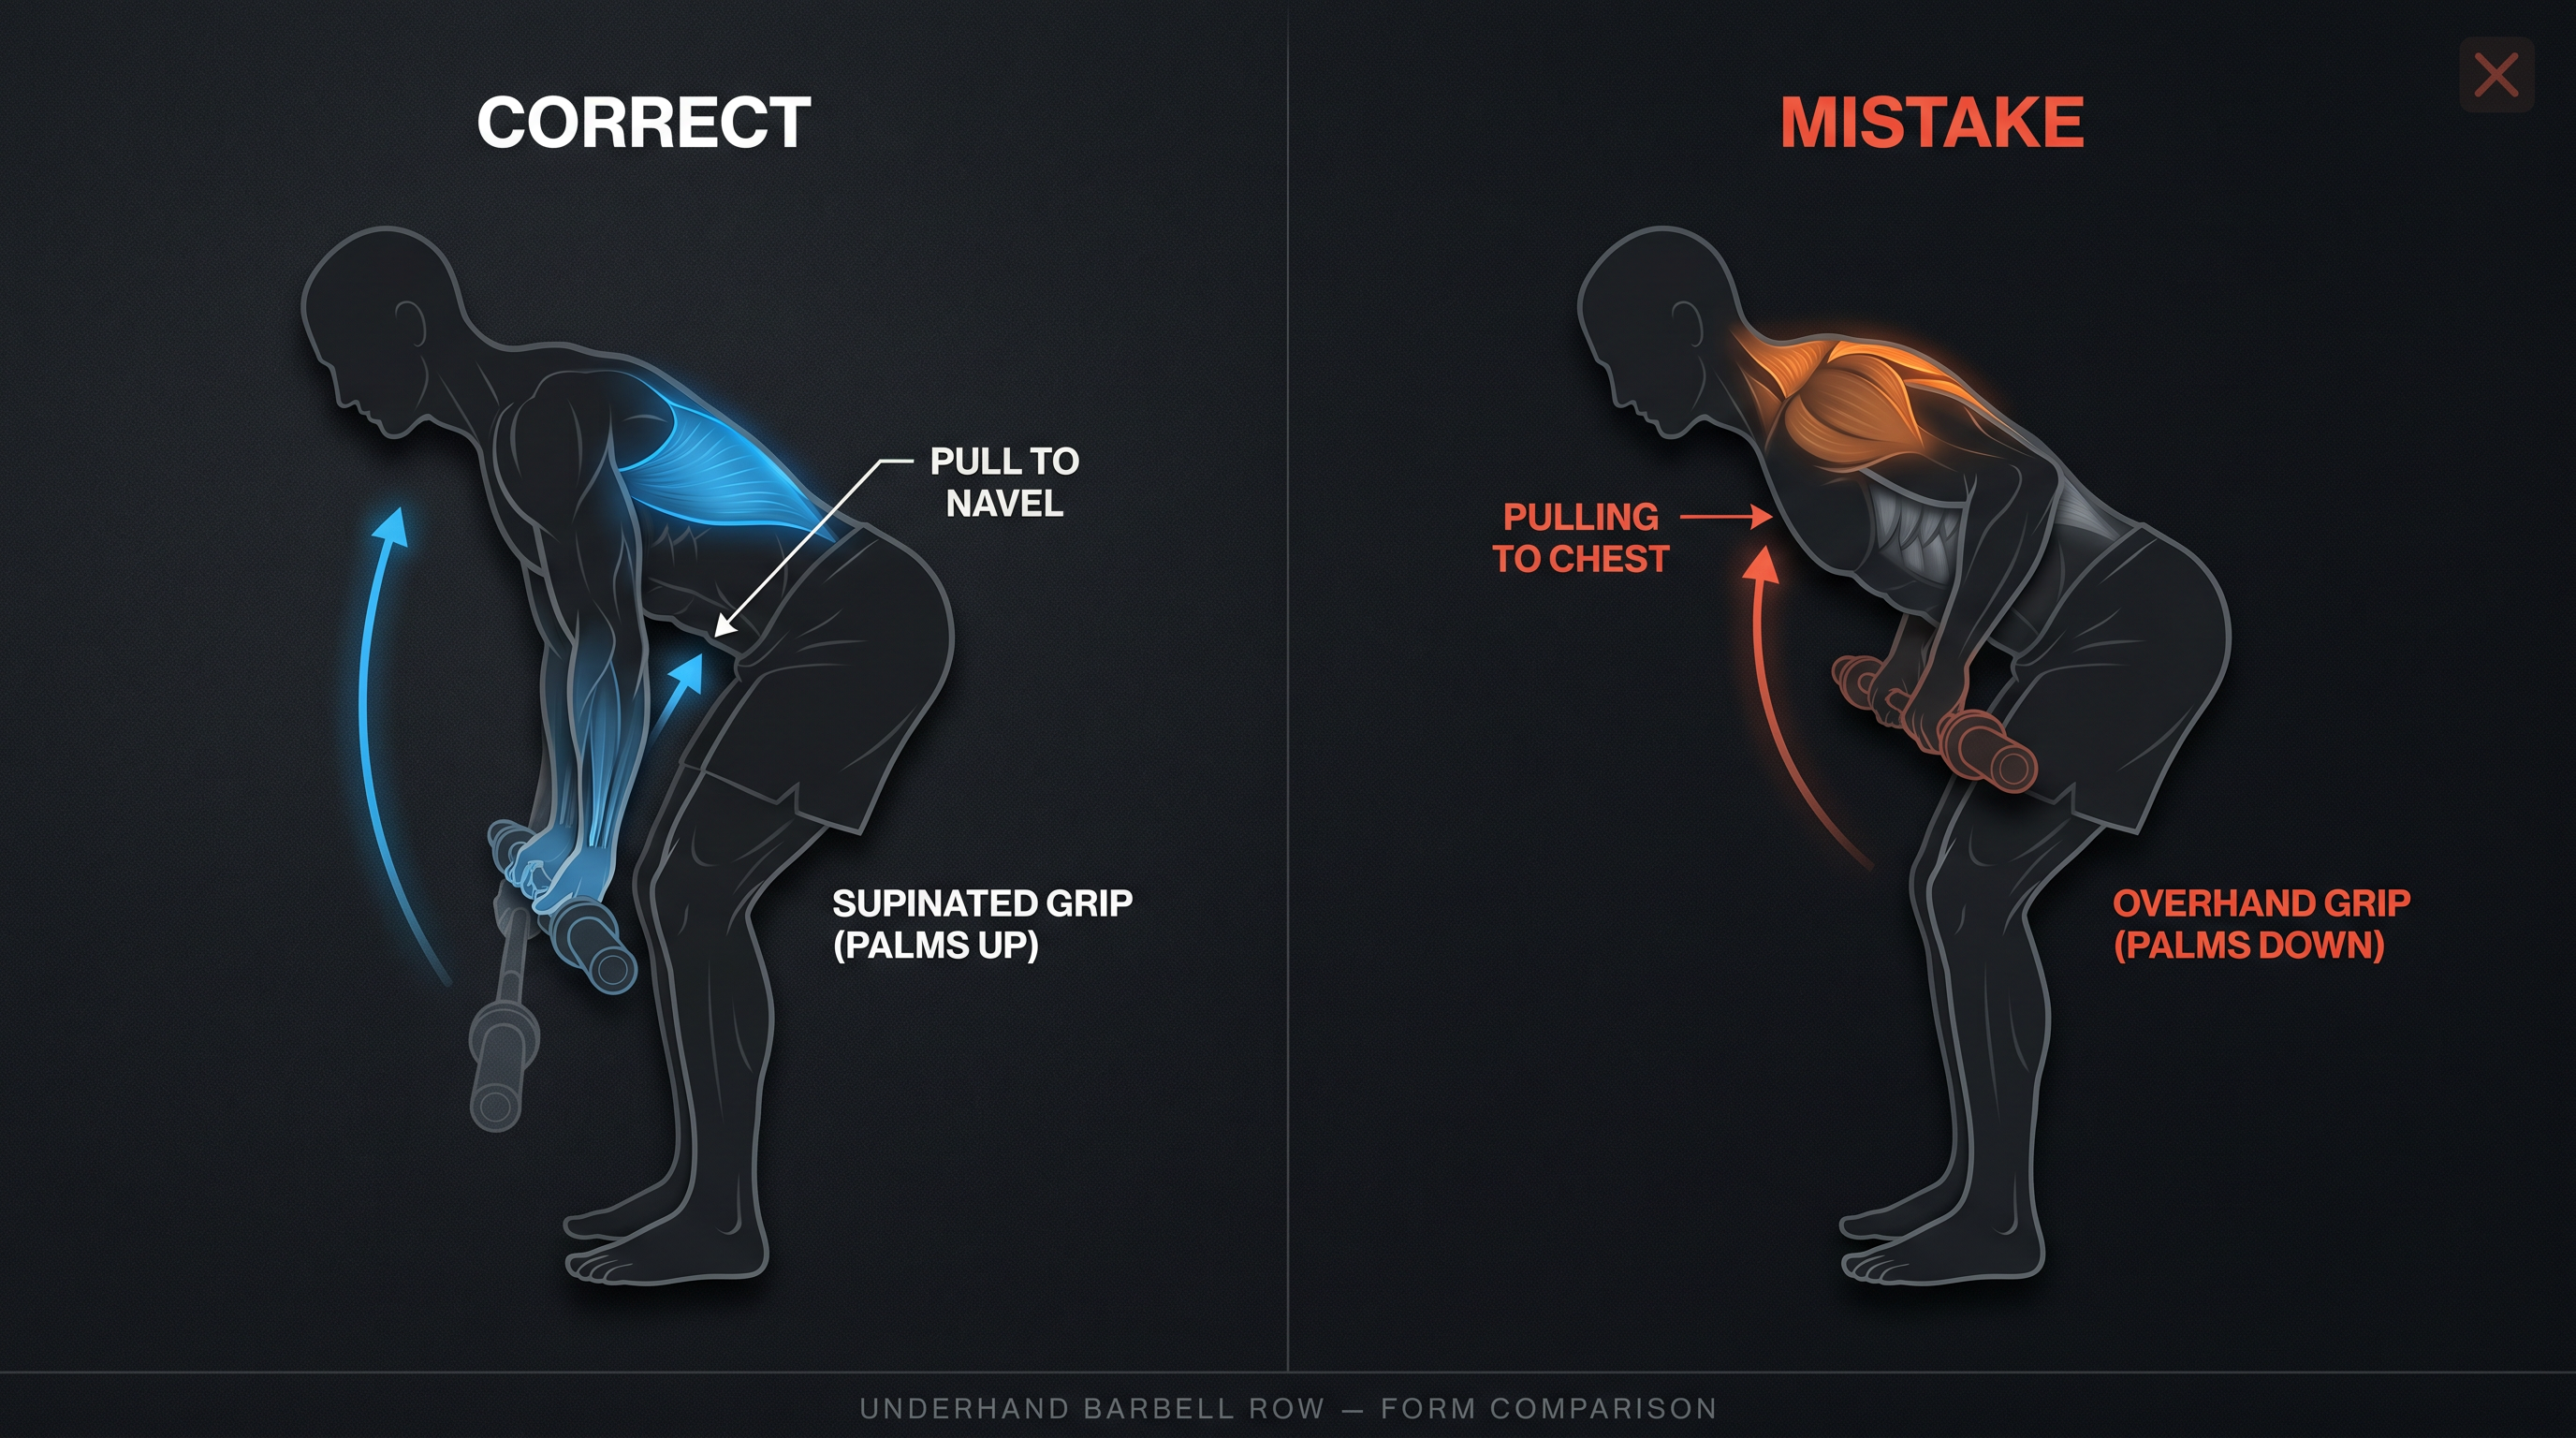
9. Underhand Barbell Row
Equipment: Barbell + weight plates
For home gym athletes with a barbell, the underhand (supinated grip) row is a powerhouse lat builder — and one of the few exercises in this list where you can consistently add significant load over time.
How to Do It:
- Load a barbell and stand over it in a hip-width stance
- Grip the bar with a supinated (underhand, palms-up) grip, hands just inside shoulder width
- Hinge at the hips to bring your torso roughly parallel to the floor (a slight angle above parallel is fine for most)
- Let the bar hang with arms extended
- Pull the bar toward your navel (lower abs) — not your chest, not your upper abs
- Hold at the top briefly, squeezing the lats
- Lower with control to full extension
Muscles Worked: Lats (primary with supinated grip), biceps, spinal erectors, rhomboids
Why It Works: The supinated grip externally rotates the shoulders, which mechanically positions the lats more favorably as the prime mover — the same reason a chin-up (underhand) activates lats more strongly than an overhand pull-up at the same load. The pull-to-navel path keeps the elbow traveling toward the hip rather than flaring wide, maintaining lat-extension motion rather than shifting into rear delt and rhomboid territory.
Key Cue: Pull the bar to your navel, not your chest. The moment the bar drifts upward toward your ribcage, you've shifted the work away from the lats.
Pro Tips:
▸ Brace everything — the bent-over position requires a rigid core and lower back. If lower back fatigue is an issue, reduce the load before reducing the range of motion.
▸ The bar should travel a nearly vertical path from floor to navel
▸ This is one of the best strength-building alternatives on this list because it can be progressively loaded indefinitely — which is exactly why tracking your rows matters. For full form guidance, grip options, and progression schemes, see our barbell row guide
Load tracking on your underhand rows? Stronger tracks your progression across every rep scheme, so you always know your PR and what weight to hit next.
Ready to Get Stronger?
Join 2,000,000+ lifters tracking their workouts with Stronger. Available on iOS and Android.
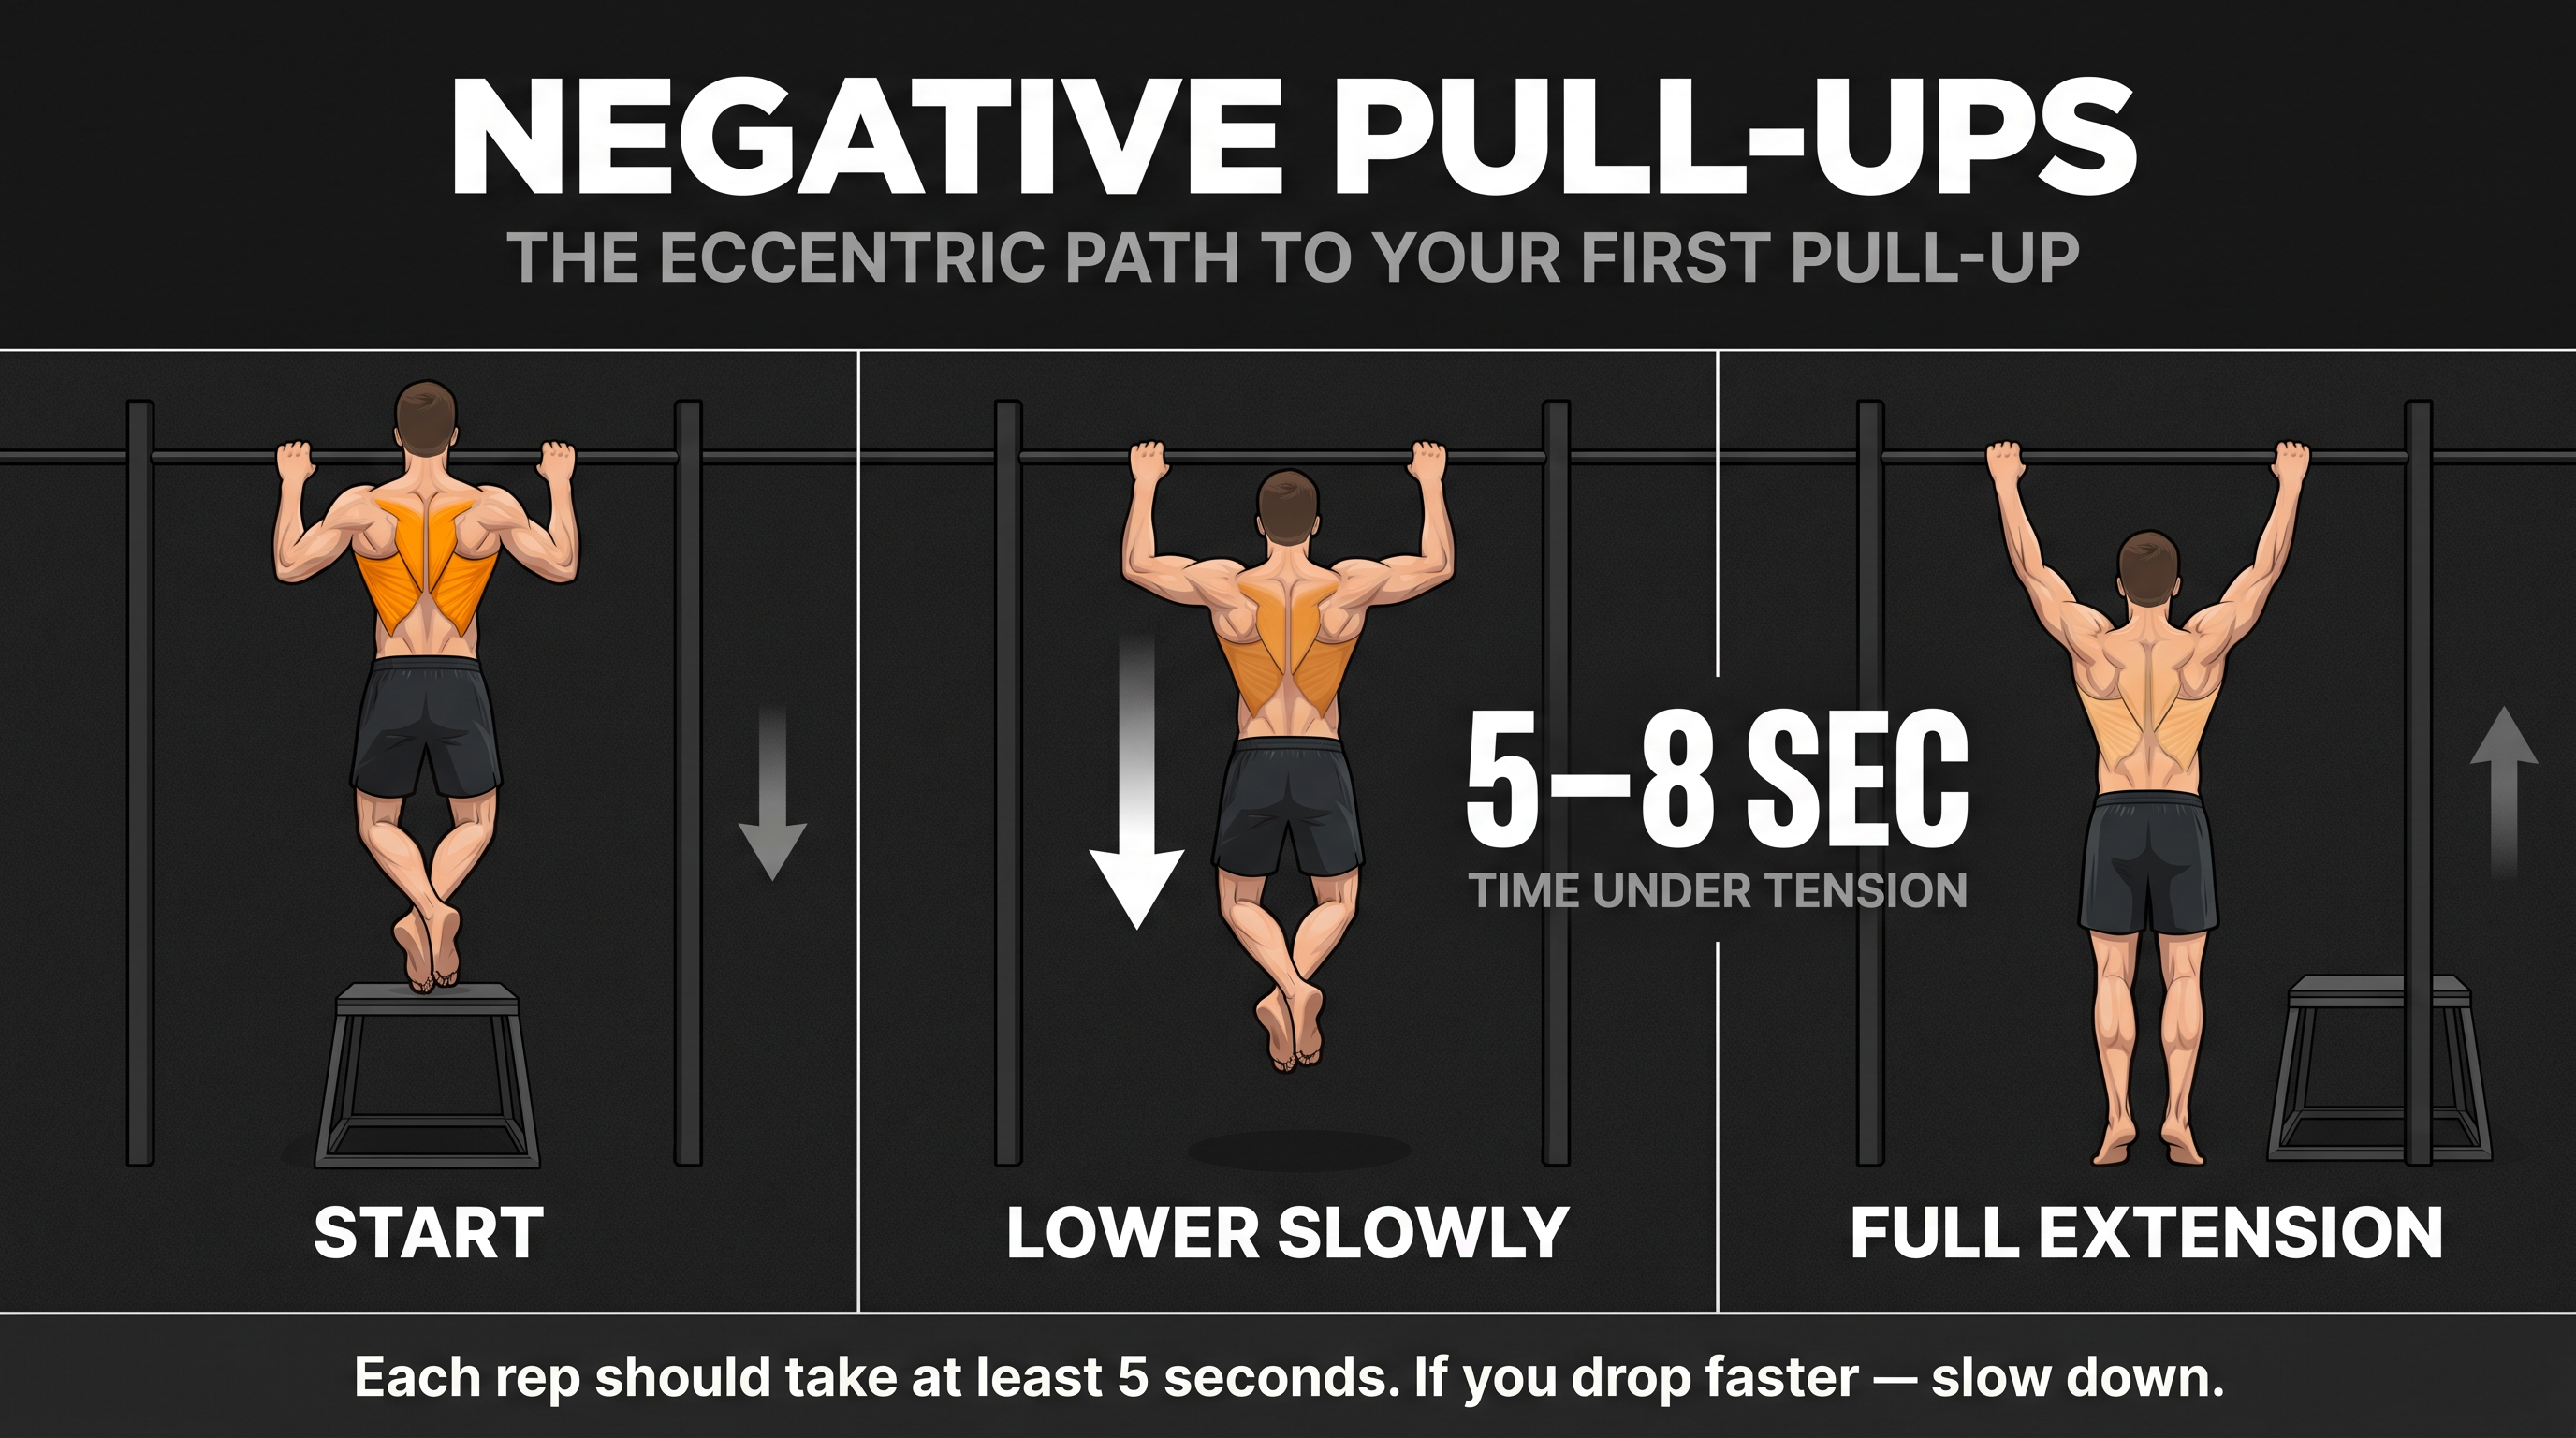
10. Negative Pull-Ups (Eccentric-Only)
Equipment: Pull-up bar + something to step up from (box, chair, step)
For those who can't yet complete a full pull-up — which means exercise #1 on this list isn't accessible yet — negative pull-ups are the most direct path to building that strength.
And because the muscles worked are identical to pull-ups, they function as a genuine lat pulldown alternative in their own right.
How to Do It:
- Place a box or step beneath your pull-up bar so you can reach the top position without jumping (chin above bar height)
- Step up and get into the top position of a pull-up — chin above the bar, elbows bent
- Take your feet off the step and hold your weight entirely with your arms
- Lower yourself as slowly as possible toward full arm extension — aim for 5-8 seconds per rep
- When you reach the bottom, step back up and repeat
Muscles Worked: Lats (primary), biceps, rear deltoids — identical to pull-ups
Why It Works: Eccentric contractions (the lowering phase) produce the same structural adaptations in muscle tissue as concentric work. Research consistently shows that eccentric-focused training is one of the fastest ways to build both strength and hypertrophy in a movement pattern — which means negatives build pull-up strength more efficiently than any assisted pull-up variation. The lat pulldown exists in commercial gyms partly to give beginners access to the vertical pull pattern before they have the strength for pull-ups. The negative pull-up does the same job with bodyweight.
Key Cue: Aim for 5-8 seconds on every descent. If you're dropping faster than 3 seconds, slow down — the time under tension is the entire point.
Progression Plan:
▸ Aim for 3-5 negatives per set, with each rep taking at least 5 seconds
▸ Rest 90-120 seconds between sets — these are more demanding than they look
▸ Weekly progression: add 1 second to your descent time each week. When you can lower for 8 seconds with control, test a full pull-up.
▸ Still too challenging? Use a resistance band looped over the bar under your feet for light assistance
How to Track Lat Pulldown Alternatives at Home
One of the biggest frustrations about shifting from cable machines to free weights and bodyweight is the loss of clarity on progressive overload. With a cable stack, progression is obvious — you move the pin. With band tension, pull-up body weight, and dumbbell increments, it gets murkier.
That's exactly the problem Stronger solves for home gym athletes.
Every exercise in this list is either already in Stronger's library of 400+ exercises or can be added as a custom exercise in seconds. Once it's logged, the app tracks every set, rep, and weight across your entire training history — so you always know your last session's performance and can see whether you're genuinely progressing or just repeating the same stimulus.
Here's how we use Stronger specifically with cable-free back training:
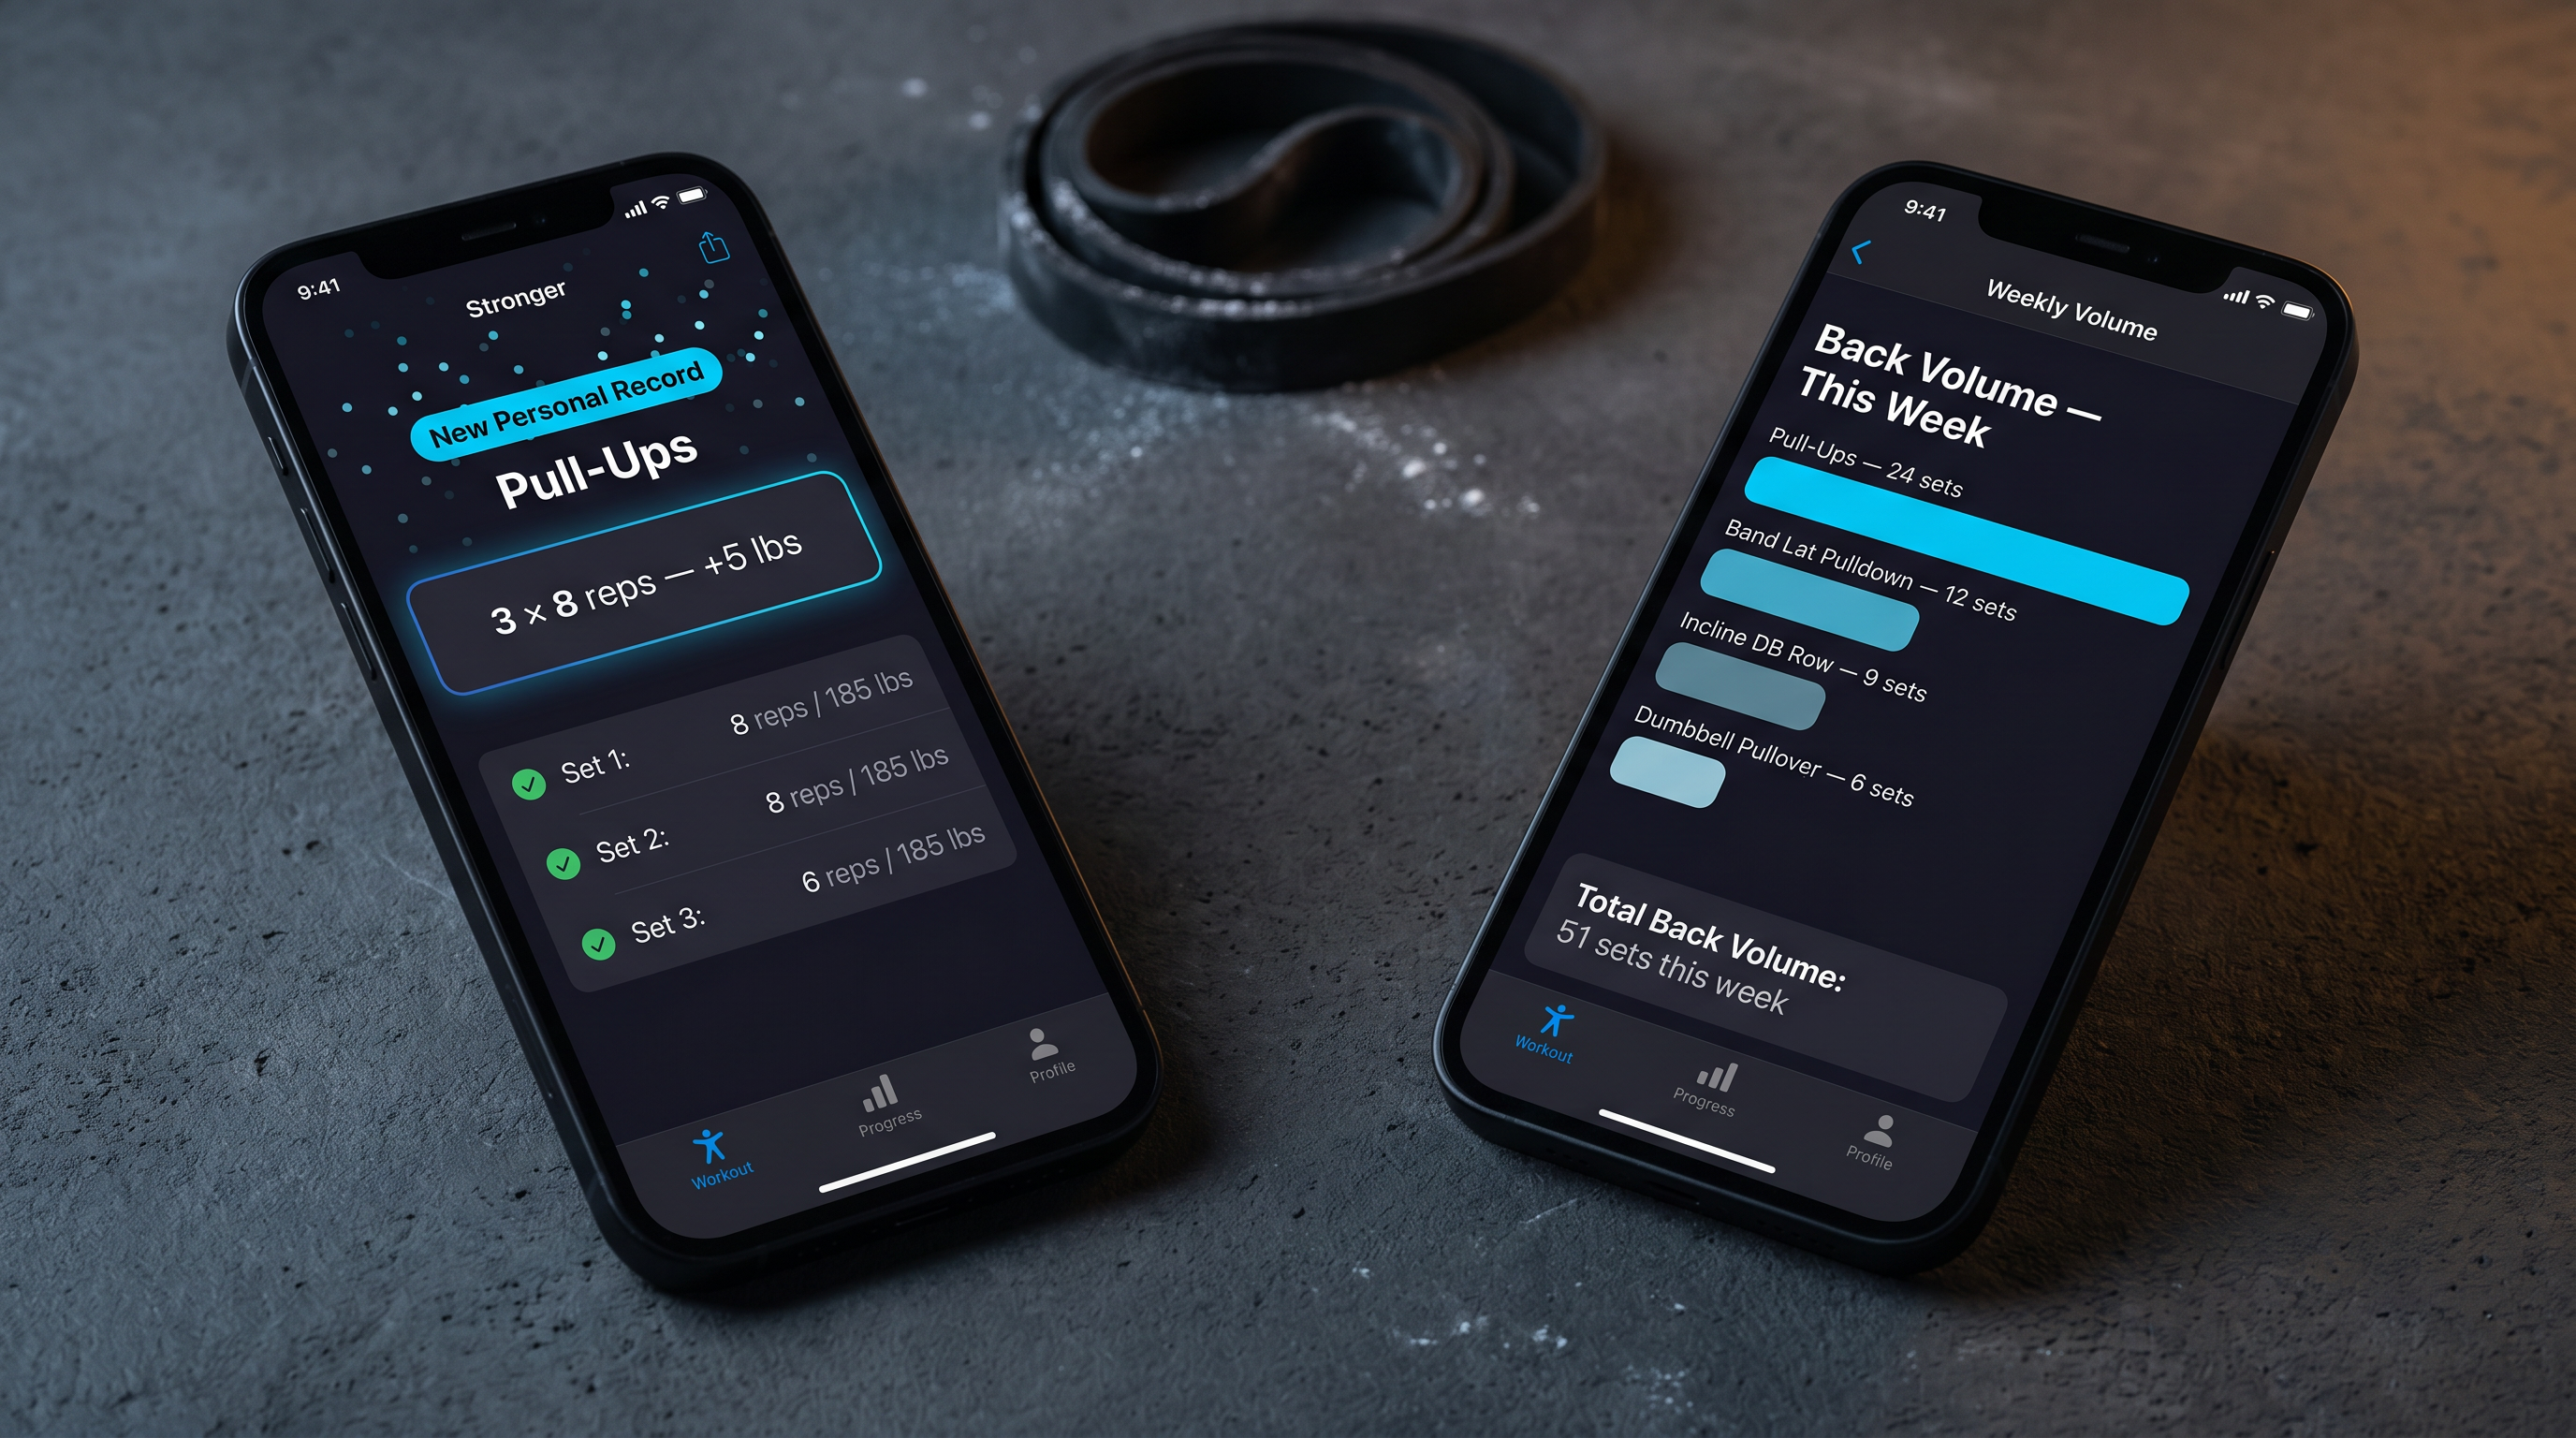
PR detection on every exercise. The first time you hit a new best on your band pulldowns or weighted pull-ups, Stronger flags it. That's your progressive overload signal — the same feedback loop you'd get from watching the cable stack weight move up.
AI-generated routines without equipment restrictions. Tell the app you're training at home with a pull-up bar and dumbbells, and Stronger's AI builds a program around your actual setup — including these lat alternatives. The routines adapt as you get stronger.
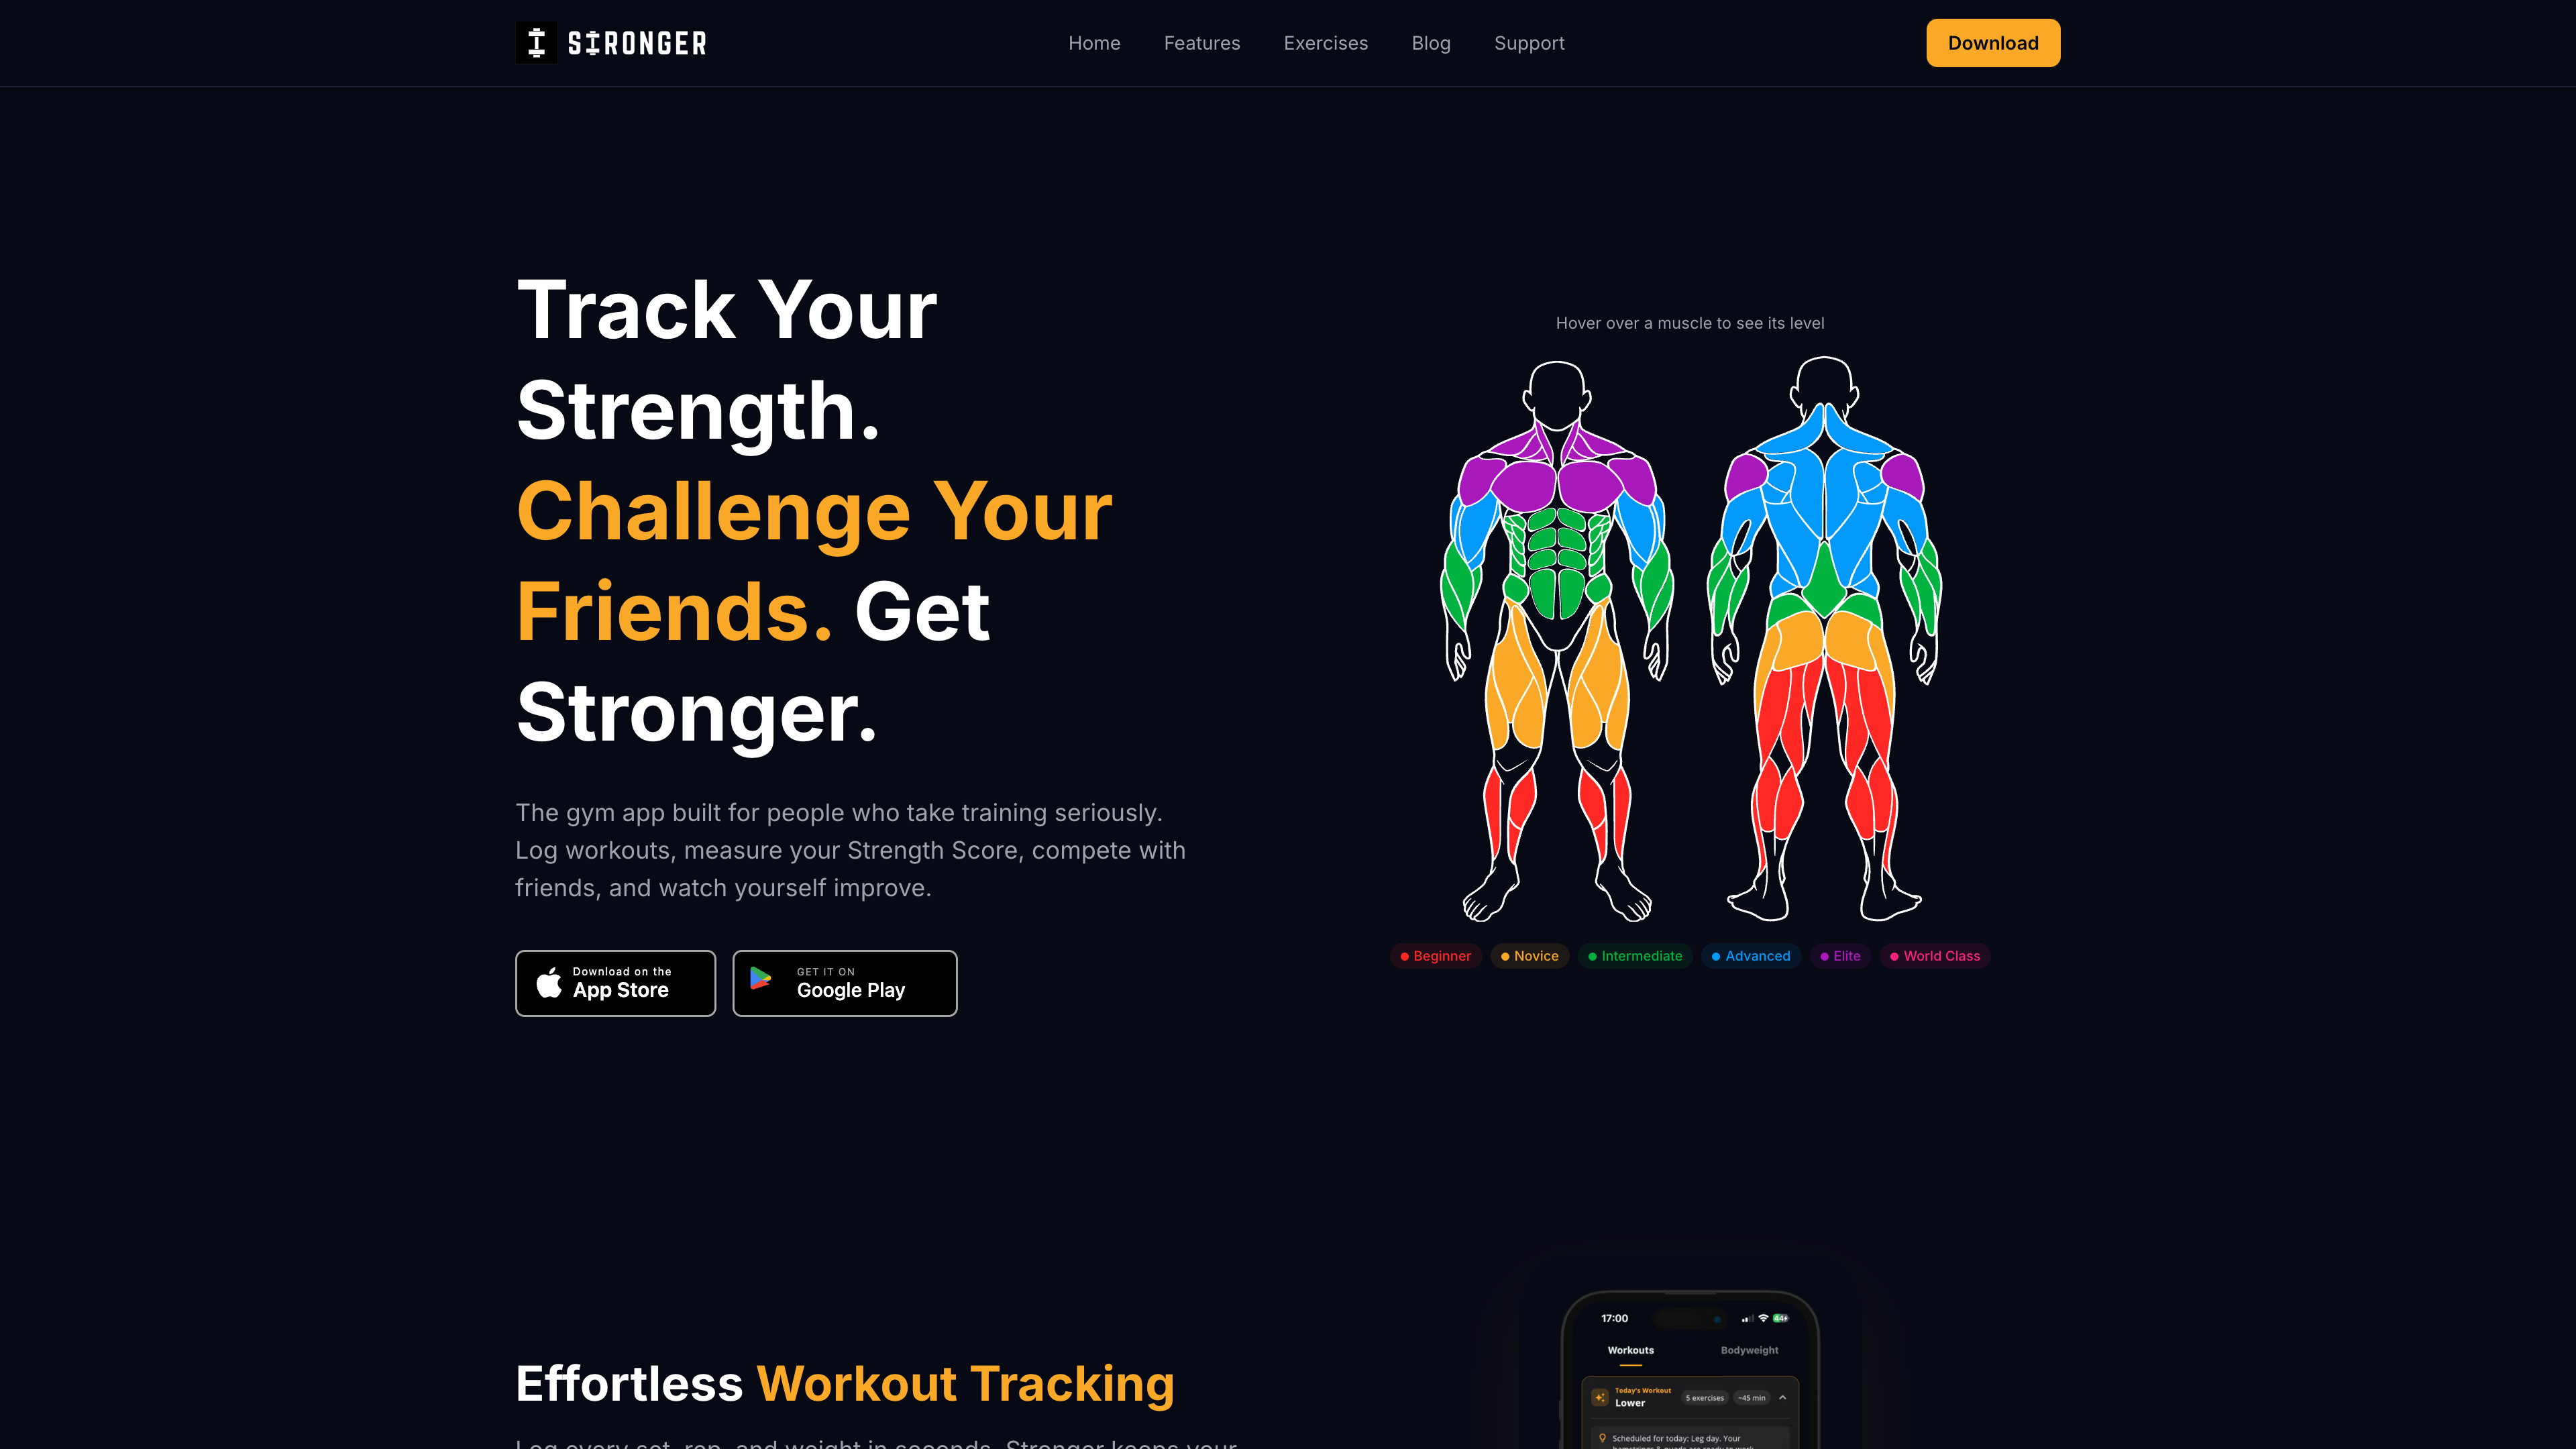
Strength Score benchmarking. Even training without cables, your back strength accumulates and reflects in your overall Strength Score — the same metric that lets you compare your progress against the global Stronger community. Home gym doesn't mean you're training in a vacuum.
Volume tracking by muscle group. See exactly how much weekly back volume you're accumulating across pull-ups, band pulldowns, rows, and pullovers — critical for avoiding both undertraining and overreaching during a home gym phase.
If you haven't started tracking your home gym sessions yet, now's the time. Download Stronger and add your first cable-free back session today.
Lat Pulldown Alternatives: FAQ
Can you build lat width without a cable machine?
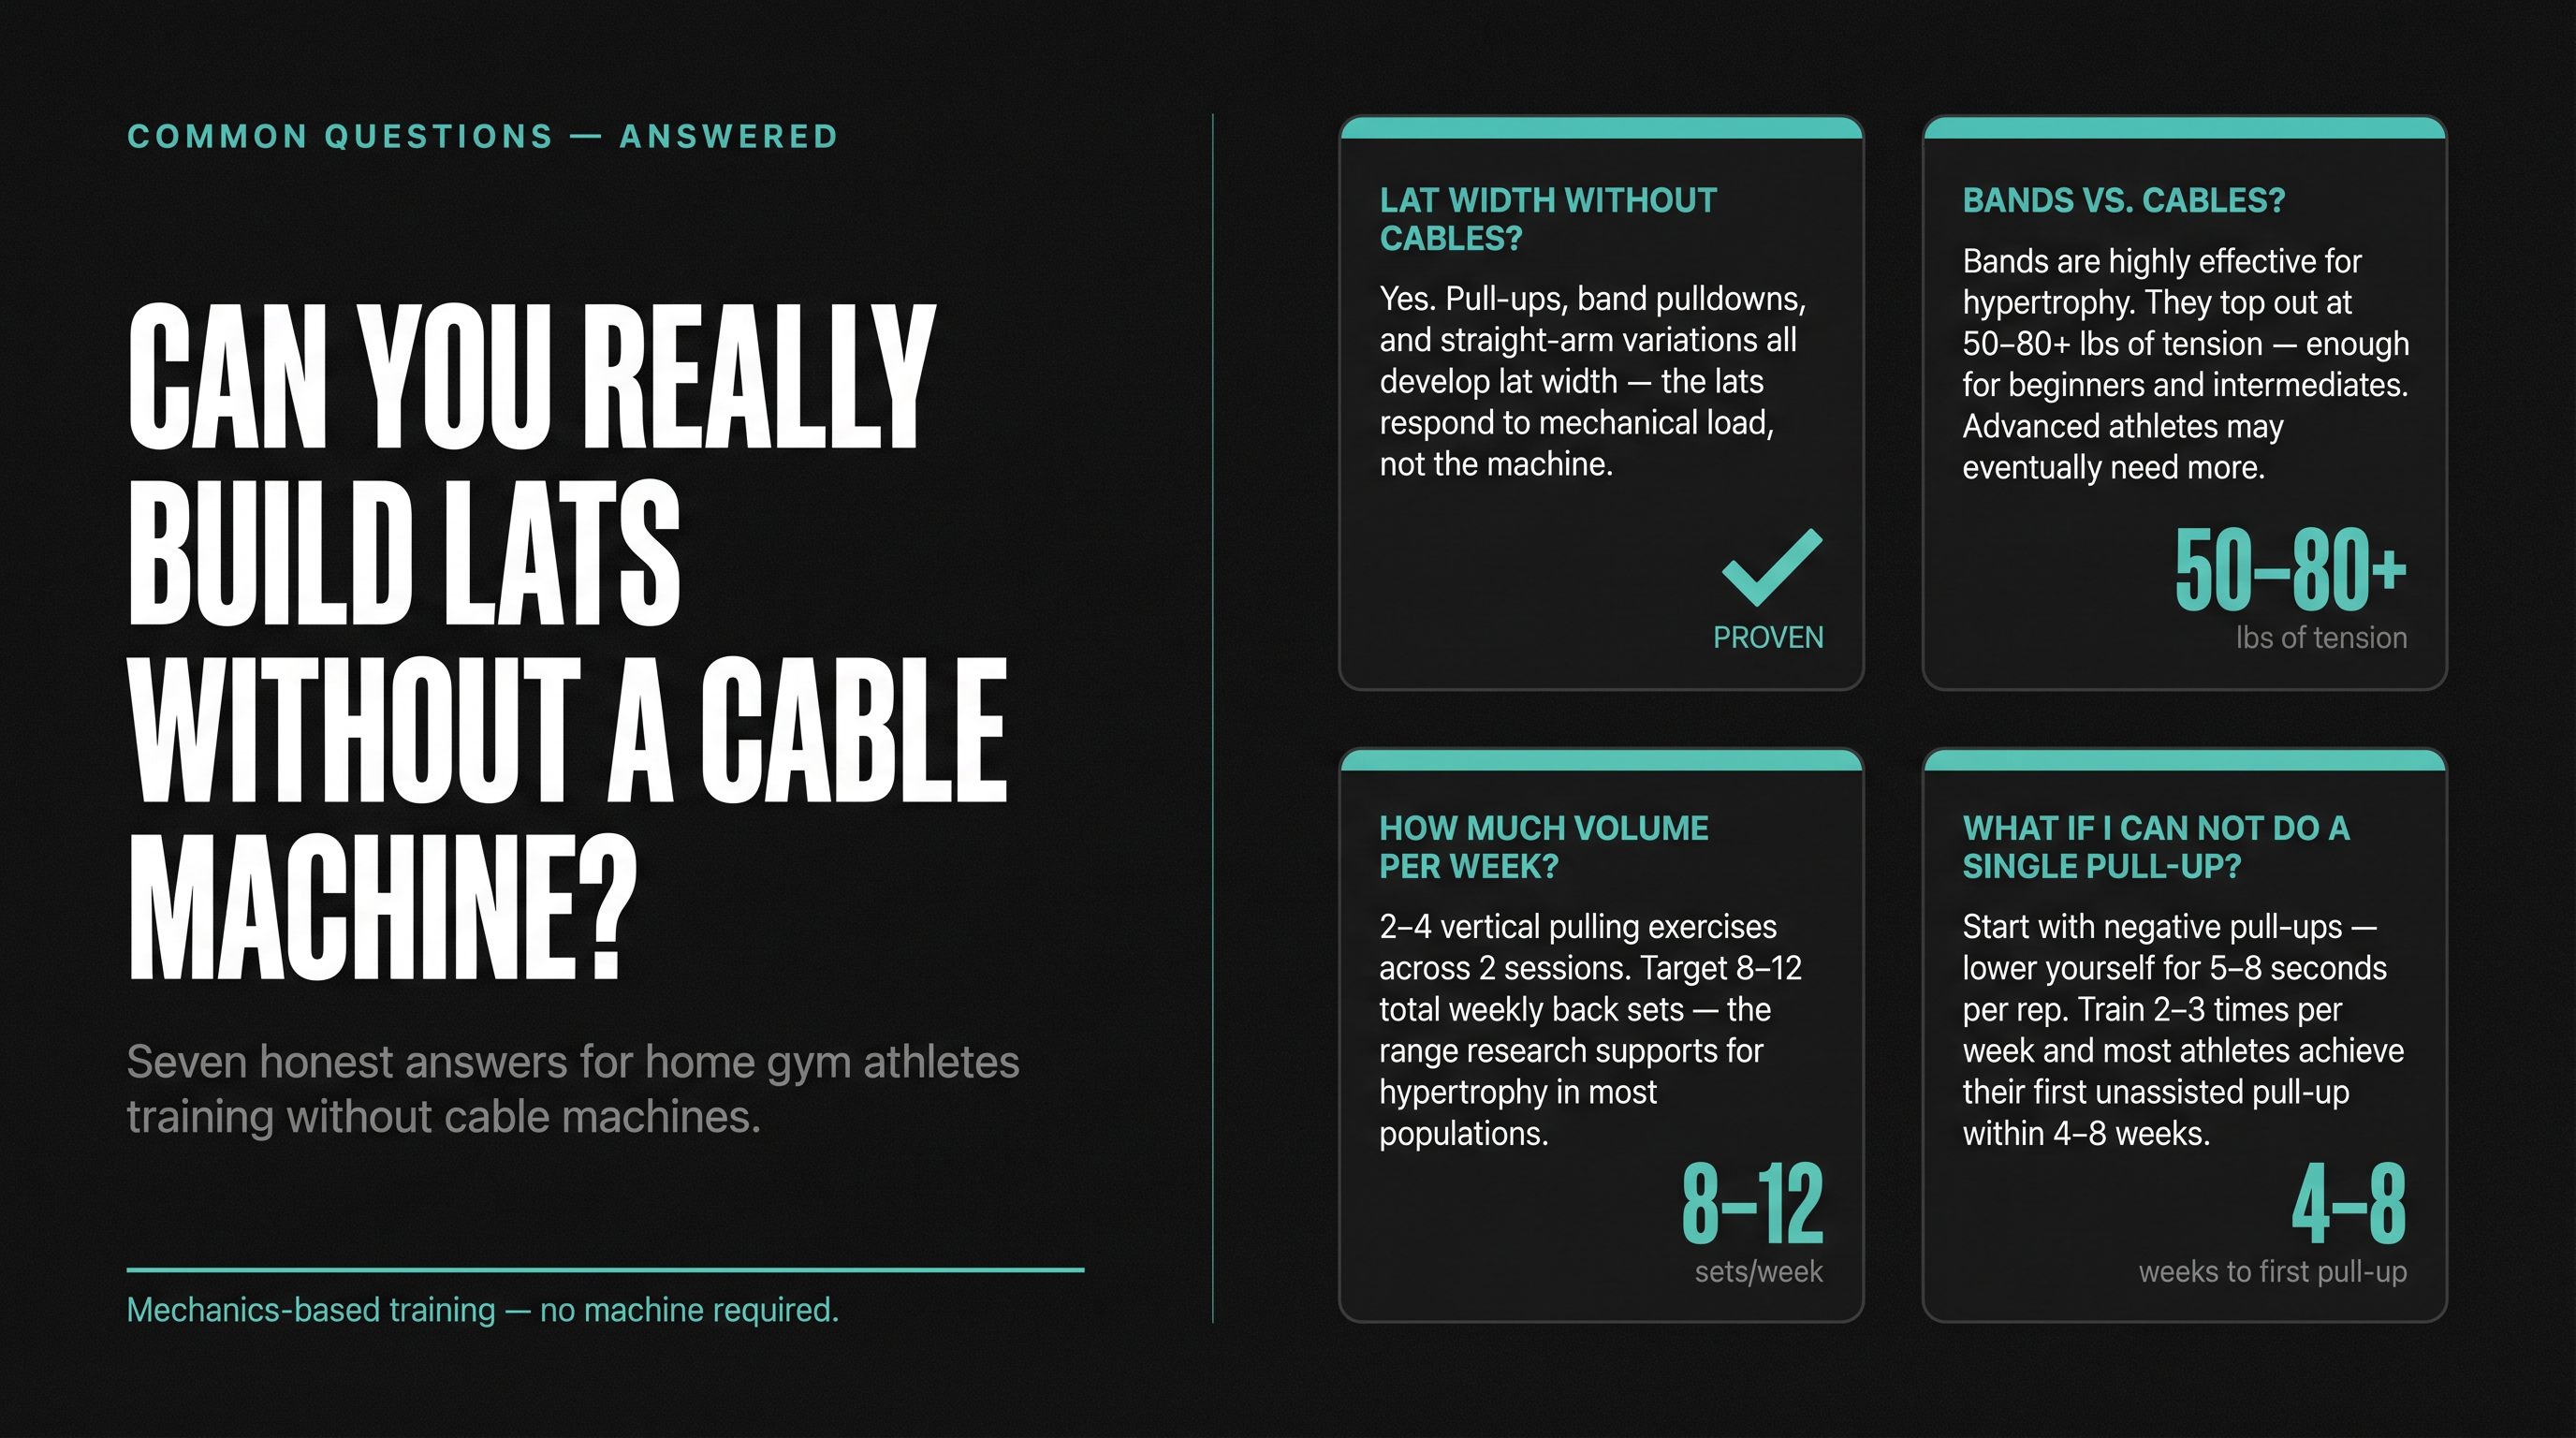
Yes — and the athletes who trained before cable machines became standard did it with pull-ups, weighted rows, and pullovers. The lats don't know whether they're pulling a cable or your bodyweight through a vertical path; they respond to the mechanical load and the stretch-shortening cycle. Pull-ups, resistance band pulldowns, and straight-arm variations all develop lat width effectively with consistent progressive overload.
Are resistance bands as effective as cables for lat training?
For most training goals (hypertrophy and functional strength), resistance bands are highly effective for lat training. The main differences are the resistance curve (bands increase tension as you stretch them, while cables remain constant) and the maximum load ceiling (bands top out at around 50-80+ lbs of tension depending on the band). For beginners and intermediates, this is rarely a limiting factor. Advanced athletes who need to regularly pull 150+ lbs may eventually find band pulldowns inadequate as a primary lat stimulus.
How many lat pulldown alternatives should I do per week?
For most people, 2-4 direct vertical pulling exercises per week across 2 sessions is sufficient. A reasonable home gym back day might look like: 3 sets of pull-ups or negative pull-ups, 3 sets of resistance band lat pulldowns, and 2-3 sets of a row variation (incline dumbbell or single-arm). That's 8-12 sets of back work — the range research supports for hypertrophy in most populations.
What exercise most closely mimics the lat pulldown?
Pull-ups (or chin-ups) come closest in terms of the movement pattern, muscle recruitment, and vertical pull mechanics. If you can do pull-ups, they are effectively a bodyweight lat pulldown. If you can't yet, the resistance band lat pulldown replicates the actual motion most precisely, since you're performing the same exercise with the same arm path and seated position.
Can I grow my lats with only pull-ups?
Yes. Pull-ups are one of the oldest and most proven lat development exercises in existence — used long before cable machines existed. The key is progressive overload: adding reps, sets, or weight over time. Adding external resistance to pull-ups — with a 10 lb dumbbell between your legs or using a weight belt — introduces the same progressive load logic as moving a pin on a cable stack. Many athletes with excellent lat development have built primarily with pull-up variations.
How do I make bodyweight lat exercises harder over time?
Three primary methods:
- Add load: a weight vest, dipping belt, or dumbbell held between your feet adds external resistance to pull-ups and chin-ups
- Add reps/sets: more total volume produces more adaptation
- Slow the tempo: adding a 3-5 second negative on every rep significantly increases time under tension, making the same rep count more demanding
For band-based exercises, progressively moving to heavier bands or doubling up your current band provides similar overload increments to cable weight increases.
What if I can't do a single pull-up?
Start with negative pull-ups (exercise #10 on this list) — they build the identical strength and muscle while making the movement accessible at any fitness level. Simultaneously, use assisted pull-up variations (loop a resistance band over the bar and place your feet or knees in it) for volume work. Most people who train negatives and band-assisted pull-ups 2-3 times per week achieve their first unassisted pull-up within 4-8 weeks.
Final Verdict: Best Lat Pulldown Alternatives for Home Gyms
The lat pulldown machine produces a movement — a vertical pull, with your shoulder blades depressing and your lats under full load. Replicate that movement with the equipment you have, and you replicate the training effect.
The 10 exercises on this list are ordered specifically by how well they reproduce that pattern. Start with the ones that match your equipment and your current fitness level, apply progressive overload consistently, and you'll develop the same lat width, back strength, and pulling capacity you'd build at any cable machine.
The best home gym programs aren't compromised versions of gym programs — they're plans built deliberately for the tools available. Log every session, track every rep, and let your progress compound. Stronger is built specifically for that kind of intentional, data-driven training — wherever you're working out from.
Stronger Editorial Team
Certified strength & conditioning specialists with 10+ years of coaching experience
The Stronger editorial team produces evidence-based training content for lifters of all levels.
Ready to Get Stronger?
Join 2,000,000+ lifters tracking their workouts with Stronger. Available on iOS and Android.