Barbell Row: Form, Grip & Variations Guide
Last reviewed: April 21, 2026 Reading time: 18–22 minutes Best for: Beginners learning proper row form, intermediate lifters building a thicker back, and serious lifters deciding which variation belongs in their program.
The barbell row is the exercise most lifters think they're doing correctly. Most aren't.
The form looks simple from across the gym: hinge forward, pull the bar to your body, lower it back down. But that apparent simplicity is exactly what makes it so easy to wreck. Too much weight, a creeping torso, elbows that curl like a biceps exercise, lower back that takes every rep instead of just stabilizing — and what should be the best back-builder in your program quietly becomes a mess.
We've built the barbell row into Stronger's exercise library alongside the Pendlay row, reverse-grip barbell row, T-bar row, inverted row, and dumbbell row, with specific coaching cues and progression guidance for each. This guide is the written version of that coaching: exactly how to execute the barbell row, which grip serves which goal, how each variation changes the exercise, and how to make measurable progress over time.
By the end, you'll know:
- The exact form mechanics that separate a productive barbell row from a wasted one
- The elbow path principle that makes grip choice actually make sense
- Which variation belongs in your program based on your specific goals and limitations
- A concrete progression system you can run session after session
Let's start with the short version, then go deep.
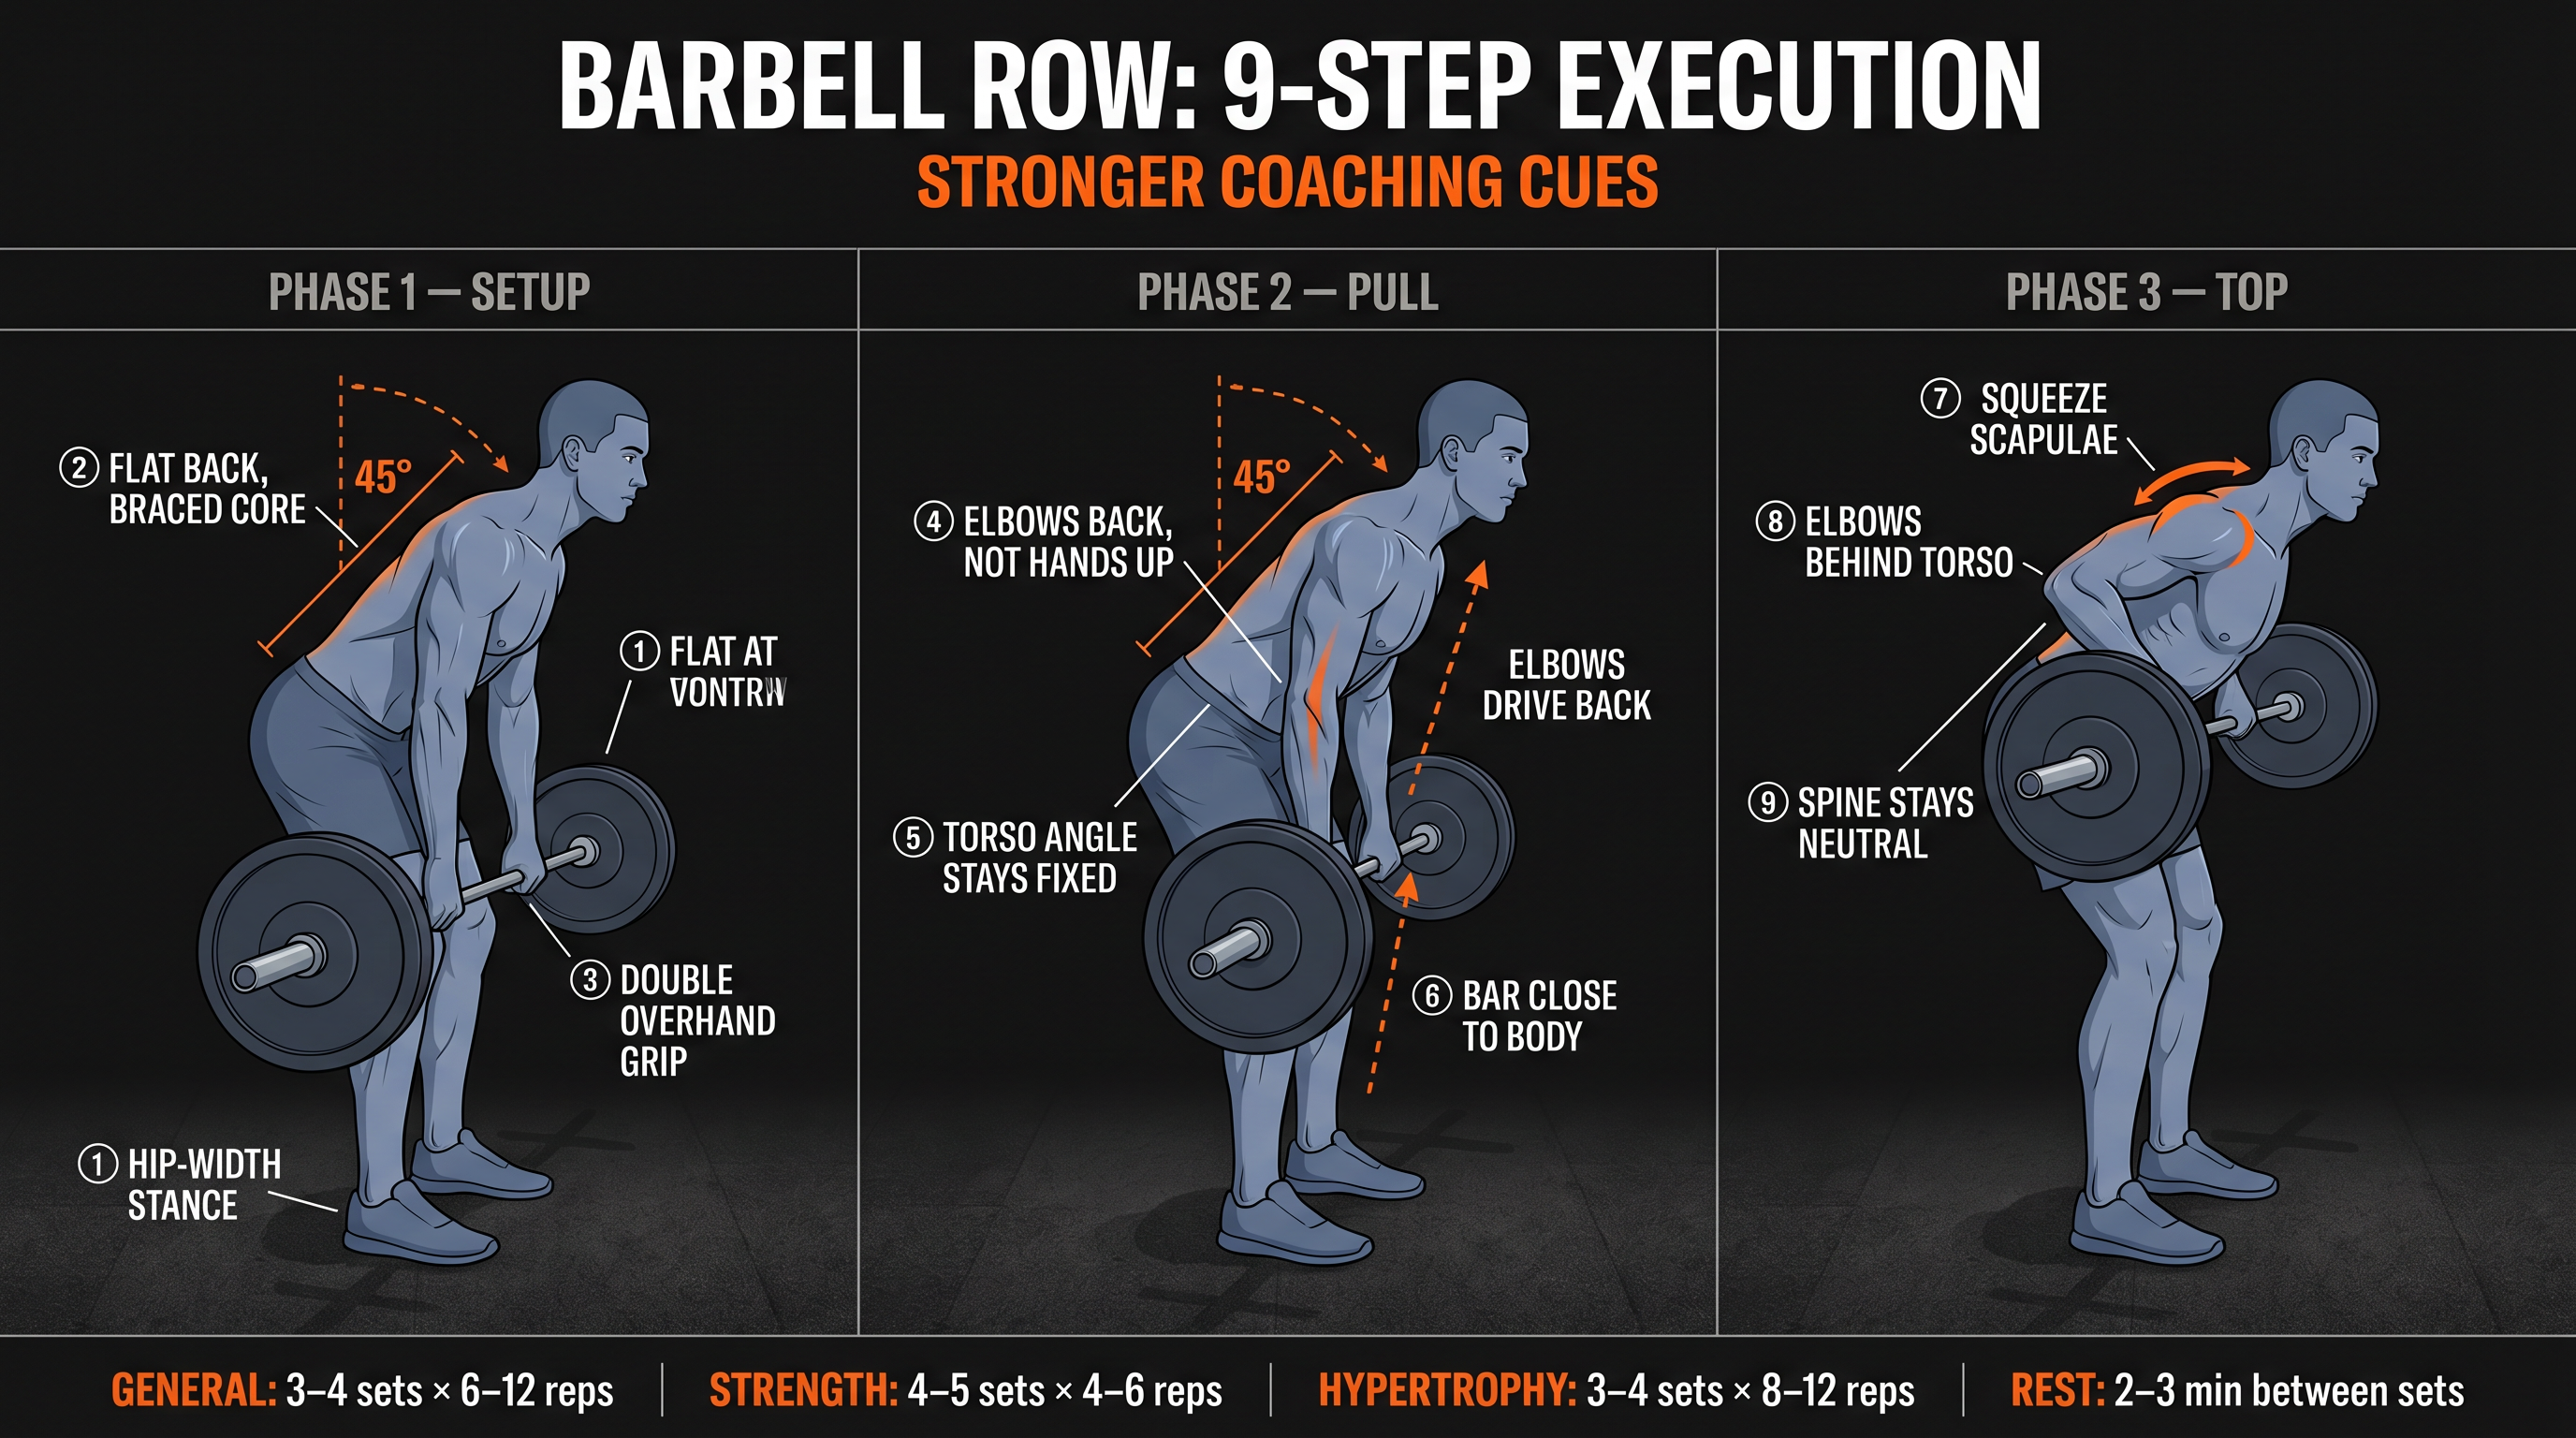
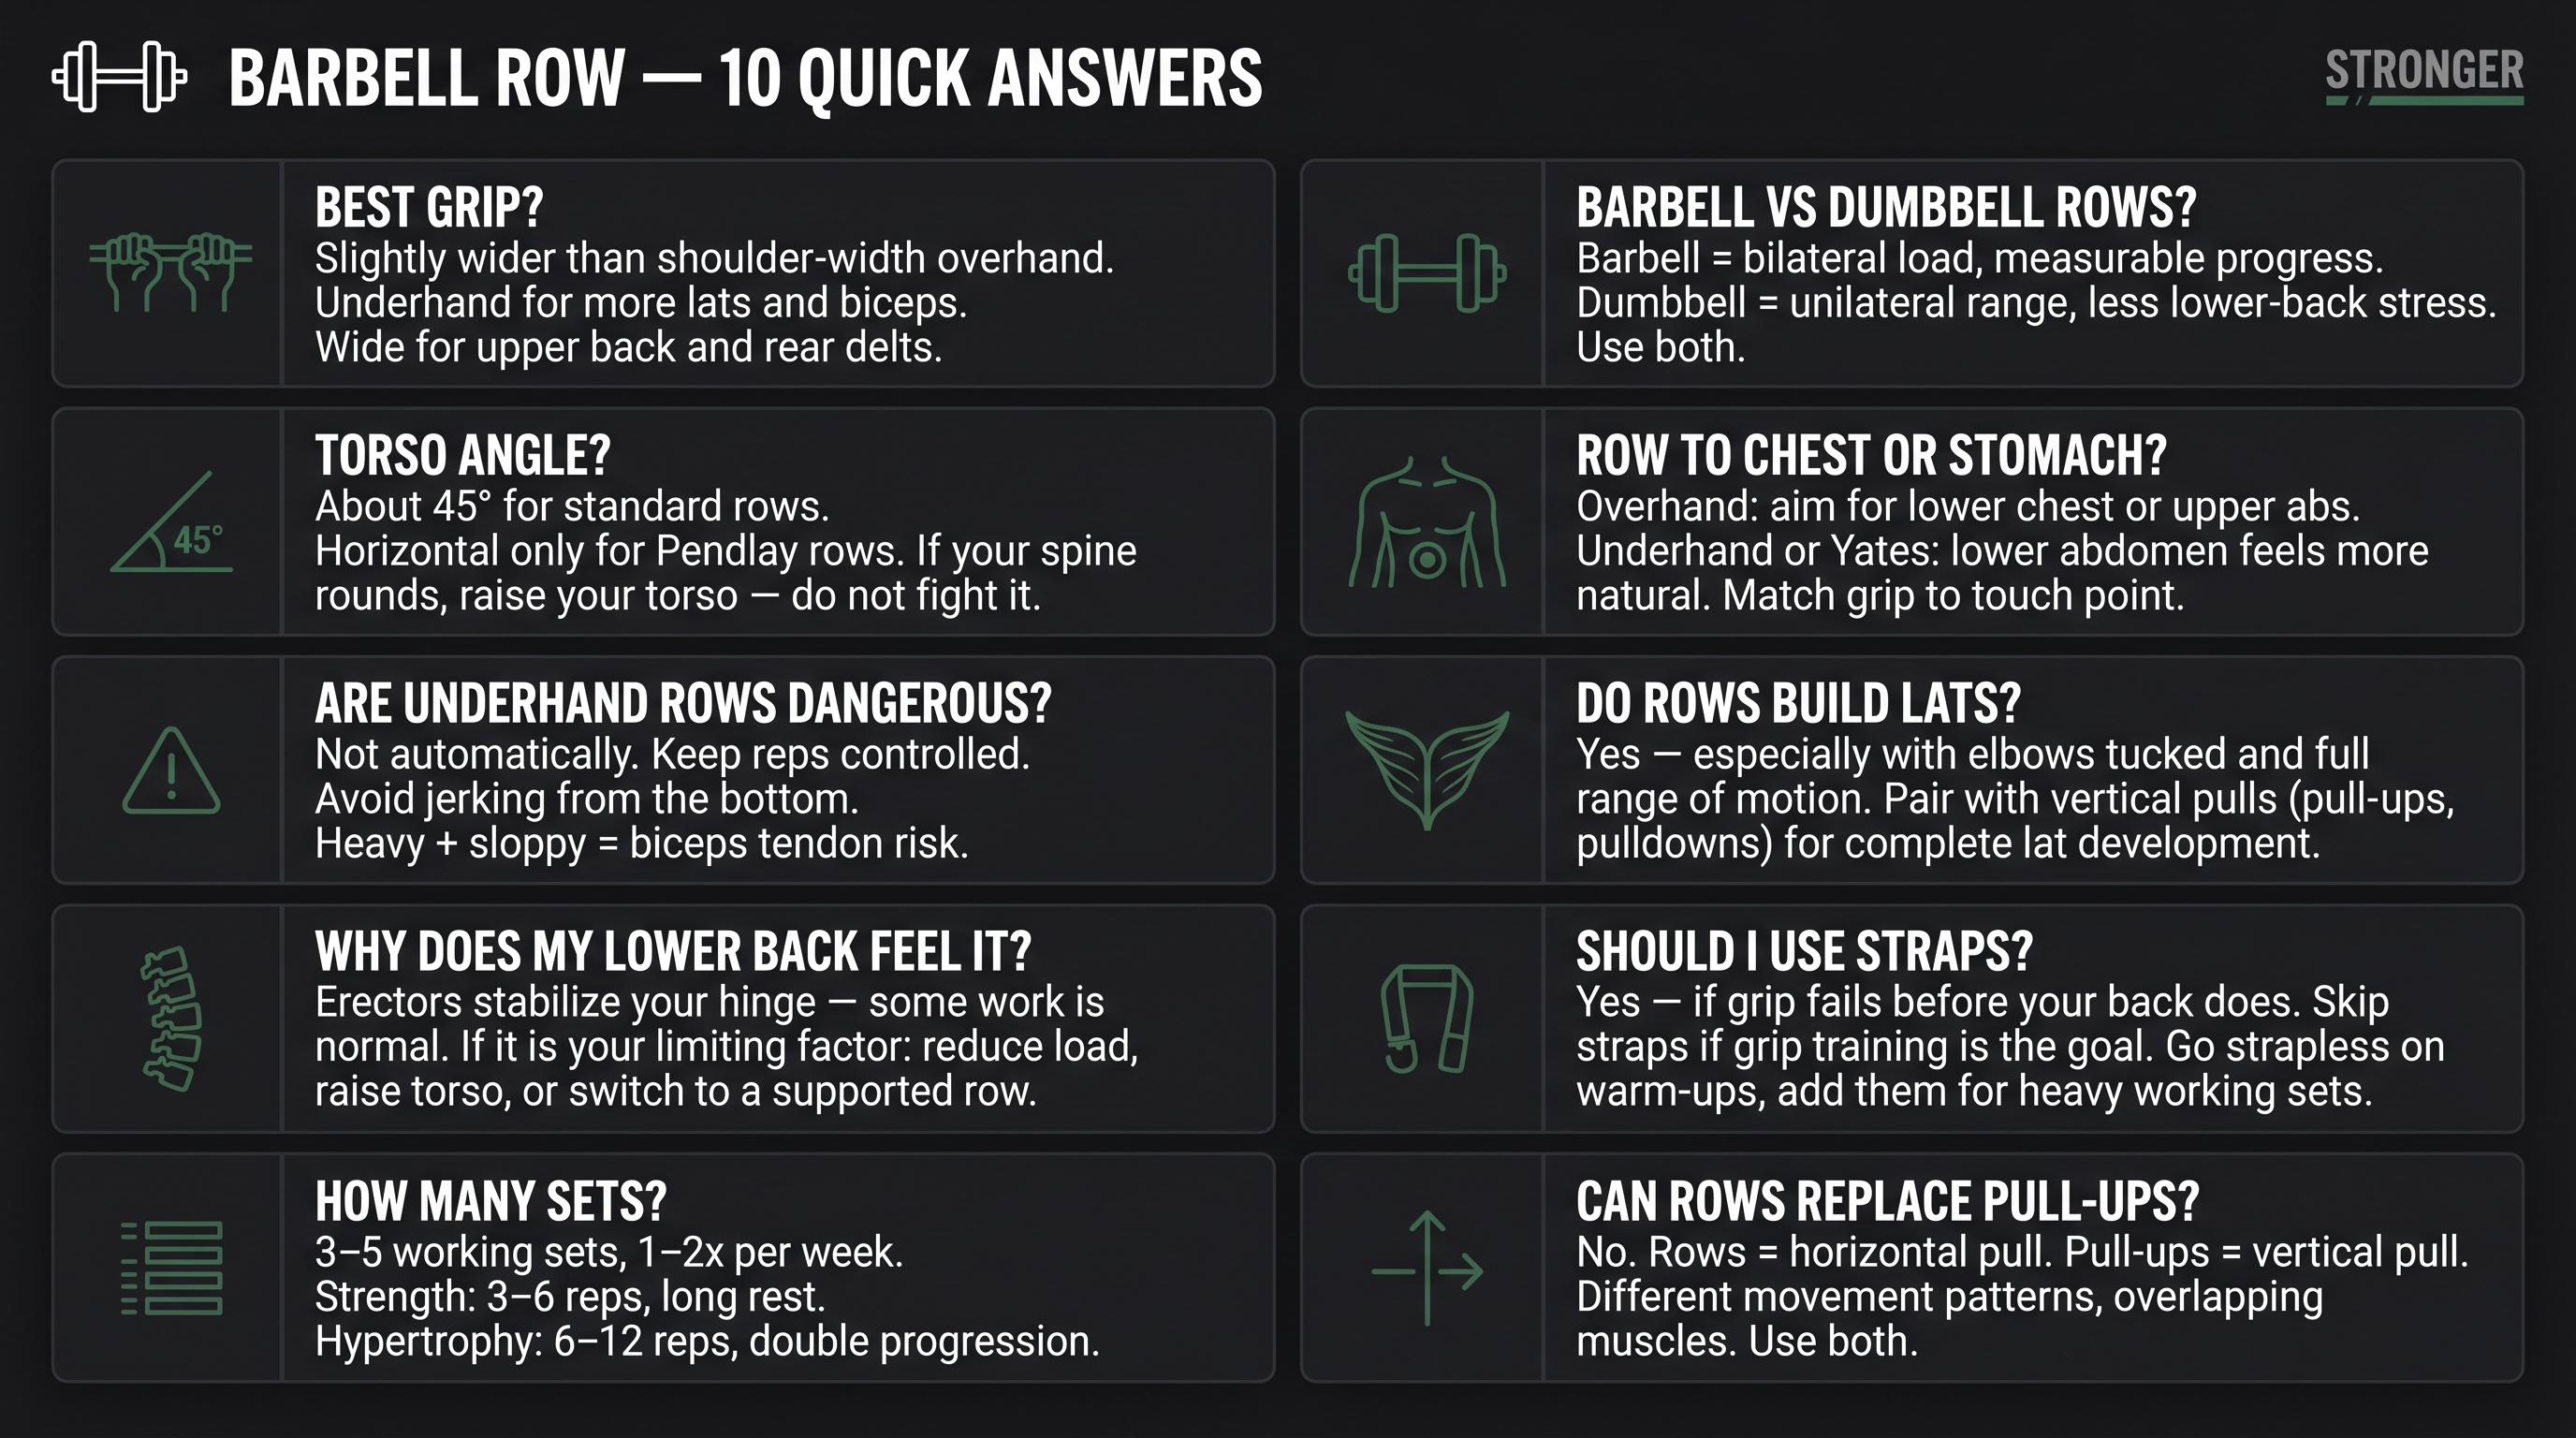
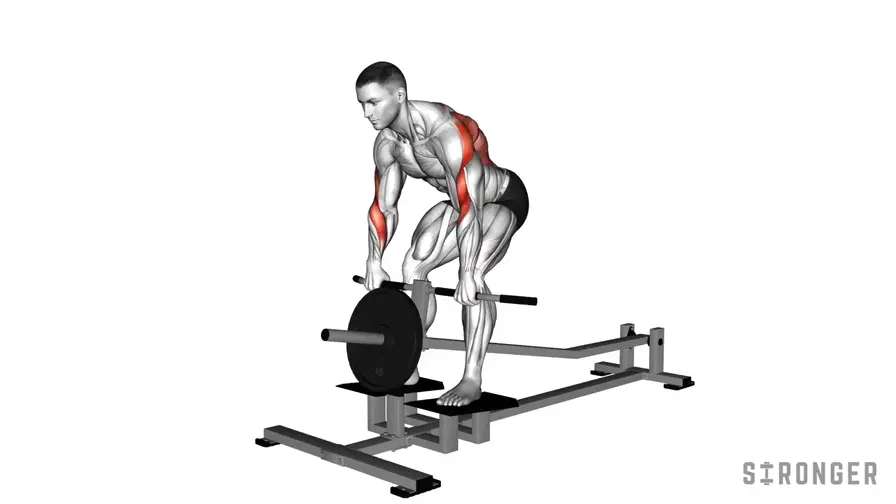
How to Do a Barbell Row
To perform a standard barbell row:
- Stand with your feet about hip-width to shoulder-width apart.
- Grip the bar slightly wider than shoulder-width with a double overhand grip.
- Hinge at the hips until your torso is roughly 45 degrees to the floor.
- Keep your back flat, knees slightly bent, core braced, and neck neutral.
- Let the bar hang at arm's length.
- Pull the bar toward your lower chest or upper abs by driving your elbows back.
- Squeeze your shoulder blades together briefly at the top.
- Lower the bar under control until your arms are fully extended.
- Keep your torso angle fixed throughout every rep of the set.
That's the movement. Those same nine points map directly to Stronger's barbell row coaching cues: a compound, intermediate barbell pull performed from a hip hinge, with a flat back, braced core, controlled lowering, and a consistent torso angle throughout the set.

For most lifters, a good starting prescription is 3–4 sets of 6–12 reps, resting 2–3 minutes between hard working sets. For strength: 4–5 sets of 4–6 reps. For hypertrophy: 3–4 sets of 8–12 reps. For endurance: 2–3 sets of 15–20 reps.
But there's more to each of those steps than the instructions suggest. Here's what's actually happening — and what breaks first.
What Muscles Does the Barbell Row Work?
Before getting into form mechanics, it's worth understanding what the barbell row is actually doing to your body. Not just "it works your back" — specifically why it's one of the most effective back exercises available, and where its limits are.
What Makes a Barbell Row Effective
Think of the barbell row as having three jobs to do simultaneously:
- Move the bar with your back, not momentum. The back muscles (lats, mid-traps, rhomboids) do the pulling. Not your hips. Not your arms.
- Hold a strong hinge position without your lower back collapsing. Your spine is the platform; it should not be the engine.
- Progress the lift over time without changing the movement. The row is not just an exercise to "feel." It's a performance lift with trackable numbers. If you are adding weight by standing up, you are not progressing the row — you are progressing a different exercise.
That last point is the one most lifters miss. The barbell row is only useful if it is repeatable with the same mechanics. When you start tracking it that way — logging the exact variation, grip, weight, reps, and form quality each session — it stops being an accessory and starts being a compound lift with real measurable carryover. We'll come back to this in the programming section.
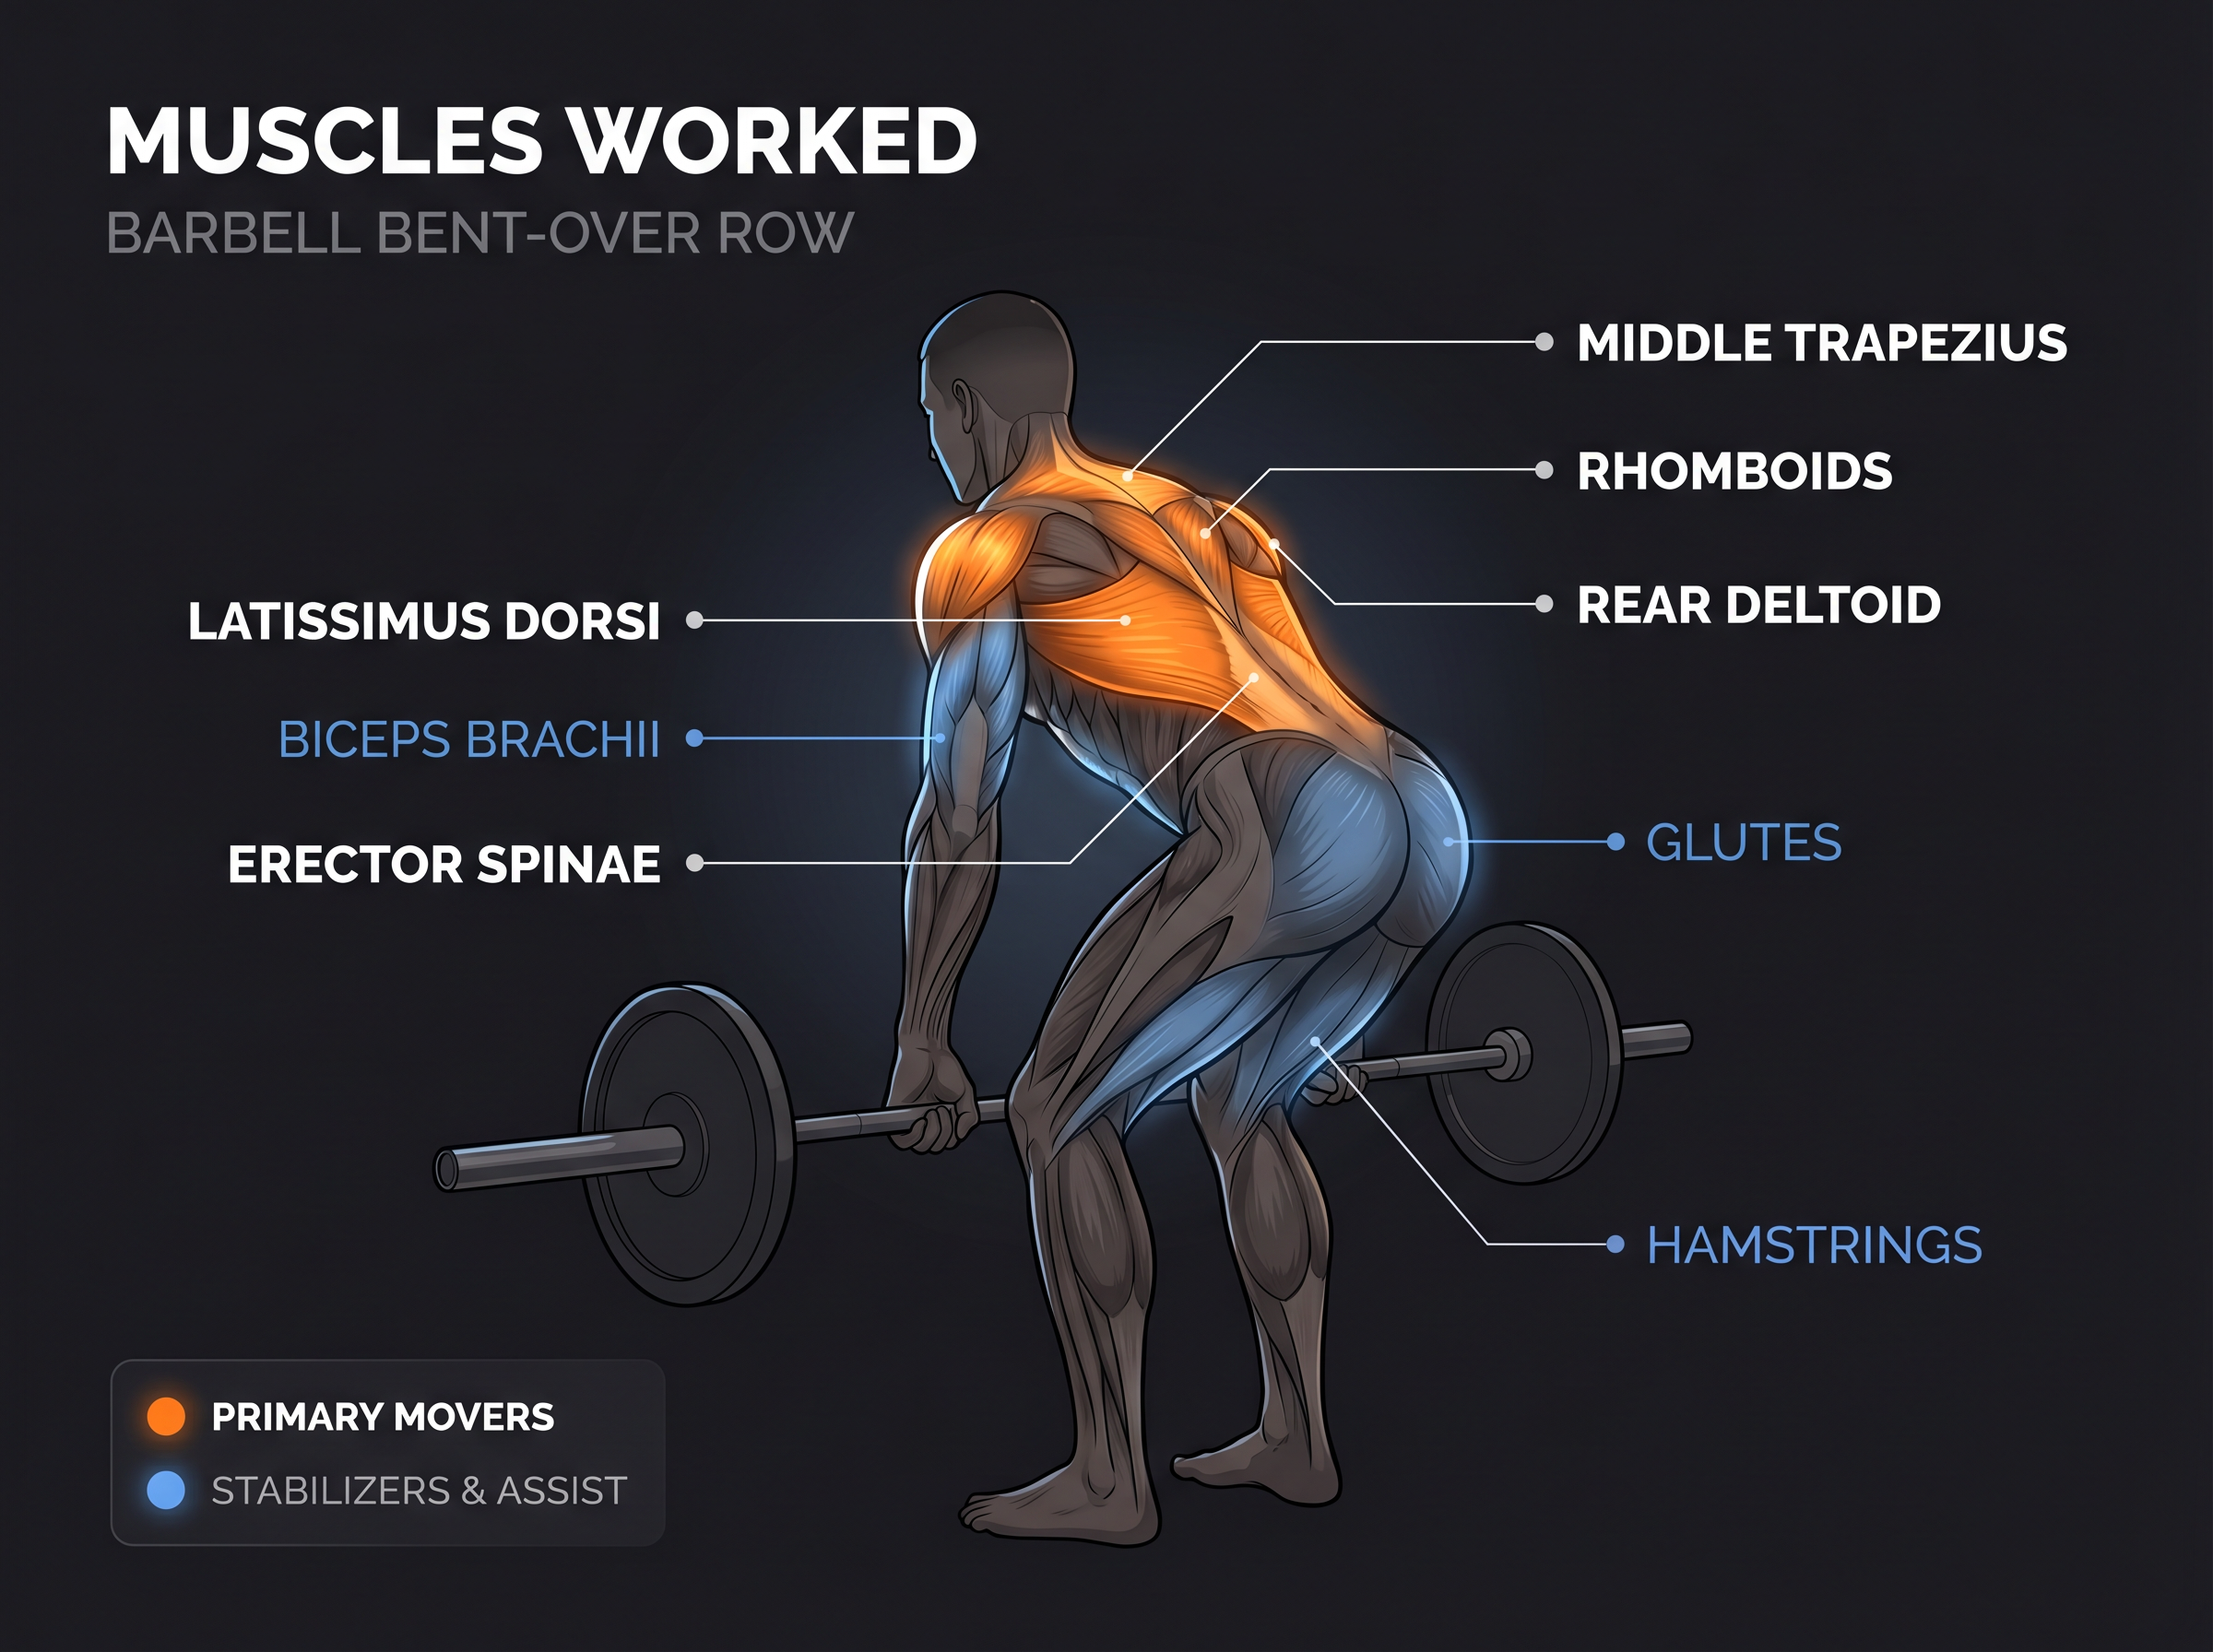
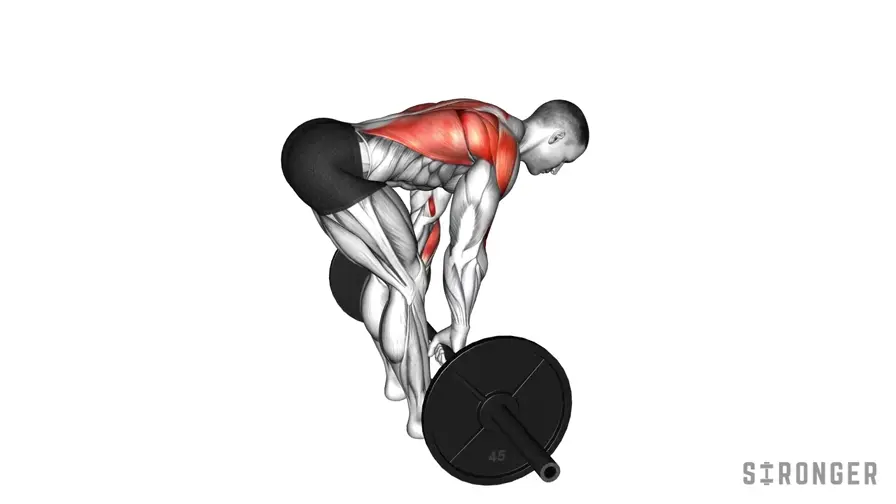
Primary Muscles Worked
Latissimus dorsi. Your lats are large fan-shaped muscles running from your spine and pelvis up to your upper arm. They help extend and adduct the shoulder — which is why pulling your elbows back and toward your hips feels more "lat-focused." ACE-sponsored back-exercise research identifies the latissimus dorsi as responsible for shoulder extension, adduction, horizontal abduction, and internal rotation. (ACE Fitness)
Middle traps and rhomboids. These muscles retract your shoulder blades — they are the main drivers of the "squeeze" at the top of a row. In ACE-sponsored research comparing back exercises, the bent-over row ranked among the best exercises tested for middle trapezius recruitment. (ACE Fitness)
Rear delts and rotator cuff. These contribute more when your elbows flare away from your torso, which is why wide-grip rows often feel more "upper back" dominant compared to close-grip rows.
Erector spinae. Your spinal erectors work isometrically to hold your torso stable in the hinge position. ACE's 2018 back-exercise study found the bent-over row to be the best-tested exercise for erector spinae activation — one clear reason why unsupported rows feel more demanding than machine or bench-supported alternatives. (ACE Fitness)
Secondary Muscles the Barbell Row Engages
Your biceps, brachialis, brachioradialis, and forearms help flex the elbow and hold the bar. Your hamstrings, glutes, and core maintain the hinge position throughout. Healthline's medically reviewed bent-over row guide similarly describes the movement as a back exercise that also demands trunk and hip stability throughout every rep. (Healthline)
Why Rows Alone Are Not Enough for Complete Back Development
The row is excellent for mid-back thickness, lat development, upper-back strength, grip strength, and posterior-chain stability. It is not, however, the only back exercise you need. ACE's research found pull-ups and chin-ups produced greater lat activation than other tested exercises, while rows were especially valuable for training multiple back muscles simultaneously. The practical conclusion: pair rows with vertical pulling movements (pull-ups, pulldowns) if your goal is complete back development — browse our full collection of back exercises to round out your training. (ACE Fitness)
Understanding this anatomy makes the form cues below land differently. Here's how to execute each step.
Barbell Row Form: Step-by-Step
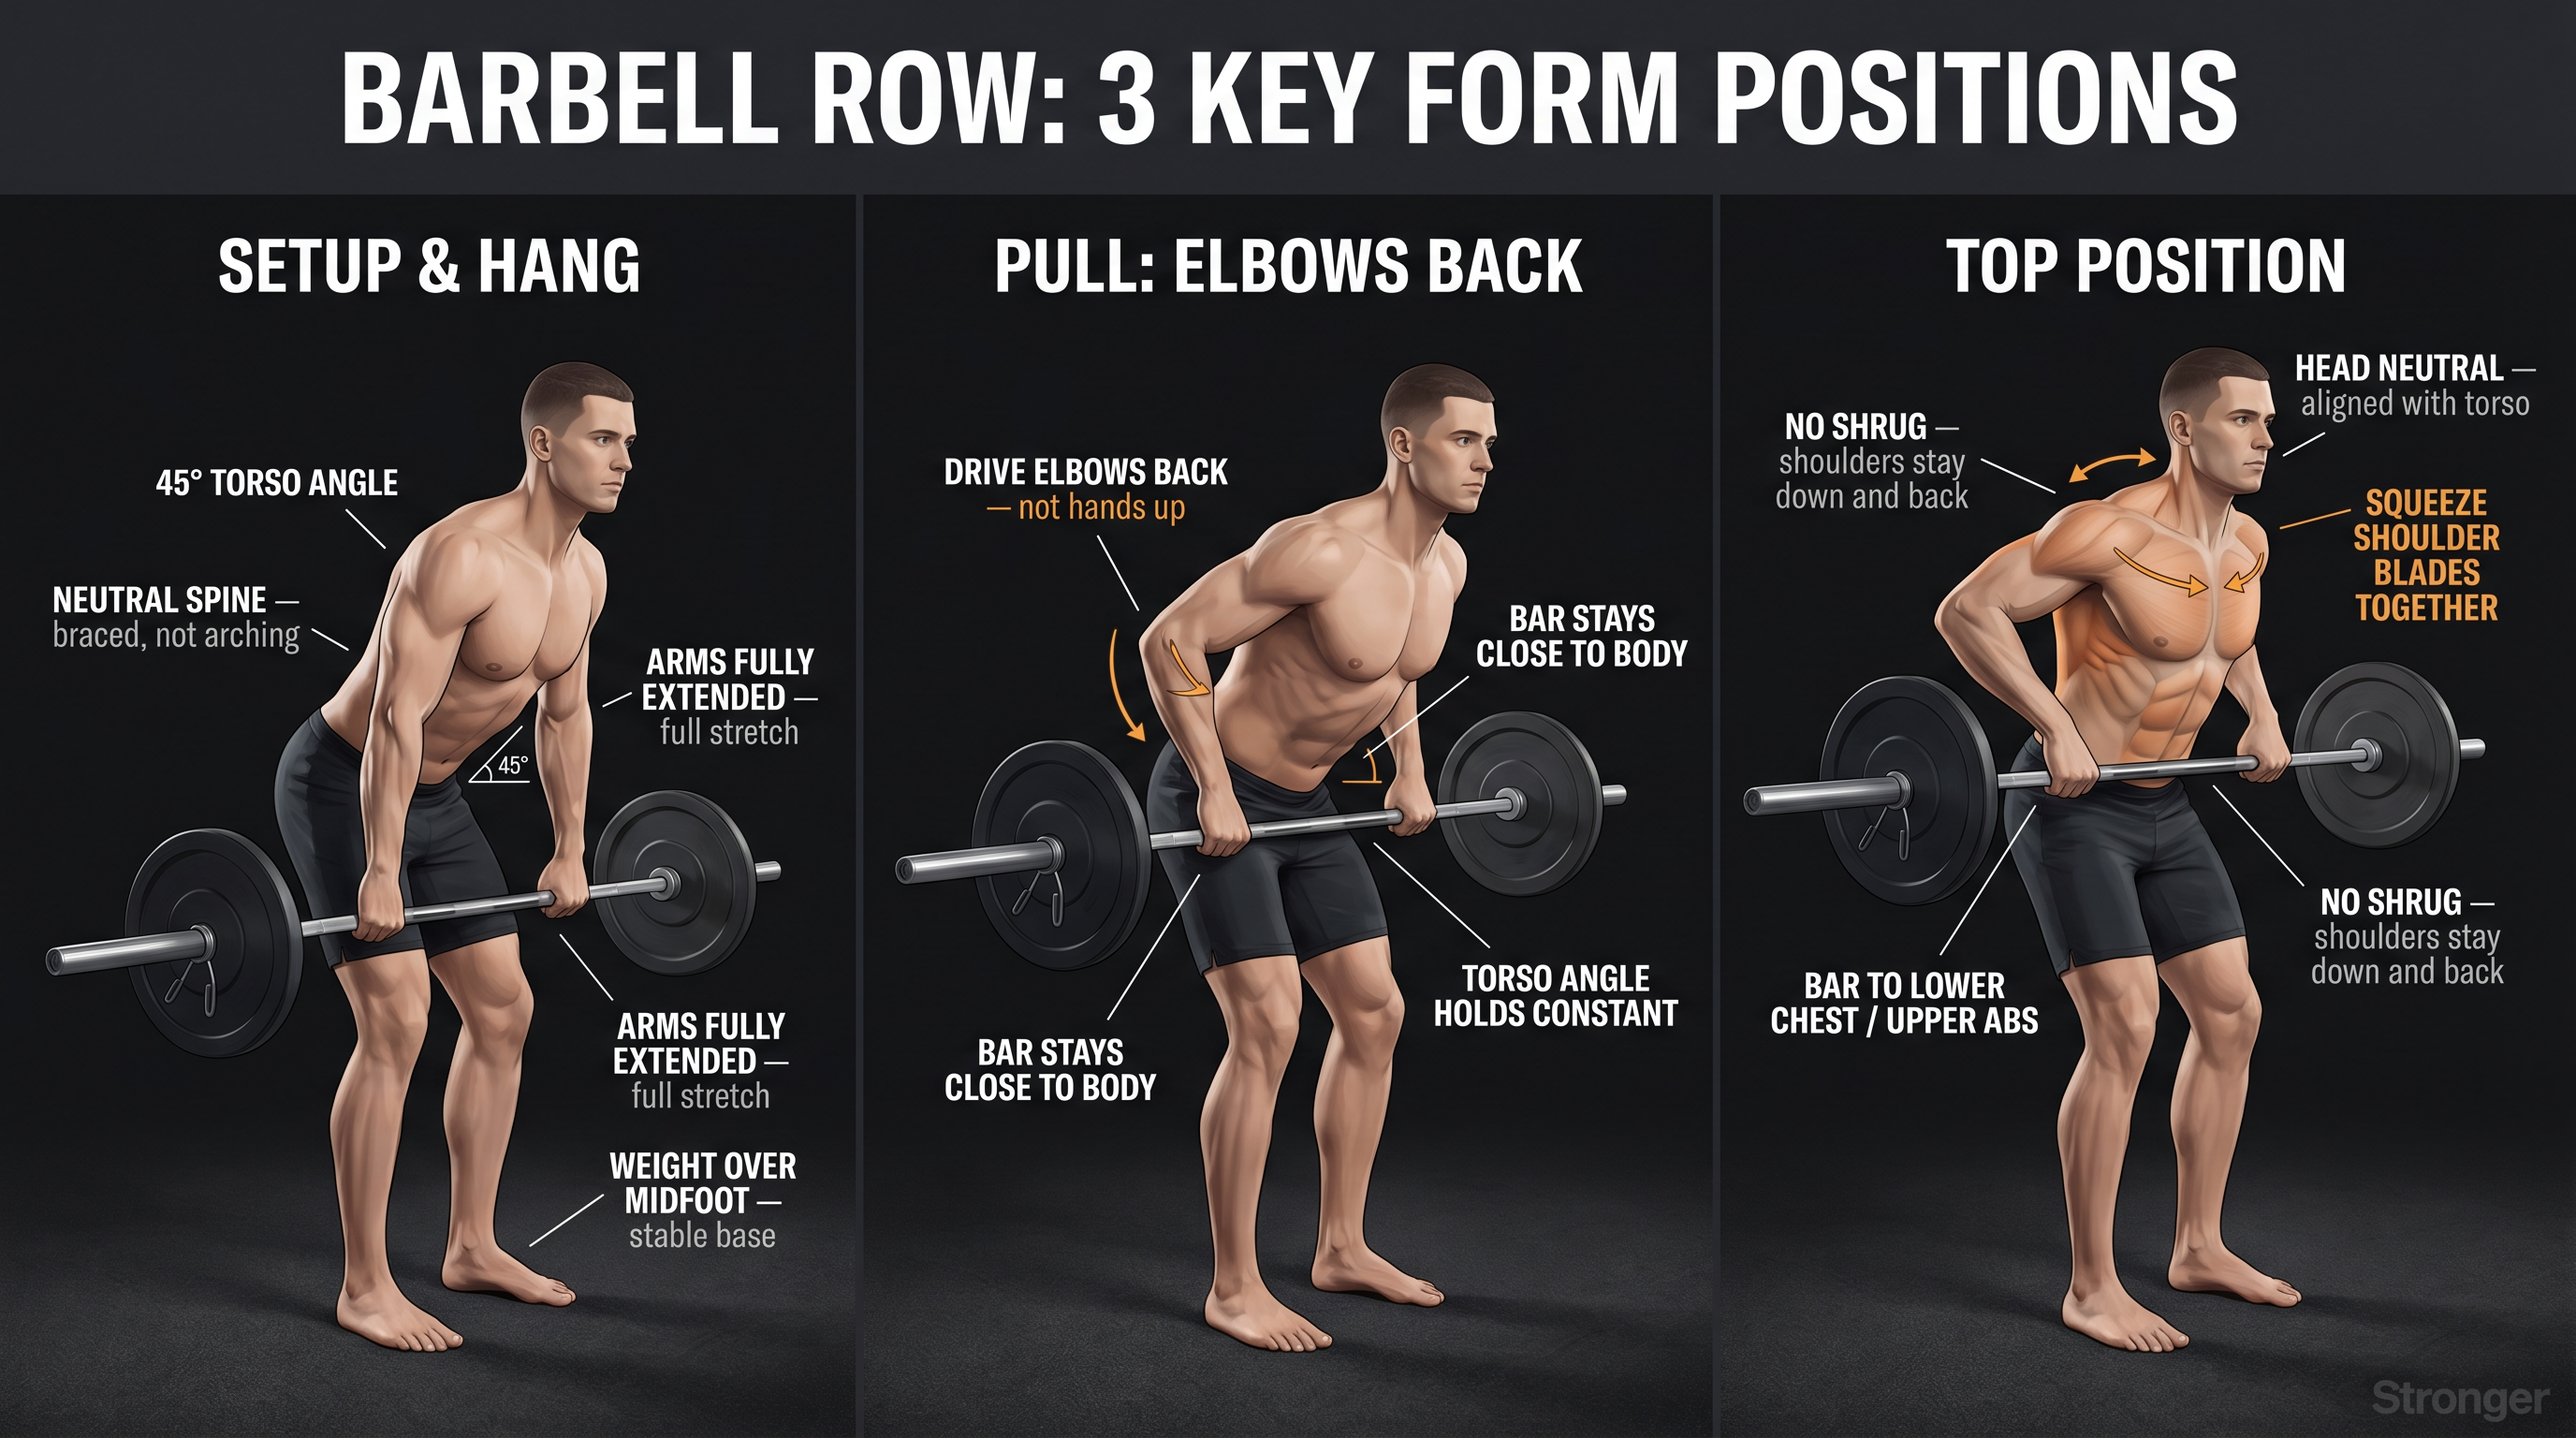
Step 1: Set Your Stance
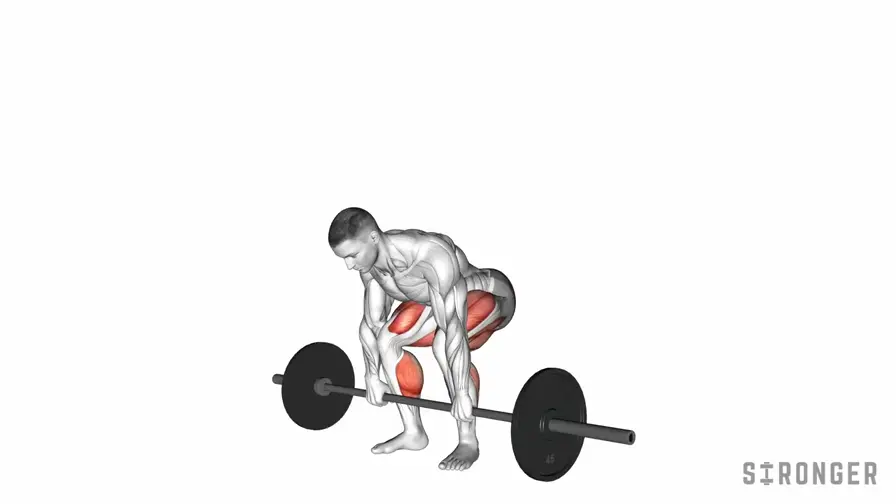
Stand with your feet roughly hip-width to shoulder-width apart. This is the same general stance you'd use for a Romanian deadlift or conventional deadlift — it does not need to be identical, but the underlying principle is the same: a stable, balanced base.
Your weight should stay balanced across the midfoot. If you feel yourself tipping forward onto your toes, the bar is drifting away from your body or your hinge is unstable.
Step 2: Grip the Bar
Start with a double overhand grip slightly wider than shoulder-width. This is the cleanest default for learning the movement.
A useful width check: when the bar reaches your torso at the top of the rep, your forearms should be roughly vertical from the front. Too wide and the bar travels a shorter range. Too narrow and your hands crash into your torso before the muscles have fully contracted.
Step 3: Hinge, Don't Squat
Push your hips back and let your torso hinge forward. Bend your knees slightly — but do not turn the setup into a squat. This is a hinge, not a squat with the bar in front.
For the standard barbell row, aim for a torso angle around 45 degrees to the floor. This is the torso angle described in Stronger's barbell row guidance and consistent with what Healthline's form guide recommends as the standard starting position. (Healthline)
A more horizontal torso makes the row stricter and usually harder on the hinge. A more upright torso lets you use heavier weight but reduces range of motion and shifts the exercise toward a Yates-style row. Either can be the right choice — the 45-degree default just gives most lifters the best balance of load, range, and back activation.
Step 4: Brace Your Trunk
Before the first rep, take a breath into your torso — expand your chest and abdomen — then brace as if you are about to be punched.
Think:
- Ribs down, not flared up
- Abs tight around the whole circumference
- Chest proud (not hunched)
- Spine neutral (natural curve maintained, not hyperextended)
- Head in line with your torso, not craned upward
Your lower back should not be the moving part. It should be the platform everything else operates from.
Step 5: Let the Bar Hang
Start each rep with your arms fully extended. Allow the shoulder blades to reach forward slightly — but do not let your lower back round to accommodate this.
Full range of motion means allowing the shoulder blades and arms to travel without collapsing the torso. These are two separate things: your spine stays neutral while your shoulder girdle gets the full stretch.
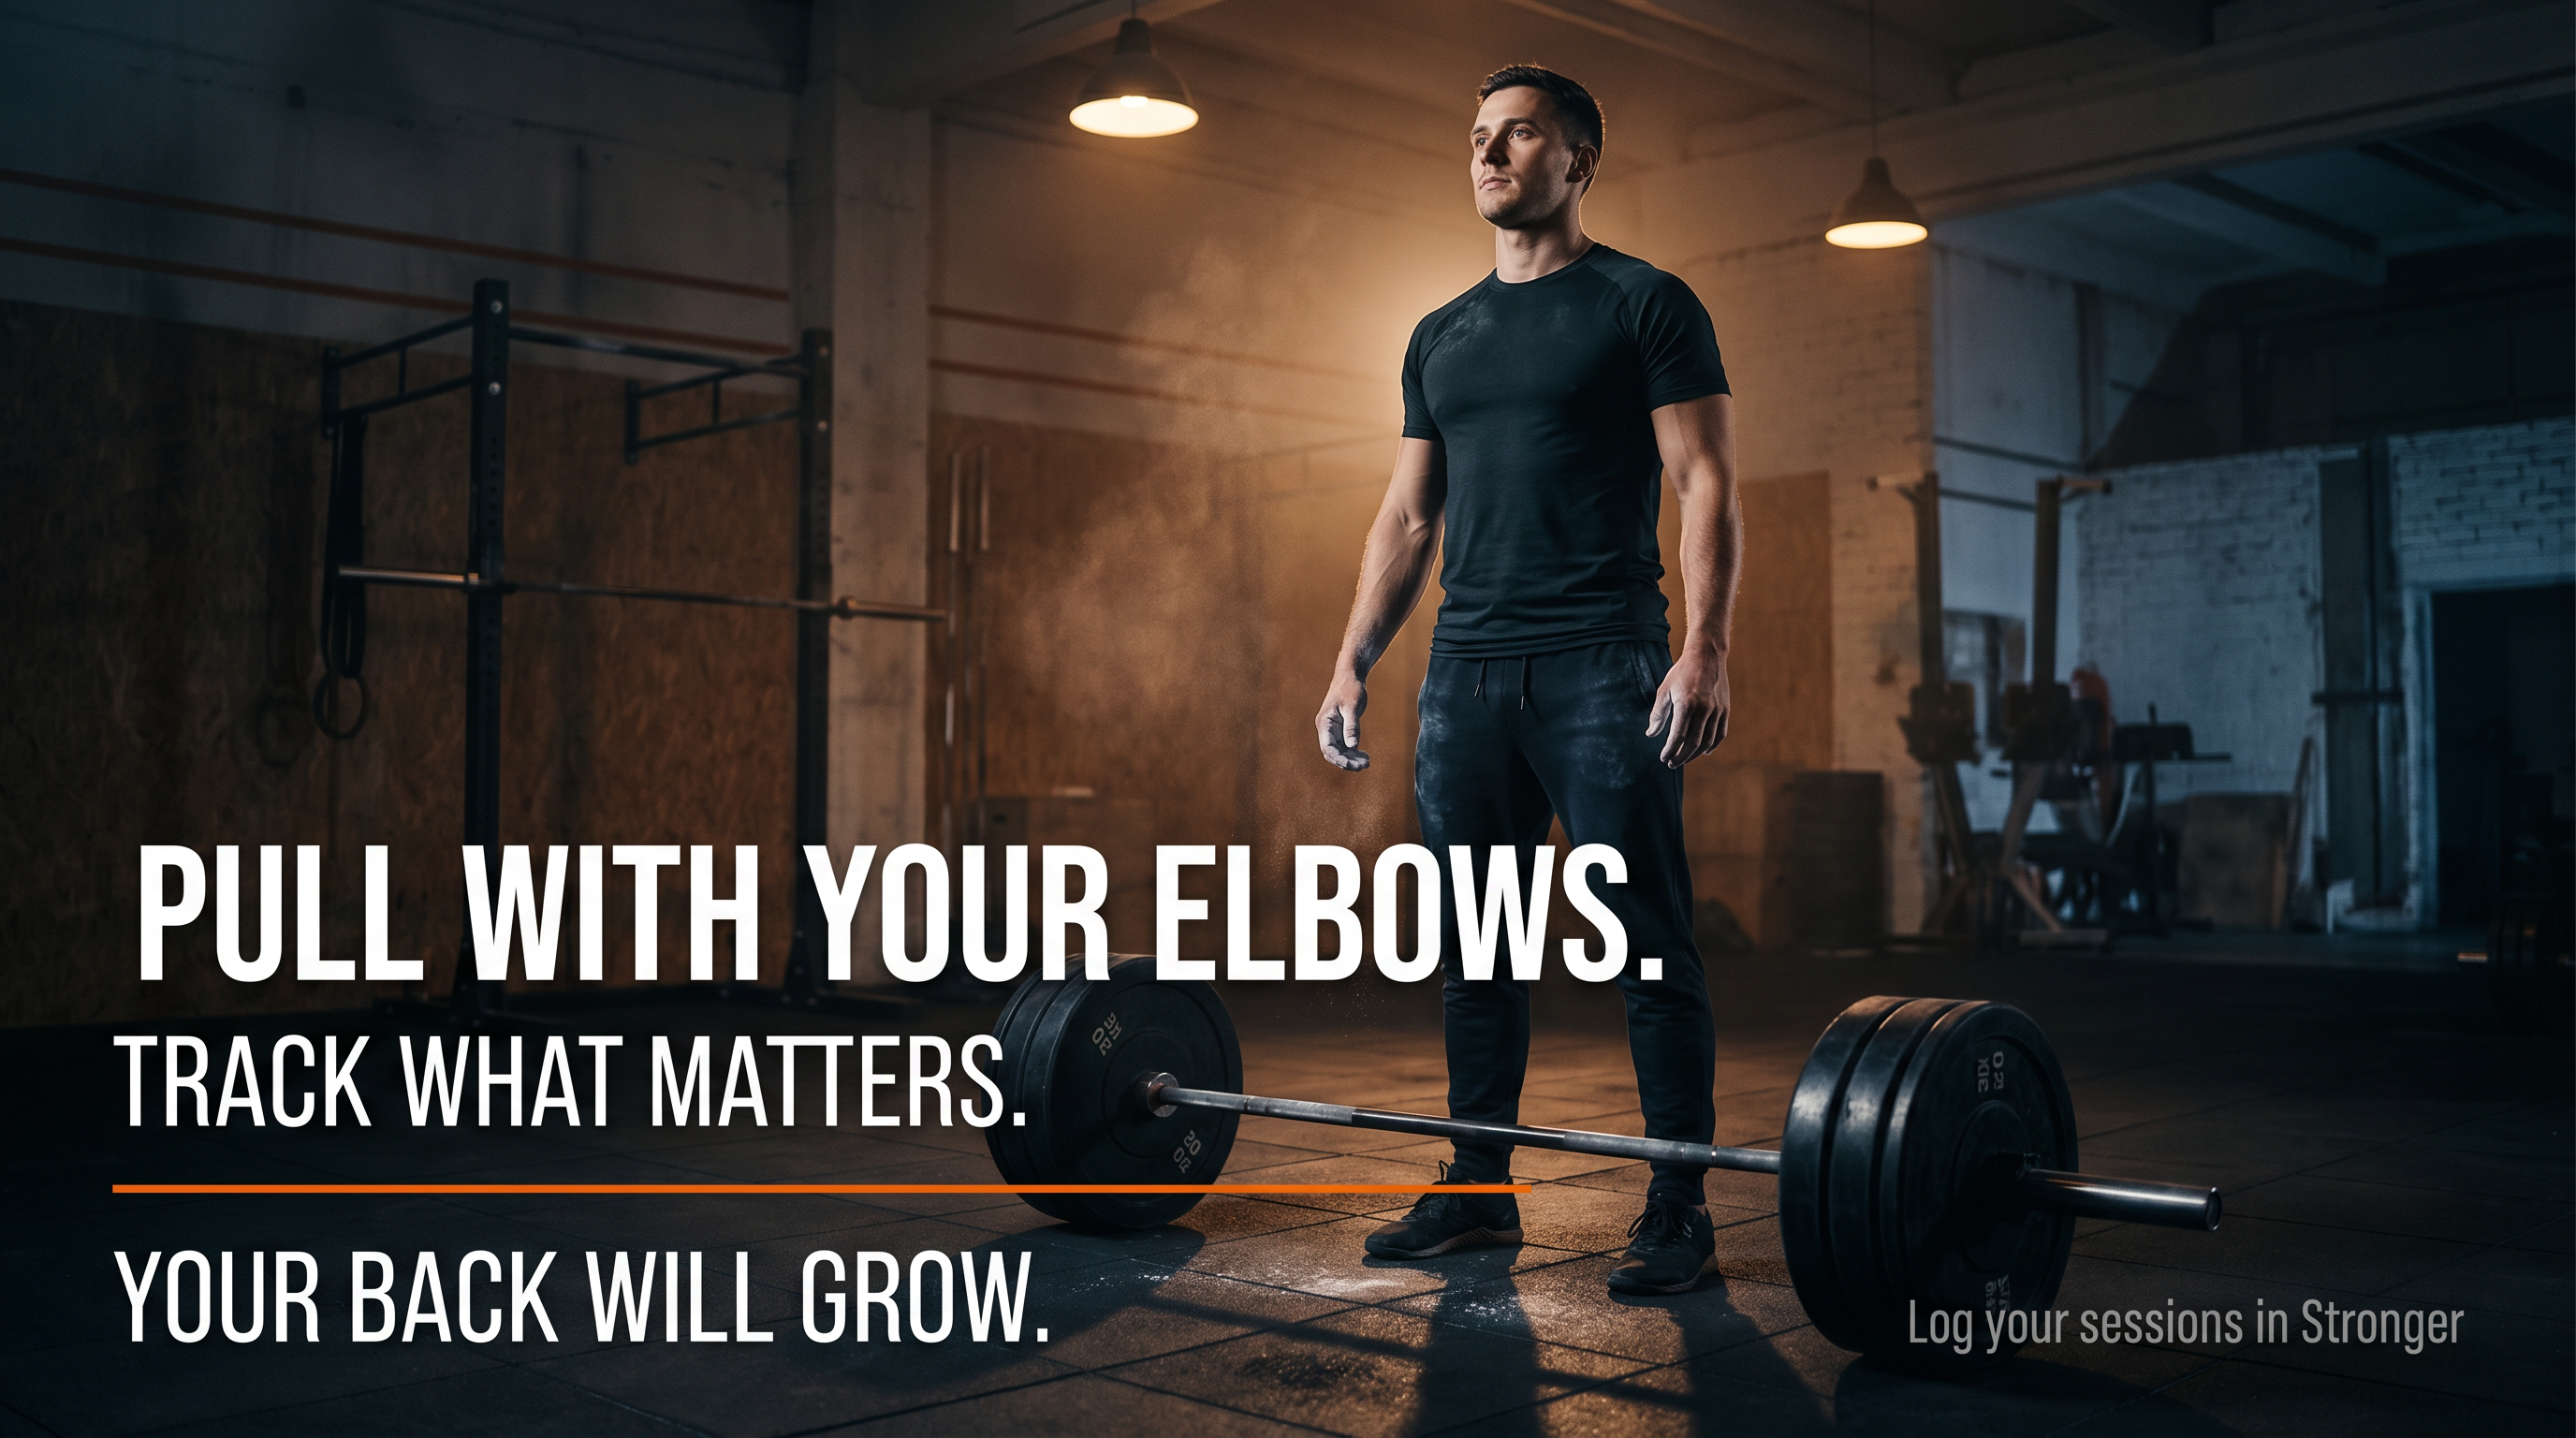
Step 6: Pull With Your Elbows
Drive your elbows back, not your hands up.
That single cue changes how most lifters row. When you think "elbows back," the back muscles initiate the pull. When you think "lift the bar," the biceps and forearms take over.
For the standard overhand barbell row, pull the bar toward your lower chest, lower ribs, or upper abs. The exact touch point depends on your torso angle, arm length, grip width, and goal. At the top, squeeze your shoulder blades together without shrugging your shoulders toward your ears.
Step 7: Lower Under Control
Lower the bar until your arms are fully extended. Do not drop the bar, bounce it off your torso, or relax your brace between reps.
A useful tempo for most lifters:
- 1 second up
- brief pause at the top
- 2 seconds down
- reset your brace if needed before the next rep
If you cannot lower the weight under control for every rep of every set, the load is too heavy for strict rows.
Barbell Row Form Checklist
| Form point | What it should look like | Common mistake |
|---|---|---|
| Stance | Feet hip-width to shoulder-width | Too wide, unstable, or shifting |
| Torso angle | About 45° for classic rows | Standing up every rep |
| Spine | Neutral and braced | Lower back rounding |
| Bar path | Close to the body | Bar drifting forward away from legs |
| Pull cue | Elbows drive back | Curling with the hands |
| Top position | Shoulder blades squeeze together | Shrugging into the neck |
| Bottom position | Arms fully extended | Half reps |
| Tempo | Controlled on the way up and down | Jerking, bouncing, or dropping |
| Load | Heavy enough to challenge form | So heavy the row becomes a cheat rep |
Stronger's barbell-row page highlights several of these same form priorities: avoid body English, keep torso angle consistent, row toward the lower chest or upper abs, maintain a flat back, and fully extend at the bottom of each rep.
That's the movement done right. Here's what breaks it.
5 Biggest Barbell Row Mistakes (and How to Fix Them)
Mistake 1: Using Hip Drive Instead of Back Muscles
A small amount of body movement happens on heavy rows, especially for experienced lifters. That is normal. But if your torso starts at 45 degrees and finishes nearly upright by the end of the rep, you are not rowing the weight — you are heaving it.
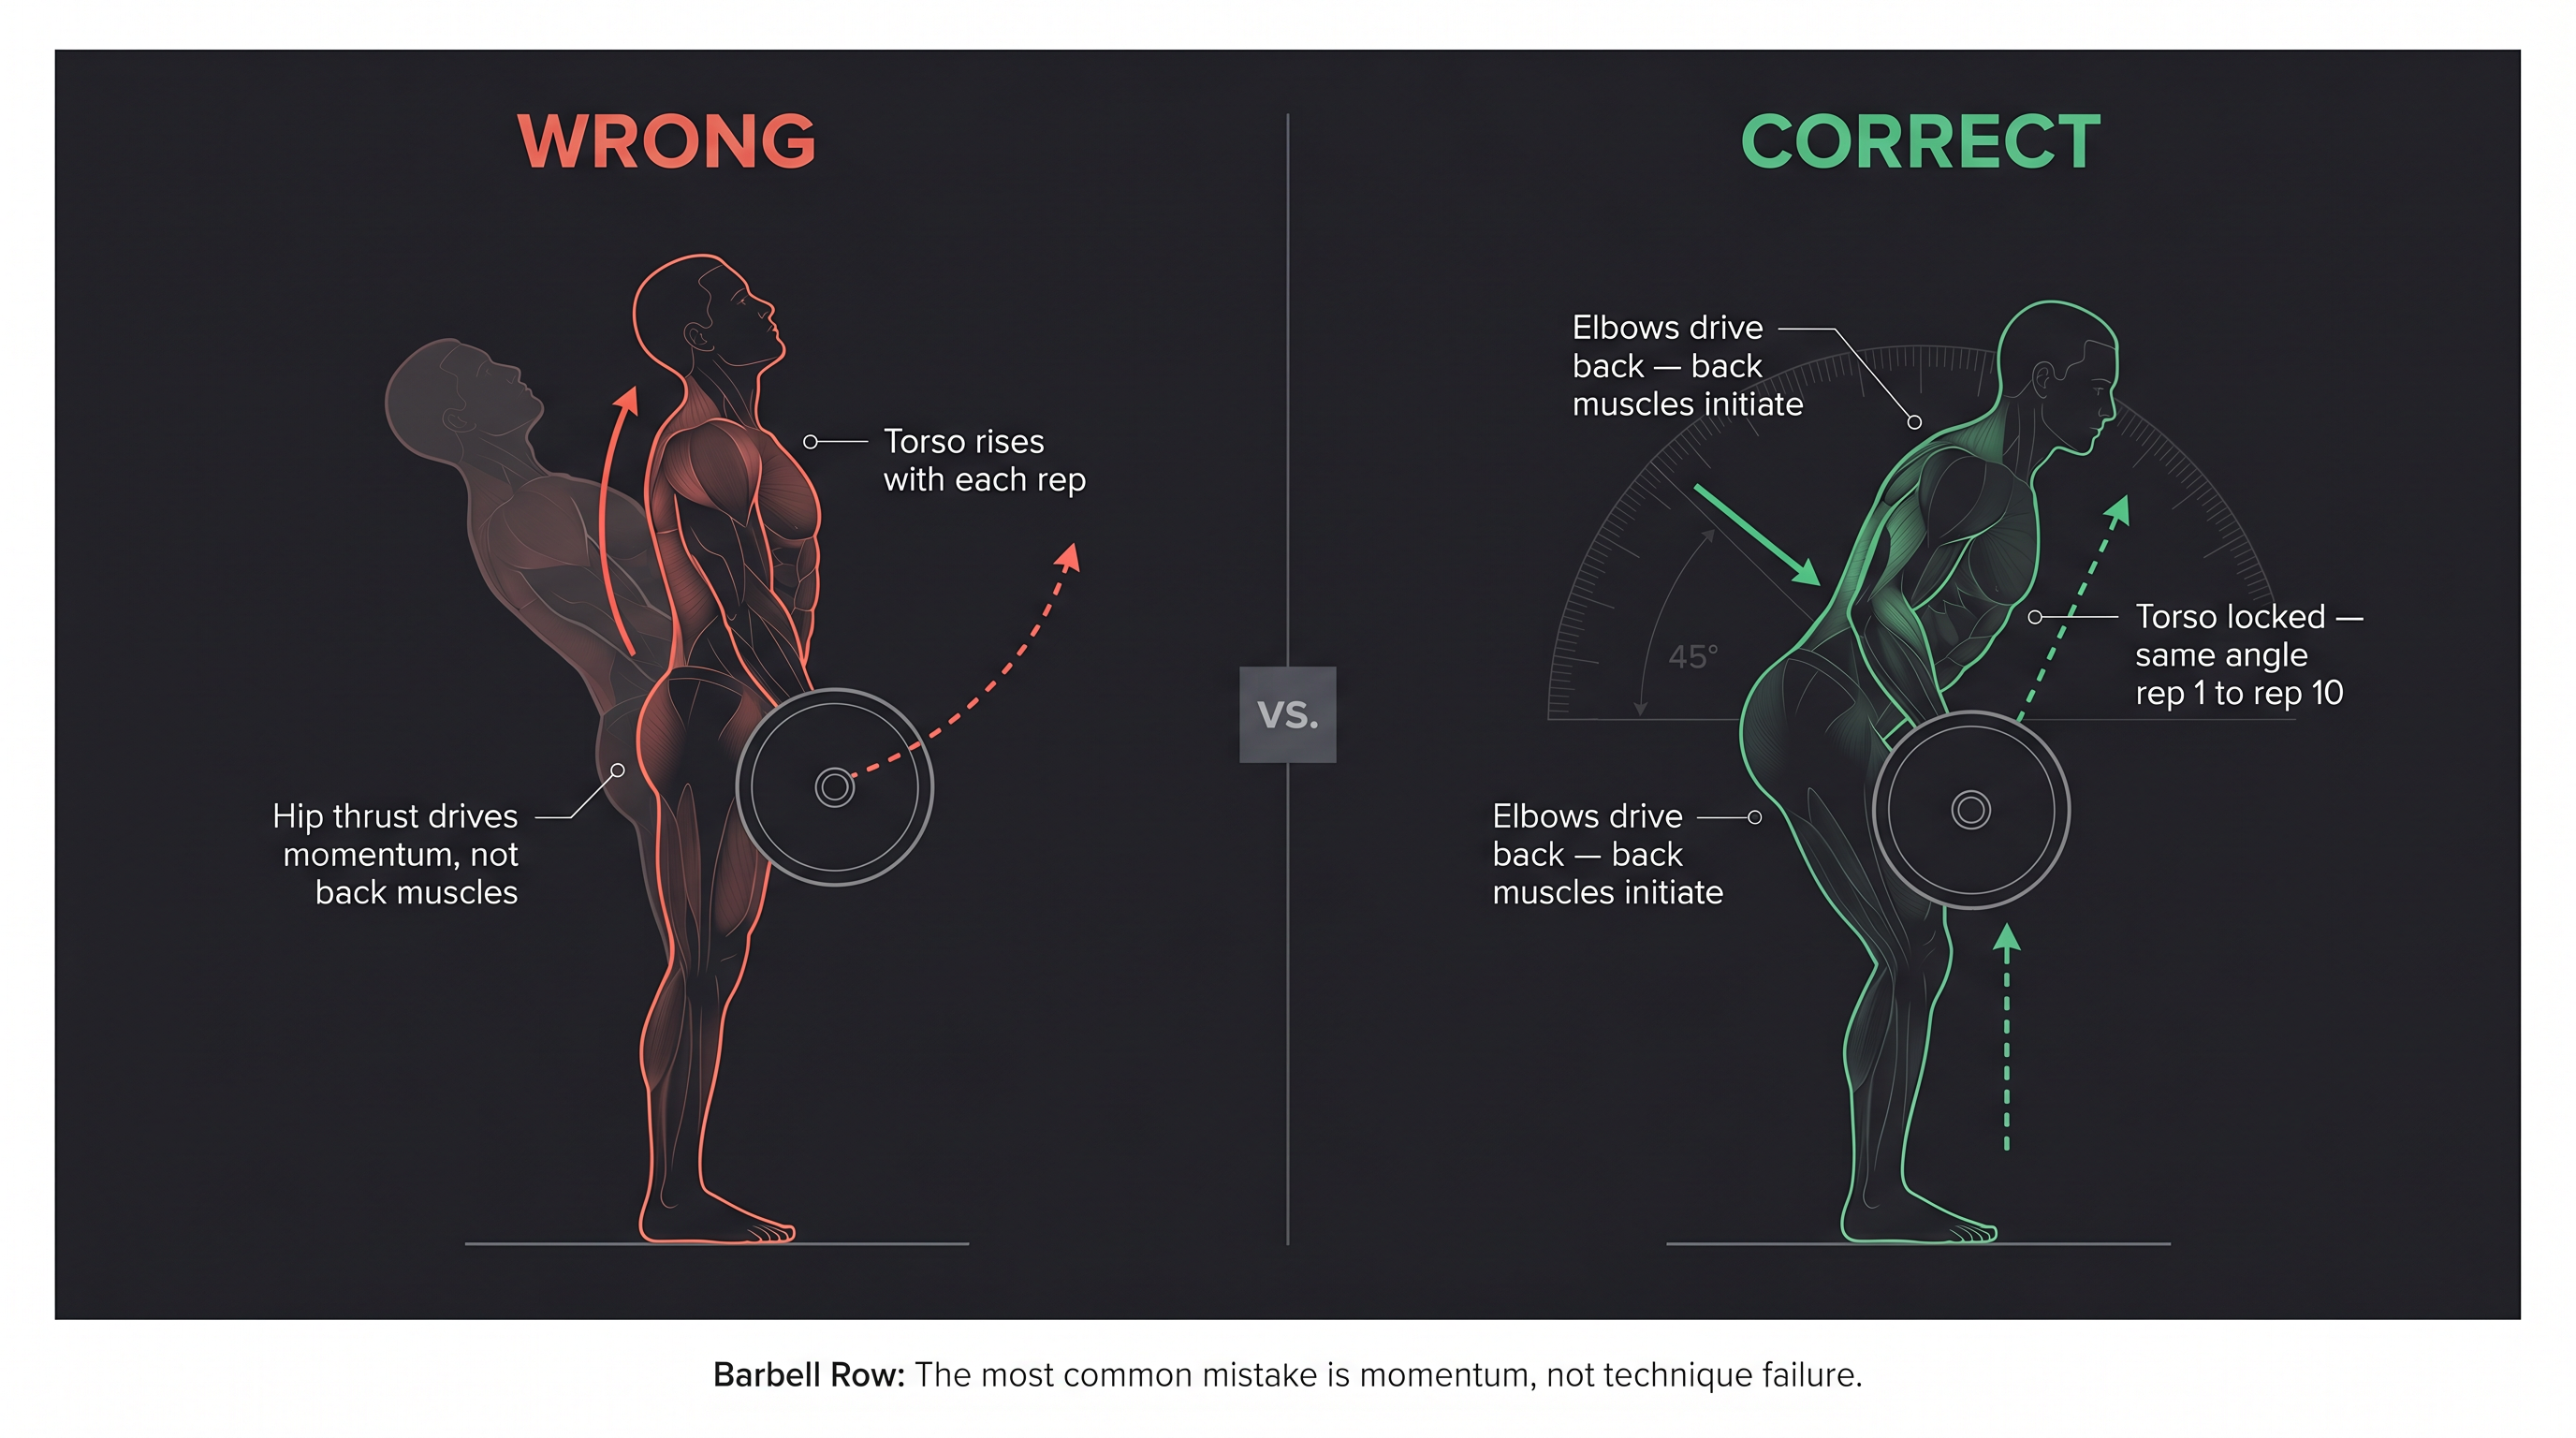
Fix: Reduce the weight. Imagine your hips and lower back are locked in place while only your arms and shoulder blades move. Video yourself from the side — if the torso moves, the set is too heavy for the goal.
Mistake 2: Lower Back Rounding on Barbell Rows
The bent-over position demands real stability from your trunk and spinal erectors. If you cannot maintain a neutral spine, the load is too heavy, your hinge is too deep, or you need a supported variation.
Fix: Brace harder before each rep. Bend your knees slightly more. Push your hips back further. Use a higher torso angle. If none of this solves it, switch to a chest-supported row, dumbbell row, or inverted row until your hinge is stronger.
A 2009 study by Fenwick, Brown, and McGill comparing rowing exercises found the standing bent-over row created high back-muscle activation but also higher lumbar loading than some supported alternatives. That is not a reason to avoid the movement — it is a reason to choose the variation that fits your spine tolerance and not push through form breakdown. (backfitpro)
Mistake 3: Feeling Rows in Your Biceps, Not Your Back
Your biceps are always involved in rowing — this is unavoidable and fine. But if your biceps fail before your back feels like it worked, something is off: the pull cue, the elbow path, or the load.
Fix: Think "elbows back" instead of "hands up." Keep your wrists neutral throughout. Use lifting straps on heavy back-focused sets if grip or forearm fatigue is pulling you away from the target muscles. Stronger's barbell-row guidance also recommends straps on heavier sets when grip is limiting back development.
Mistake 4: Shrugging Instead of Retracting Your Shoulder Blades
If the bar moves because your shoulders rise toward your ears, your upper traps and neck are doing the work the mid-traps and rhomboids should be doing.
Fix: Pull your elbows back and slightly down. Keep your neck long. Cue "shoulder blades together," not "shoulder blades up."
Mistake 5: Focusing on Grip Instead of Elbow Path
This is the most common conceptual mistake, and understanding it unlocks the entire grip section below.
Lifters spend enormous energy debating overhand vs underhand, wide vs narrow, straps vs no straps — when the variable that actually changes which muscles get trained is mostly elbow path and shoulder angle, not hand orientation.
A Stronger by Science review of rowing research explains this precisely: grip affects rows mainly because it changes shoulder movement and elbow position, not because a palm-up or palm-down grip directly targets a specific muscle.
Speaking of grip — the answer is more nuanced than most people assume.
Ready to Get Stronger?
Join 2,000,000+ lifters tracking their workouts with Stronger. Available on iOS and Android.
Which Barbell Row Grip Is Best?
The short answer: for most lifters starting out, a slightly wider-than-shoulder-width overhand grip is the best default. It is easy to standardize, works well for overall back development, and keeps the movement strict.
But grip choices should be made based on goals, not habits. Here's how to think about it.
Elbow Path: The Rule That Determines Muscle Emphasis
Before the grip table, internalize this:
Elbows closer to your torso = more lat-focused. Elbows more flared out from your torso = more upper-back and rear-delt focused.
This is not absolute — your lats still work on wide rows, your traps still work on close rows. But the rule is useful because it focuses on joint motion rather than hand position.
A row with elbows tucked close to your ribs primarily involves shoulder extension. A row with elbows flared out involves more shoulder horizontal extension. Stronger by Science explains that grip width is mainly a tool for changing shoulder and elbow motion, and that those joint actions determine muscle emphasis.
The grip you choose mostly matters because it influences elbow path. Once you understand that, the entire grip debate simplifies.
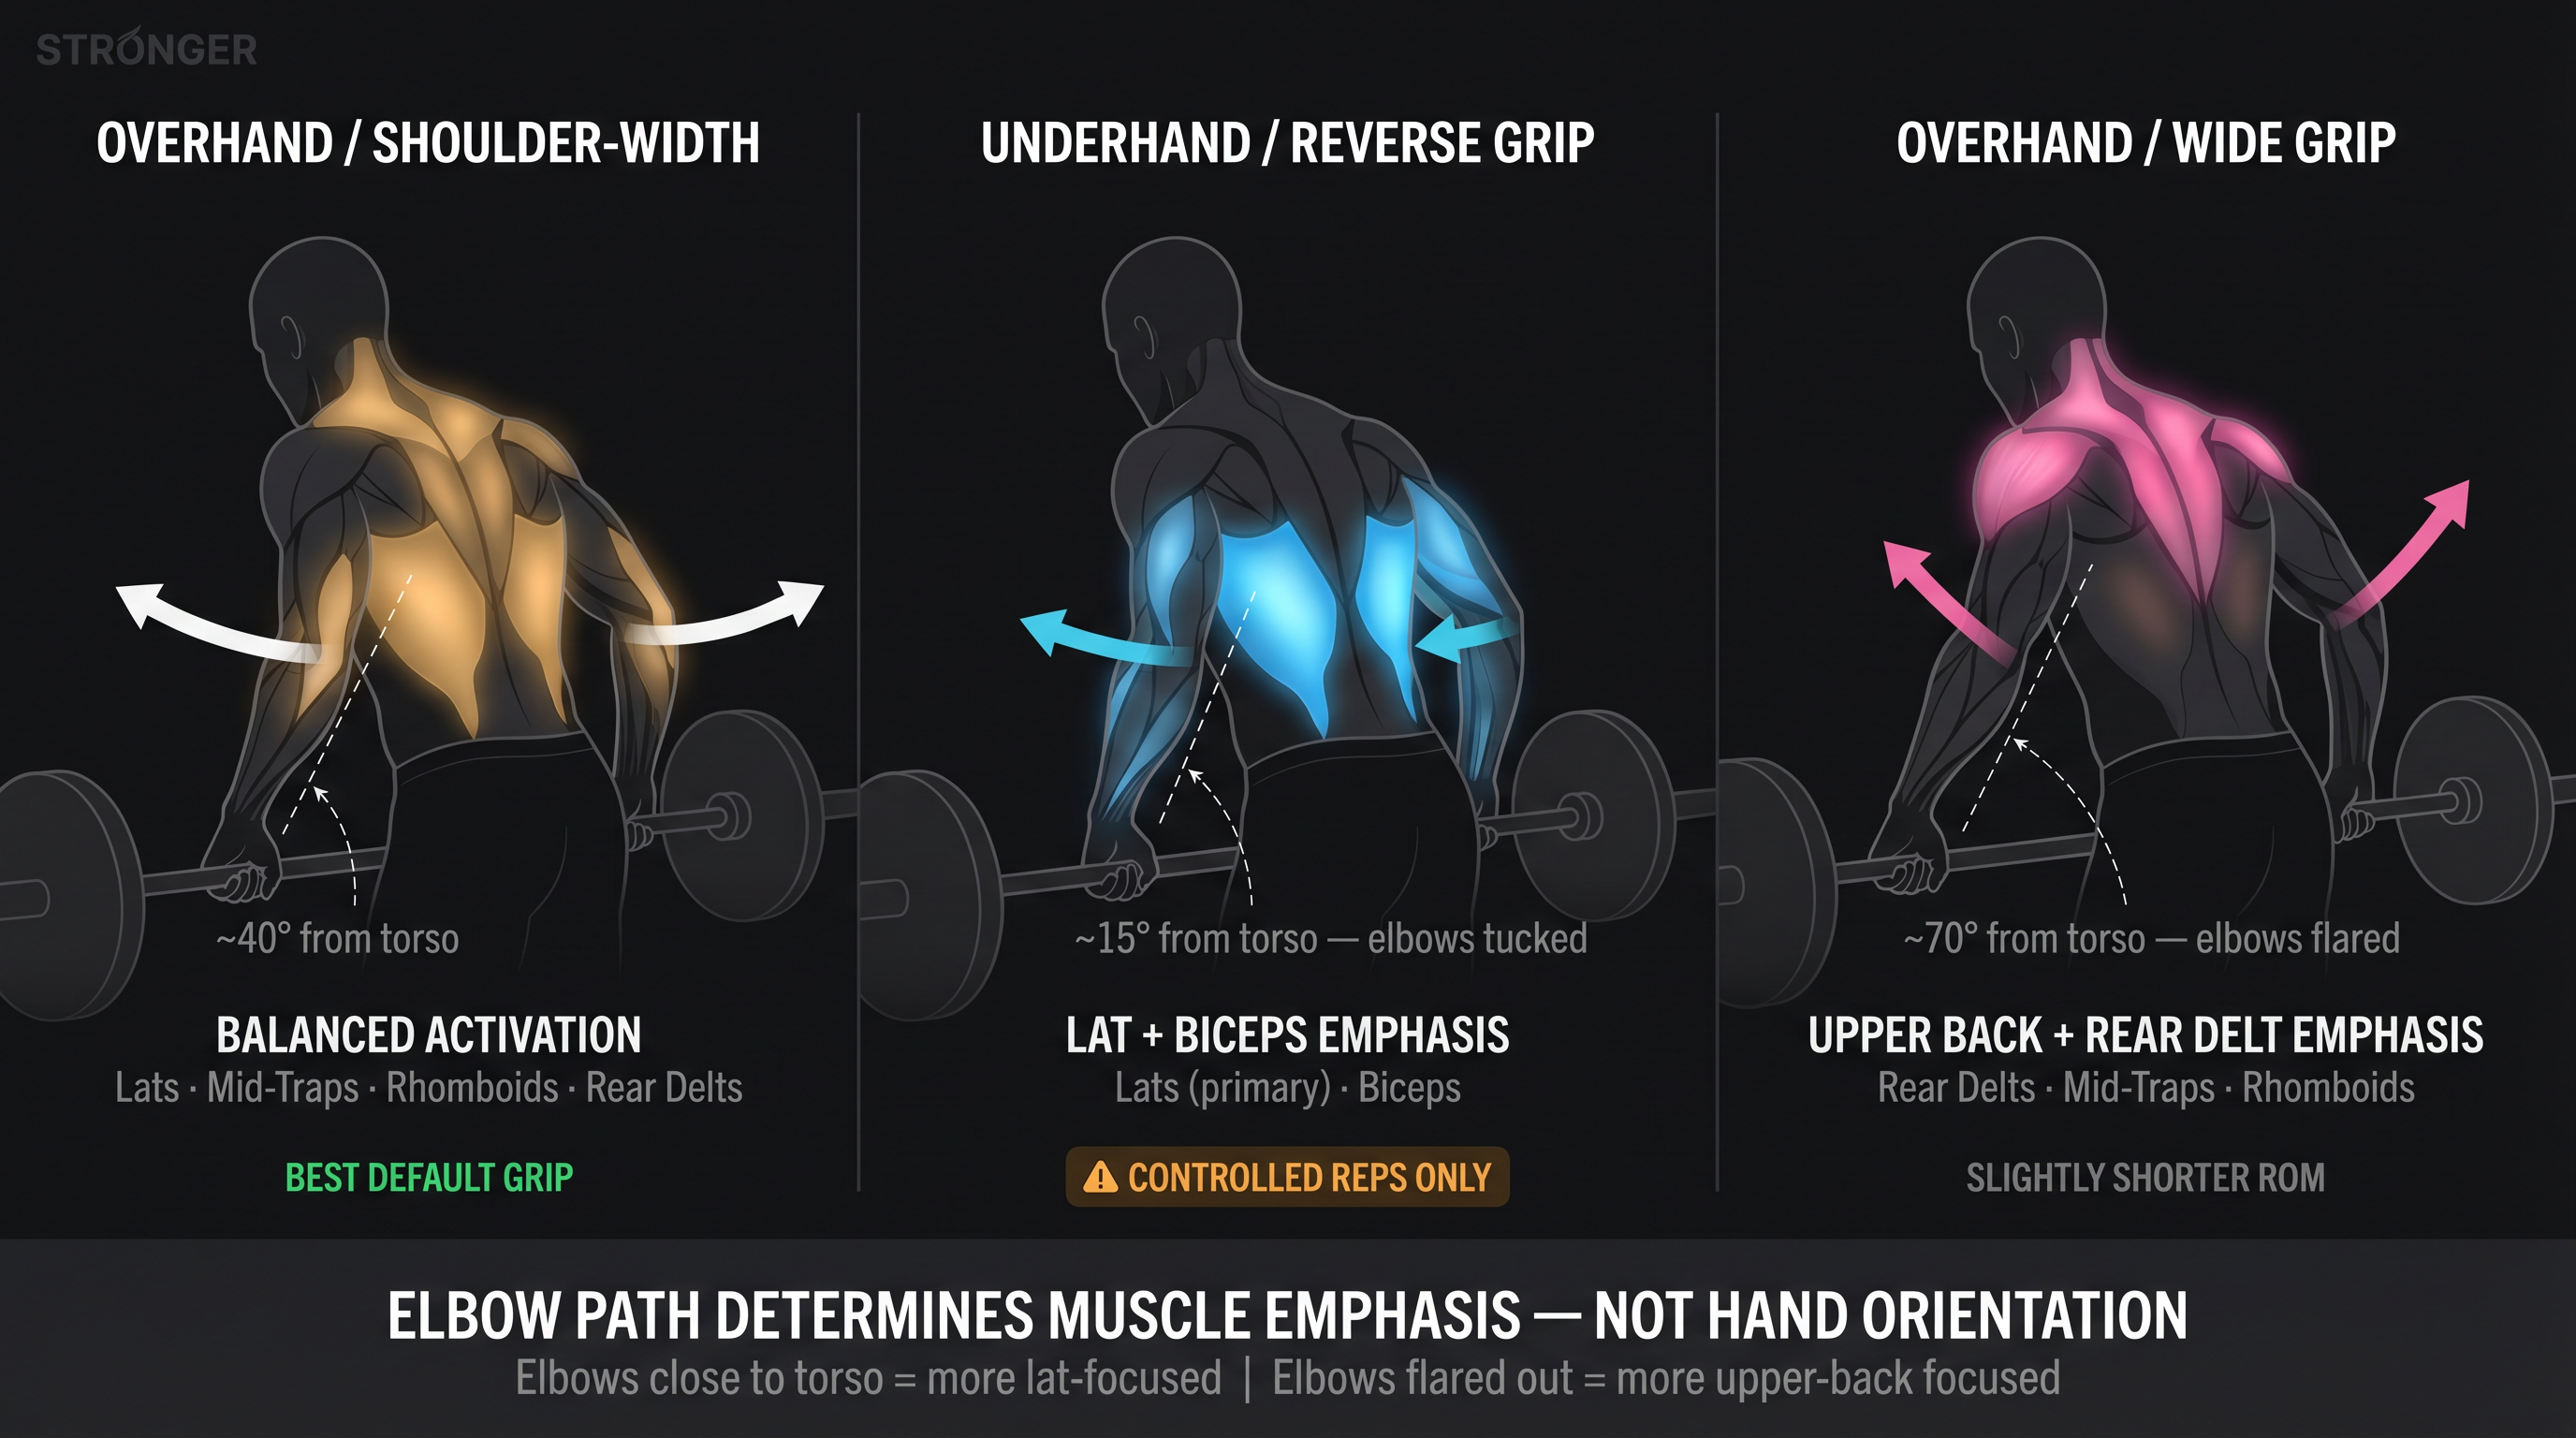
Barbell Row Grip Options Compared
| Grip | Best for | How it changes the row | Programming note |
|---|---|---|---|
| Overhand, shoulder-width | General back strength | Balanced lats, traps, rhomboids, rear delts | Best default |
| Overhand, wide | Upper back, rear delts, mid-traps | More elbow flare, slightly shorter ROM | Use lighter loads and strict form |
| Underhand / reverse grip | Lats, biceps, lower pull path | Elbows tuck closer, often more ROM | Moderate loads; avoid aggressive jerking |
| Narrow grip | Lat-focused rowing, heavier loading | Elbows stay closer to torso | Usually better with landmine or T-bar setup |
| Straps | Back emphasis when grip limits you | Reduces forearm fatigue as a bottleneck | Useful on heavy or high-rep sets |
Overhand Grip Barbell Row: When to Use It
This is the standard version. Use it as your baseline before experimenting with alternatives.
Grip slightly wider than shoulder-width. Elbows track roughly 30–60 degrees from your torso depending on your goal and comfort. Pull toward the lower chest or upper abs.
Best for:
- Learning the movement
- Building overall back thickness
- Balancing heavy pressing volume
- Training strict scapular retraction
- Loading the row consistently session to session
Reverse Grip Barbell Row: Benefits and When to Use It
The underhand row — also called the reverse grip barbell row — uses a supinated grip with palms facing up. It typically encourages a lower pull path and more elbow tuck, and many lifters feel more lat engagement and biceps involvement with this version.
Stronger's reverse-grip barbell row guide describes this as a shoulder-width supinated grip row pulled toward the lower abdomen, with secondary emphasis on lats, biceps, and forearms. (Stronger)
Use it if:
- You struggle to feel your lats with overhand rowing
- Overhand rows irritate your shoulders
- You want a row that naturally pairs with upper-back-heavy work
- Your primary goal is hypertrophy over maximum loading
One important caution: a supinated grip increases biceps involvement, and the biceps tendon can be vulnerable under heavy load — especially if you jerk the bar from the bottom position. Keep reps controlled.
Wide-Grip Barbell Row: Muscle Activation and Benefits
A wide overhand grip makes the row more upper-back dominant by forcing elbow flare and shifting the shoulder movement toward horizontal extension.
Here is where current research adds an interesting wrinkle. A 2025 surface electromyography study from Northumbria University compared narrow and wide grips in the bent-over barbell row and found greater latissimus dorsi activation with the wide grip in 20 active male university students at 60% of their 1RM. (northumbriajournals.co.uk)
This is the opposite of the "close grip = more lats" convention. What does it mean in practice? Probably that grip width and elbow path interact in a way the conventional rule oversimplifies, and that individual anatomy plays a role. The study was small (n=20), so treat the finding as a useful data point rather than a universal law.
Practical guidance: do not assume wide grip "turns off" your lats. Use wide-grip rows when you want more upper-back emphasis, can maintain strict form, and are comfortable with a slightly shorter range of motion.
Narrow Grip Barbell Row: Why T-Bar Rows Work Better
A close grip with a straight barbell is awkward for most lifters — your hands may hit your torso or upper legs before the movement is complete. If lat-focused narrow-grip rowing is your goal, it usually works better as a neutral-grip T-bar row, a landmine row, or a cable variation.
Stronger's T-bar row guidance notes that the fixed bar path of a T-bar setup can reduce stabilization demands and help lifters focus on back contraction — a practical advantage for close-grip, lat-biased work. (Stronger)
Should You Use Straps for Barbell Rows?
Use straps when your grip is the bottleneck, not your back.
If your forearms and hands fatigue before your lats, mid-traps, and rhomboids have been properly worked, straps remove that bottleneck. They are especially useful for high-rep sets, late-session rows after deadlifts or pull-ups, and underhand variations where grip comfort can be an issue.
Do not use straps if grip development is part of the training goal. A useful compromise: no straps for warm-up sets and the first working sets, straps only for the heaviest or most demanding sets in the session.
Barbell Row Grip: Key Takeaways
The takeaways from current evidence on grip and muscle activation: (northumbriajournals.co.uk)
- Grip matters, but elbow path determines more of the muscle emphasis than hand orientation alone.
- Wide grip can still train the lats — possibly as effectively as close grip in some populations.
- Underhand grip usually increases biceps involvement and shifts the pull path lower.
- Your best grip is the one you can keep consistent, control well, and progress over time.
- Full, controlled reps with good technique beat any grip manipulation used to compensate for poor form.
Now that you understand how grip and elbow path interact, here's how the major row variations change both.
Barbell Row Variations: Which One Is Right for You?
The barbell row is not a single exercise — it is a family of movements, each suited to different goals, anatomies, and program contexts. Here is what each variation does, who it is best for, and when to use or avoid it.
If you are new to rows, start with the standard version. Build the hinge and bar-path mechanics before experimenting with other options. A good progression: inverted row → chest-supported dumbbell row → dumbbell row → light barbell row → standard barbell row → Pendlay row or other advanced variations.
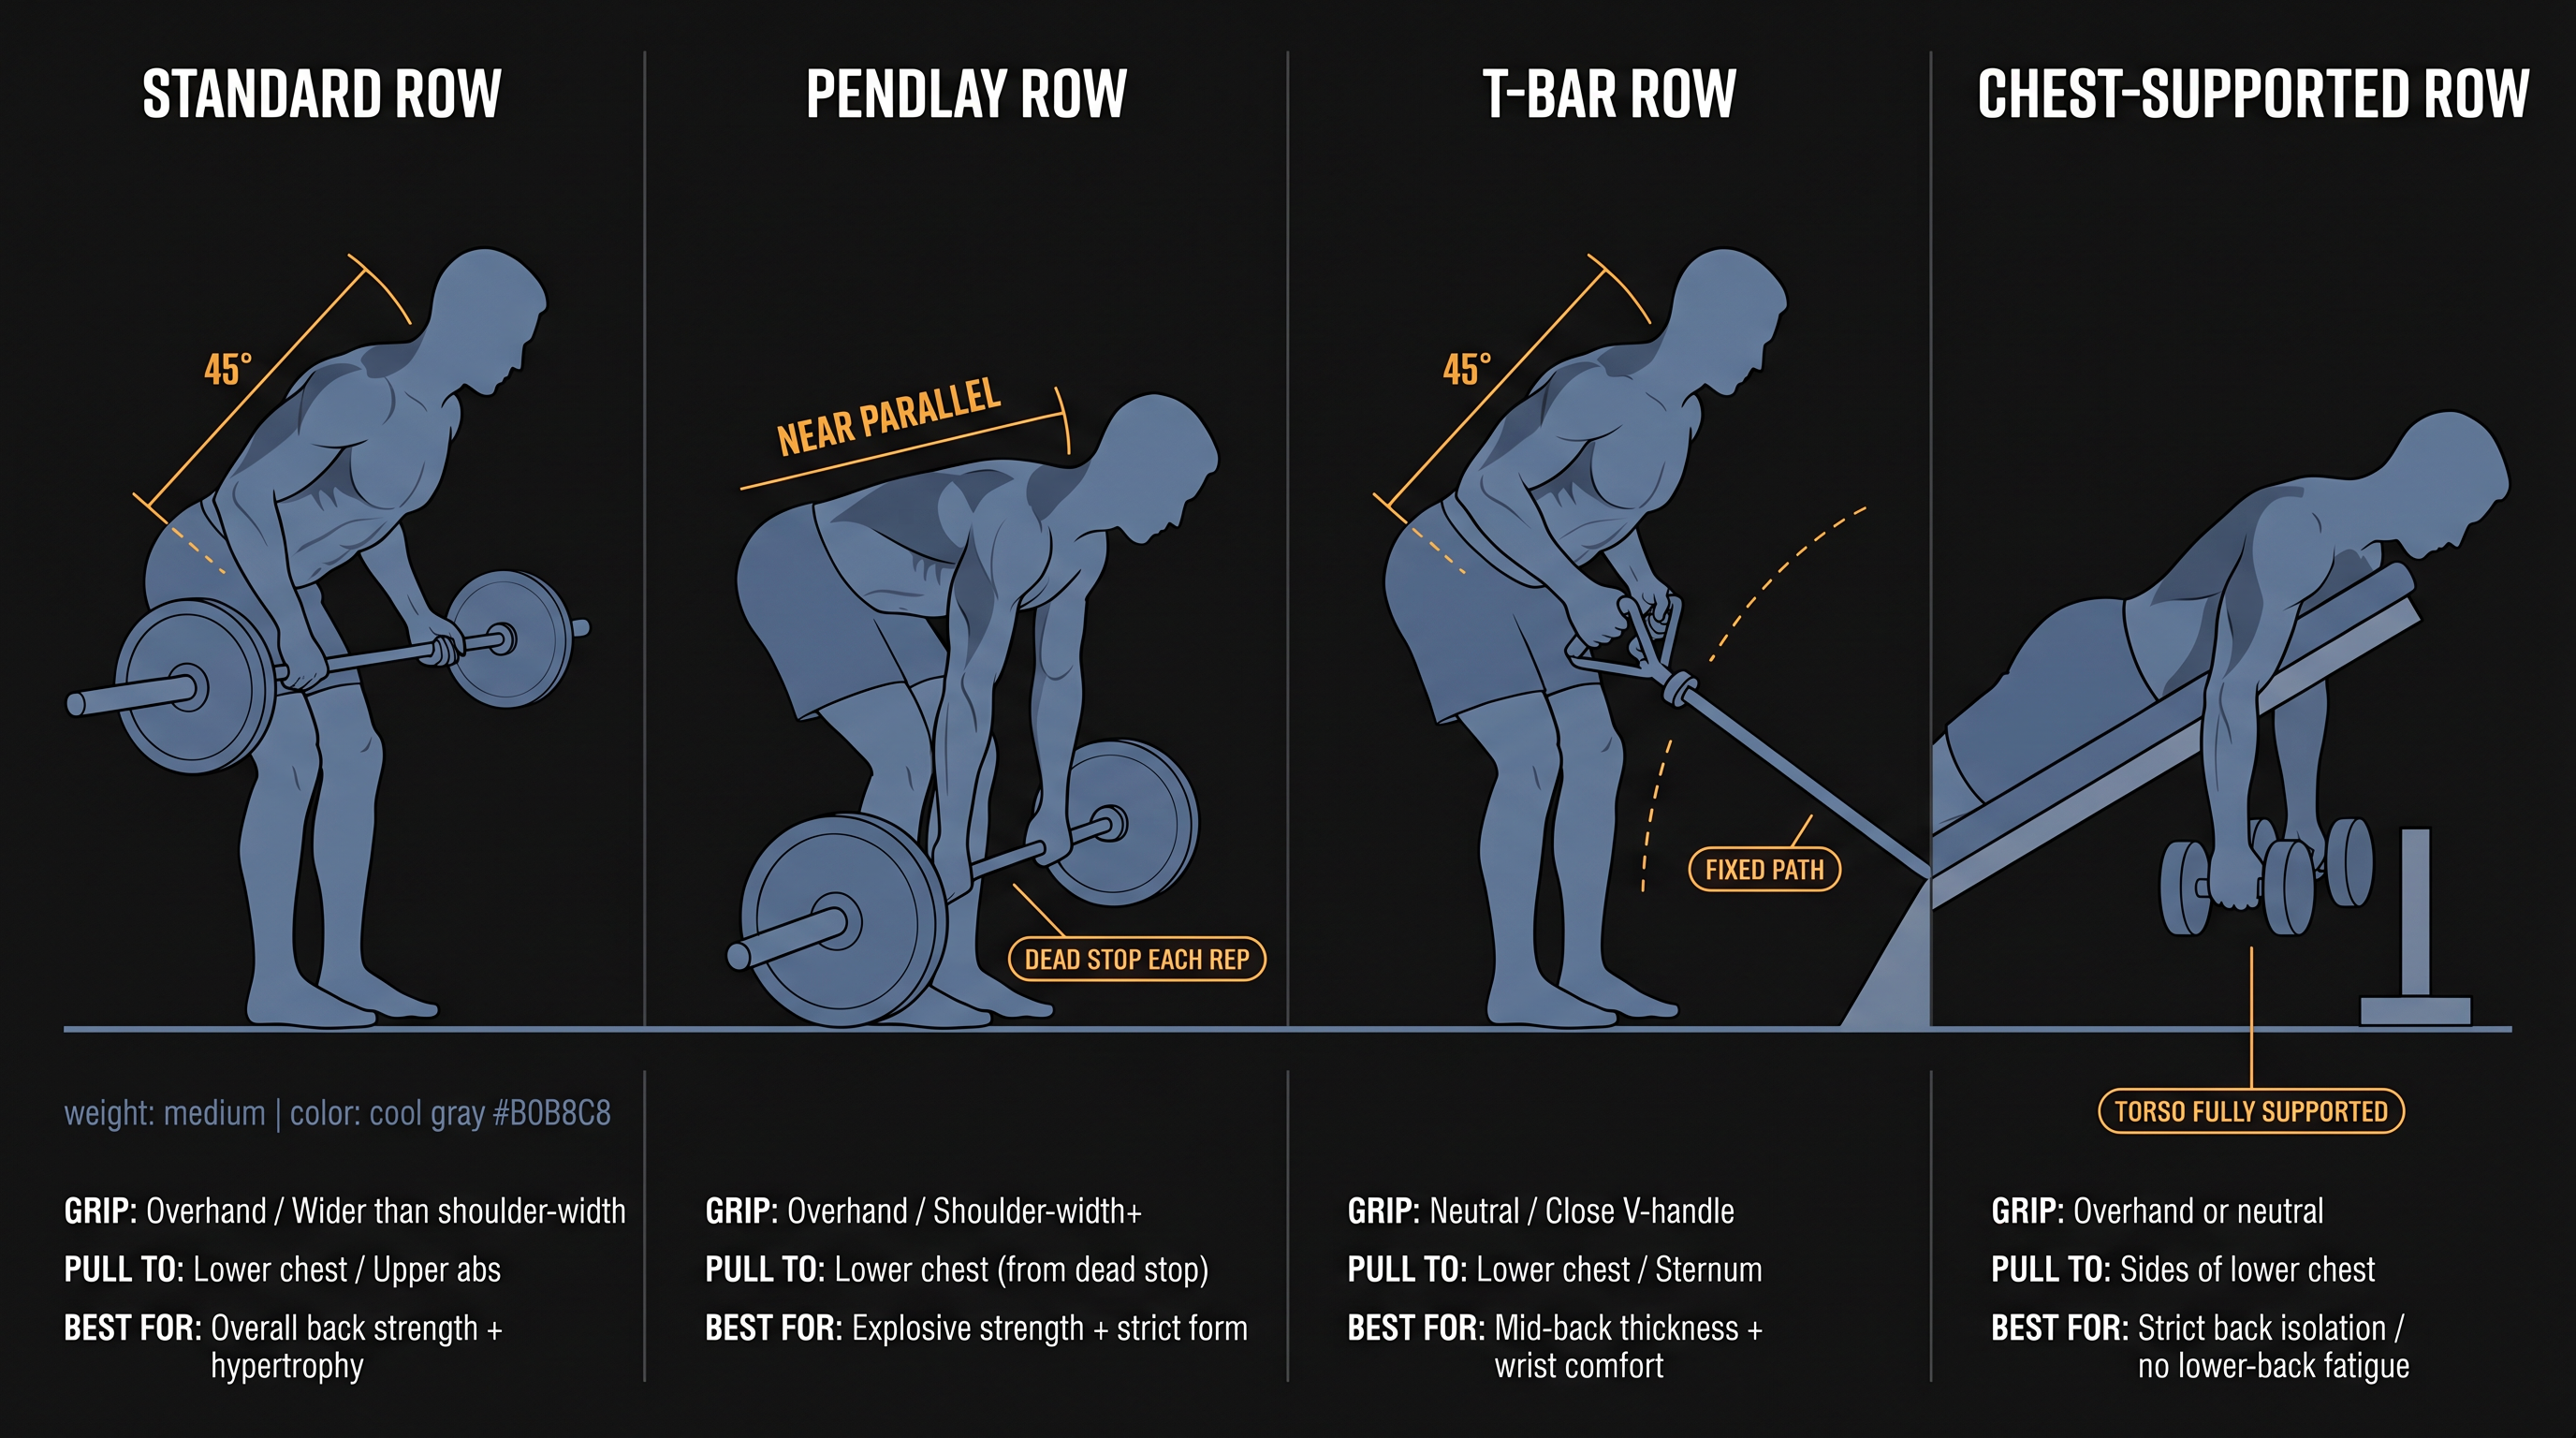
1. Standard Barbell Row: Best for Overall Back Strength
Best for: Overall back strength and hypertrophy Grip: Overhand, slightly wider than shoulder-width Torso angle: About 45 degrees Pull target: Lower chest or upper abs
This is the version most lifters should master first. It is strict enough to train the back effectively but not as technically demanding as a fully horizontal Pendlay row. Use it in strength blocks, hypertrophy programs, upper/lower splits, and push-pull-legs programs. It pairs naturally with bench press as the primary pulling movement for pushing-volume balance.
2. Pendlay Row: Best for Explosive Pulling Strength
Best for: Explosive pulling strength, strict dead-stop reps, powerlifting carryover Grip: Overhand, slightly wider than shoulder-width Torso angle: Nearly parallel to the floor Pull target: Lower chest or upper abdomen Key difference: Every rep starts from a dead stop on the floor
The Pendlay row is stricter than the standard barbell row. The bar returns to the floor between every rep, removing momentum and forcing a clean reset. This eliminates the stretch reflex and demands more controlled force production.
Stronger's Pendlay row coaching cues emphasize a nearly parallel torso, dead stop on the floor each rep, braced core, and an explosive row to the lower chest or upper abdomen. (Stronger)
Use Pendlay rows if:
- You want maximum strictness and minimal momentum
- You are using rows as a deadlift accessory with a pulling emphasis
- You can maintain a neutral spine close to parallel without rounding
- You prefer lower reps and a more explosive intent
Avoid or modify if:
- Hamstring mobility limits your parallel hinge without rounding
- Your lower back fatigues quickly in deep hinge positions
- You are training after heavy deadlifts and your hinge is already taxed
3. Reverse-Grip Barbell Row: Best for Lats and Biceps
Best for: Lats, biceps, lower pull path Grip: Underhand / supinated Torso angle: About 45 degrees Pull target: Lower abdomen
The reverse-grip row often feels smoother for lifters who struggle to get their elbows close to the body with an overhand grip. It can also allow a longer range of motion because the bar tends to finish lower on the torso. (Stronger)
Use it for:
- Hypertrophy programs
- Lat-biased rowing
- Moderate-to-high rep ranges
- Variety within a program that already uses overhand rows heavily
Do not use it as a license to overload beyond control. The underhand position increases biceps involvement, and heavy jerky reps can stress the elbow and biceps tendon.
4. Yates Row: Heavy Lat Training With a Higher Torso
Best for: Heavier lat-biased rows with a more upright torso Grip: Usually underhand, sometimes overhand Torso angle: More upright than a classic row Pull target: Lower abdomen
The Yates row — associated with Dorian Yates, who built one of the best backs in bodybuilding history with this variation — uses a higher torso angle. It allows many lifters to use heavier loads than a strict 45-degree row.
Use it if:
- You want heavy lat-biased rowing with less hip-hinge depth
- Strict horizontal rows stress your lower back
- You can keep the movement controlled at higher loads
- You want a high-tension back exercise with reduced spinal loading
The main risk: a higher torso angle makes it easier to shorten the range of motion and turn the lift into a heavy shrug. Keep your shoulders depressed and drive your elbows back, not up.
5. T-Bar Row: Heavy Mid-Back Work With Neutral Grip
Best for: Heavy rowing, mid-back thickness, neutral-grip comfort Equipment: T-bar machine or landmine setup with a row handle Grip: Neutral or close grip Torso angle: About 45 degrees
The T-bar row is not strictly a straight-barbell exercise, but it belongs in the same movement family. The fixed bar path (via a landmine pivot or machine) reduces the lateral stability demand compared to a free barbell, which often lets lifters focus more cleanly on back contraction.
Stronger's T-bar row guidance describes it as a compound pull using a T-bar machine or barbell landmine setup, torso around 45 degrees, braced core, and pull toward the chest. (Stronger)
Use it if:
- Your grip or wrists are uncomfortable with straight-bar rows
- You want heavier loading with a slightly more stable bar path
- Neutral-grip rowing feels more comfortable for your elbows
- You want a row variation that stacks well after heavy barbell work
6. Barbell Inverted Row: Best for Beginners
Best for: Beginners, bodyweight horizontal pulling, scapular control Equipment: Barbell in a rack Grip: Overhand or underhand Difficulty: Highly scalable (change bar height or foot elevation to adjust difficulty)
The inverted row is a bodyweight horizontal pull. You lie beneath a bar set in a rack, grip it, brace your body like a plank, and pull your chest to the bar.
Stronger's inverted row guidance describes it as a beginner-friendly compound pull that teaches scapular retraction mechanics and can be made easier or harder by raising or lowering the bar height, or elevating the feet. (Stronger)
Use it if:
- You are new to horizontal pulling movements
- Your lower back needs a break from loaded hinge work
- You want to practice full-range scapular movement without spinal loading
- You need a bodyweight option within a program
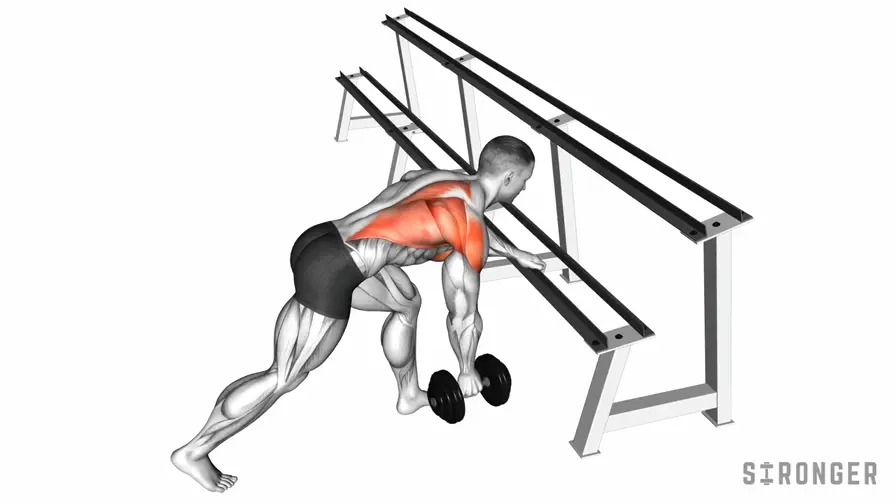
7. Chest-Supported Row: Strict Back Work Without Lower-Back Fatigue
Best for: Strict back hypertrophy without lower-back fatigue Equipment: Incline bench and barbell, or a dedicated seal-row bench Grip: Overhand, underhand, or neutral depending on setup
This variation removes most of the hip-hinge demand by letting you lie face-down on an incline bench. Because the torso is supported, your back muscles can work in relative isolation without the erectors and hamstrings needing to hold the hinge.
A 2025 study published in the Journal of Electromyography and Kinesiology investigated the prone barbell row and found that changes in range of motion produced only medium and inconsistent differences in muscle activation when time under tension was standardized. The practical implication: prioritize controlled execution and a useful range of motion rather than assuming shorter or longer ranges are automatically superior. (ScienceDirect)
Use chest-supported rows if:
- Your back muscles need more volume but your lower back is already fatigued from deadlifts or squats
- You want to isolate the upper back more cleanly
- Strict form has been difficult to achieve with free-standing rows
8. Dumbbell Row: Best for Fixing Strength Imbalances
Best for: Unilateral development, longer range of motion, correcting side-to-side imbalances Equipment: Dumbbell and bench Grip: Neutral by default
Dumbbell rows are not barbell rows, but they belong in any serious back program. Because each arm works independently, you cannot compensate with your stronger side — and you can achieve a longer range of motion than most barbell variations allow.
Stronger's dumbbell row guidance notes that the dumbbell row corrects left-to-right imbalances, allows greater range of motion, and reduces lower-back stress when bench-supported. (Stronger)
Use dumbbell rows if:
- One side is notably stronger or larger
- Your bar path twists to one side during barbell rows
- You want more lat stretch at the bottom of the pull
- You want a supplemental row after heavy barbell work
Which Barbell Row Variation Fits Your Goal?
| Goal or limitation | Best row choice |
|---|---|
| Learn basic form | Standard overhand barbell row |
| Build overall back size | Standard row + dumbbell row |
| Emphasize lats | Reverse-grip row or neutral-grip T-bar row |
| Emphasize upper back | Wide overhand row or Pendlay row |
| Train strict explosive power | Pendlay row |
| Reduce lower-back fatigue | Chest-supported row or inverted row |
| Fix side-to-side imbalance | Dumbbell row |
| Minimal equipment | Barbell row or inverted row |
| Pair with heavy deadlifts | Chest-supported row, T-bar row, or lighter standard row |
| Build grip strength | Overhand rows without straps |
| Keep grip from limiting back training | Use straps on heaviest sets |
Picking the right variation is the first step. The next is loading it and progressing it systematically.
How to Program Barbell Rows for Strength and Hypertrophy
How Heavy Should Your Rows Be?
Your row should be heavy enough to challenge your back — not so heavy that the movement changes.
A simple test: if your torso angle, range of motion, and bar path stay consistent from rep 1 to the final rep, the load is appropriate. If the final reps become upright shrugs with the bar barely moving, the weight is too heavy for the goal.
Use these guidelines as starting points:
| Goal | Sets | Reps | Effort | Rest |
|---|---|---|---|---|
| Strength | 4–5 | 3–6 | 1–2 reps in reserve | 3–5 min |
| Hypertrophy | 3–5 | 6–12 | 1–3 reps in reserve | 2–3 min |
| Technique | 2–4 | 8–12 | 3–4 reps in reserve | 90–150 sec |
| Endurance / pump | 2–3 | 12–20 | 0–2 reps in reserve | 60–120 sec |
Reps in reserve (RIR) means how many more reps you could have completed before form failure. RIR 2 = you stopped with 2 reps left in the tank.
ACSM's updated resistance-training guidelines from March 2026 emphasize that programs should be individualized by goal, safety, and adherence, with heavier loading for strength, higher weekly volume for hypertrophy, and a broad emphasis on consistency over unnecessary complexity. (ACSM)
Stronger's rep ranges guide provides the same practical framework: lower reps and heavier loads for strength, moderate reps for efficient hypertrophy, and higher reps for muscular endurance. (Stronger)
How to Progress the Barbell Row Using Double Progression
The most reliable progression method for most lifters is double progression.
Here's how it works: pick a rep range (e.g., 8–10 reps). When you can complete all sets at the top of that range with good form, add weight at the next session. When you add weight, you drop back toward the bottom of the range and build up again.
| Session | Weight | Set 1 | Set 2 | Set 3 | Action |
|---|---|---|---|---|---|
| 1 | 70 kg | 8 | 8 | 7 | Keep weight |
| 2 | 70 kg | 8 | 8 | 8 | Keep weight |
| 3 | 70 kg | 9 | 8 | 8 | Keep weight |
| 4 | 70 kg | 10 | 9 | 8 | Keep weight |
| 5 | 70 kg | 10 | 10 | 10 | Add weight next session |
| 6 | 72.5 kg | 8 | 8 | 7 | Build back up |
Simple and consistently effective. Stronger's progressive overload guide recommends this same approach: add reps within a target range, then increase the load by the smallest practical increment when all sets hit the top. (Stronger)
RPE (Rate of Perceived Exertion) is a 1–10 scale of effort, where RPE 8 means "I could have done 2 more reps." It's used in the strength program below as a session-to-session intensity guide.

What Actually Counts as Progress on the Barbell Row?
For barbell rows, progress is more nuanced than just "added weight." Real progress includes:
- More weight with the same torso angle and bar path
- More reps with the same weight and strict form
- More sets with maintained quality across the session
- Better control throughout the eccentric (lowering) phase
- Longer pause at the top with shoulder blades retracted
- Fuller range of motion at the bottom
- Less body English on the hardest reps
- Improved left-right symmetry
What does NOT count: getting an extra rep by standing up, bouncing the bar off your torso, or shortening the range of motion. Stronger's progressive overload guide makes this point directly — adding a rep with excessive momentum or degraded form is not real overload. (Stronger)
Where to Put Barbell Rows in Your Workout Program
If rows are a priority, program them early in the session, after your main warm-up but before smaller accessories.
Example pull day:
- Pull-up or lat pulldown — 3–4 sets
- Barbell row — 4 sets
- Chest-supported row — 3 sets
- Rear-delt raise — 3 sets
- Curl variation — 2–3 sets
If deadlifts are also in the session, deadlift first if maximum deadlift strength is the priority. Row after, but be realistic with the load — your lower back and erectors will already have worked hard.
Example deadlift + row day:
- Deadlift — 3–5 sets
- Barbell row — 3–4 sets of 6–10
- Hamstring curl — 3 sets
- Lat pulldown — 3 sets
- Back extension or core — 2–3 sets
If your lower back is too fatigued after deadlifts, use a chest-supported row, cable row, or T-bar row instead.
If bench press is the priority, rows pair naturally as the antagonist pulling pattern. See our complete bench press guide for how to structure this pairing.
Example upper day:
- Bench press — 4 sets
- Barbell row — 4 sets
- Overhead press — 3 sets
- Pull-up — 3 sets
- Triceps + biceps — 2–3 sets each
Many lifters benefit from matching their weekly pressing volume with at least equal pulling volume, especially if heavy pressing is frequent.
How Long to Rest Between Barbell Row Sets
For hard barbell rows, rest longer than feels necessary:
- Heavy strength rows: 3–5 minutes
- Moderate hypertrophy rows: 2–3 minutes
- Lighter technique rows: 90–150 seconds
- High-rep pump rows: 60–120 seconds
Stronger's rest-period guide recommends longer rest for heavy compound lifts and 2–3 minutes for moderate compound movements like rows, particularly when maintaining load and rep quality is the goal. (Stronger)
A practical rule: start the next set when your breathing is under control and you are confident you can match your previous set's form.
How to Warm Up for Barbell Rows
A good warm-up prepares your hinge, lats, upper back, and brace — without tiring you out before the working sets.
- Hip hinge drill — 8–10 reps (groove the movement pattern)
- Band pulldown or scapular pulldown — 10–15 reps (prime the shoulder blades)
- Empty-bar row — 10 reps (lock in the bar path at zero load)
- Light warm-up set — 8 reps
- Moderate warm-up set — 5 reps
- Working sets begin
Example for 80 kg × 4 sets of 8: Empty bar × 10 → 40 kg × 8 → 60 kg × 5 → 70 kg × 3 → 80 kg × working sets
Barbell Row Sample Programs: Beginner to Advanced
Beginner row progression (Weeks 1–4)
| Exercise | Sets | Reps | Notes |
|---|---|---|---|
| Barbell row | 3 | 8 | Light, strict, 3 reps in reserve |
| Inverted row | 3 | 8–12 | Practice scapular control |
| Lat pulldown | 3 | 10–12 | Full stretch and control |
Progress by adding reps first, then load.
Intermediate hypertrophy progression (Weeks 1–6)
| Day | Exercise | Sets | Reps |
|---|---|---|---|
| Pull Day 1 | Barbell row | 4 | 6–10 |
| Pull Day 1 | Lat pulldown | 3 | 10–12 |
| Pull Day 2 | Chest-supported row | 3 | 8–12 |
| Pull Day 2 | Reverse-grip barbell row | 3 | 8–12 |
Strength-focused row progression (Weeks 1–4)
| Week | Sets | Reps | Effort |
|---|---|---|---|
| 1 | 4 | 5 | RPE 7 |
| 2 | 4 | 5 | RPE 8 |
| 3 | 5 | 4 | RPE 8 |
| 4 | 3 | 5 | Deload — lighter and strict |
Repeat with slightly more load if form was consistent across the block.
Now let's fix what's breaking.
Barbell Row Troubleshooting: Why It Feels Wrong
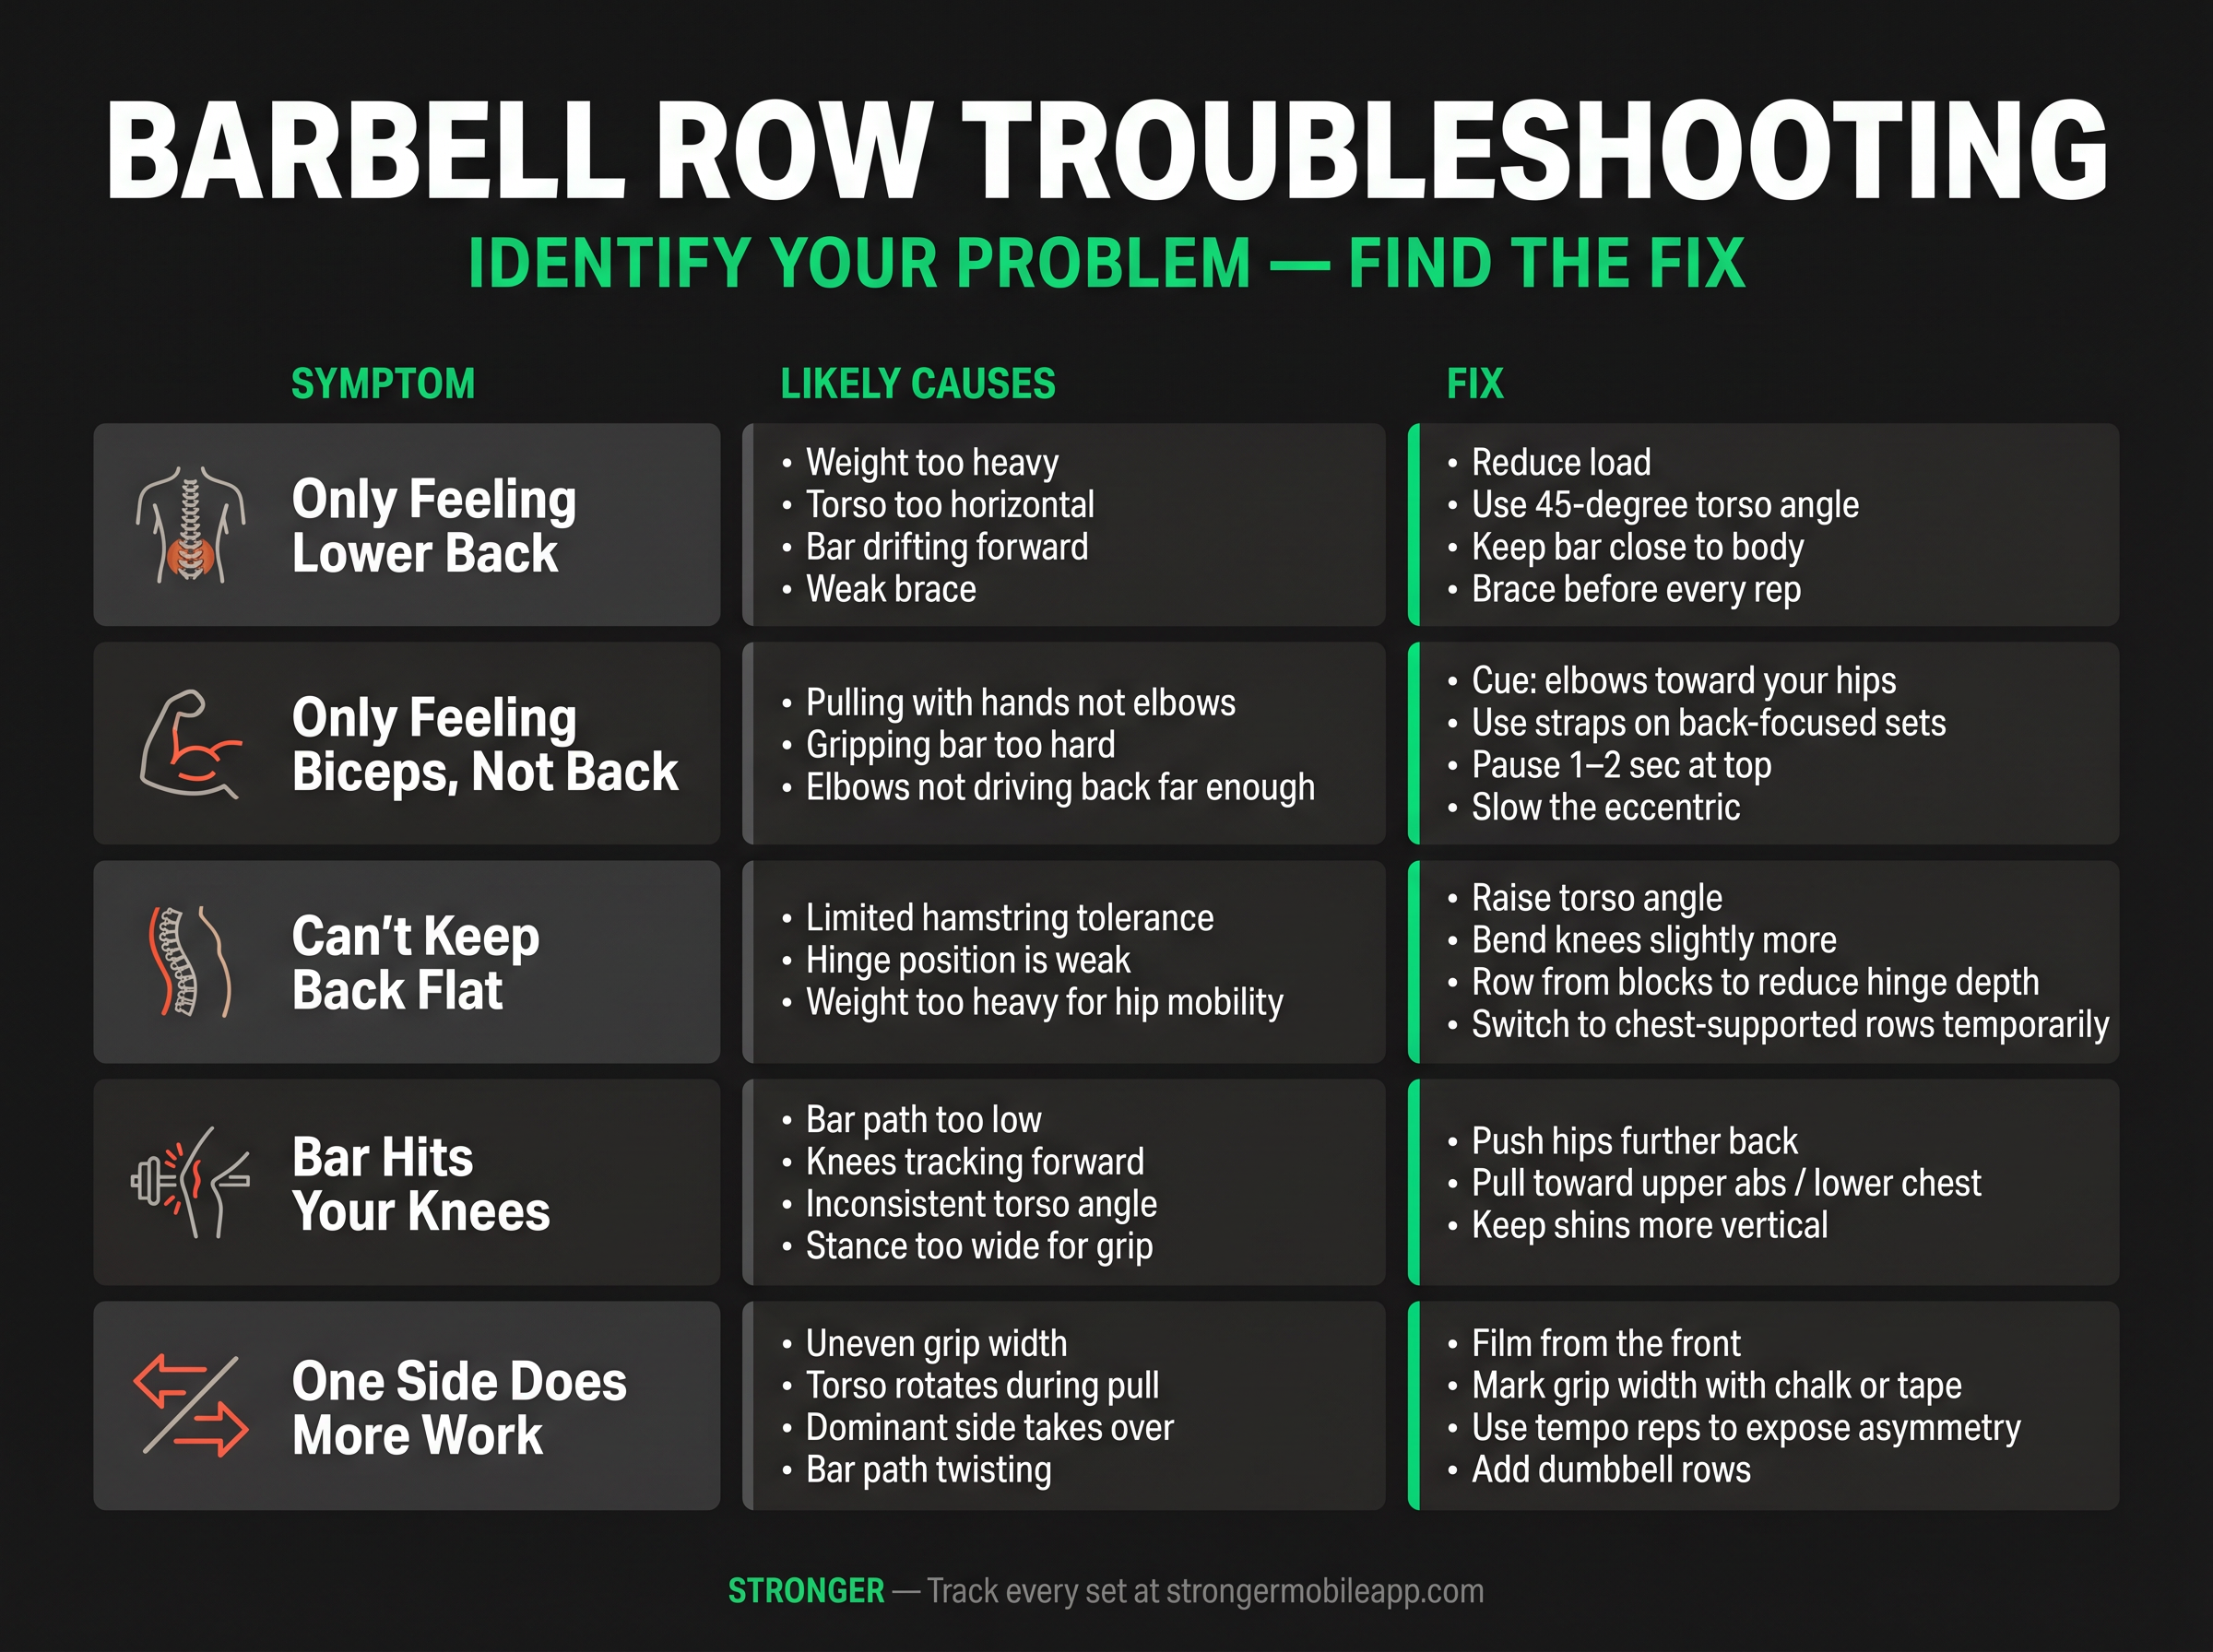
Only Feeling Your Lower Back During Barbell Rows
Likely causes:
- Weight is too heavy for your current form
- Torso angle is too horizontal
- Bar is drifting forward away from your body
- Brace is weak or inconsistent
- You're rowing after heavy deadlifts with already-fatigued erectors
- Sets are too long (15–20 reps with accumulated fatigue compounds lumbar stress)
Fixes:
- Reduce load
- Use a 45-degree torso angle instead of near-parallel
- Keep the bar close to your body throughout
- Brace before every single rep, not just the first
- Temporarily switch to chest-supported rows
- Keep barbell row reps in the 6–10 range for now
Only Feeling Your Biceps, Not Your Back
Likely causes:
- Pulling with hands instead of elbows
- Gripping the bar too hard
- Not driving the elbows back far enough
- Too much underhand-grip volume relative to your biceps tendon tolerance
- Grip fatigue shifting the work up the arm
Fixes:
- Think "hands are hooks" — grip only enough to control the bar
- Use straps for back-focused sets
- Cue "elbows toward your hips" rather than "pull the bar up"
- Pause and hold the top position for 1–2 seconds
- Slow down the eccentric to keep the back engaged through the full range
Can't Keep Your Back Flat During Barbell Rows
Likely causes:
- Limited hamstring tolerance in a deep hinge
- Weak hinge position or unfamiliar motor pattern
- Weight too heavy for current hip mobility
- Torso angle too horizontal
- Accumulated fatigue from prior exercise
Fixes:
- Raise your torso angle
- Bend your knees slightly more
- Practice Romanian deadlifts to build hinge mobility and strength
- Row from blocks or pins set at mid-shin to reduce hinge depth
- Switch to chest-supported rows until the hinge is stronger
Bar Hits Your Knees During Barbell Rows
Likely causes:
- Bar path too low (pulling toward hips with a straight bar)
- Knees tracking too far forward
- Inconsistent torso angle
- Stance too wide relative to grip
Fixes:
- Push hips further back to keep shins more vertical
- Pull toward upper abs or lower chest instead of toward hips
- Tighten the torso angle consistency
- Consider T-bar row or dumbbell row if straight-bar path feels consistently awkward
One Side Doing More Work Than the Other
Likely causes:
- Uneven grip width (one hand wider than the other)
- Torso rotation during the pull
- Dominant side taking over on harder reps
- Bar path twisting
Fixes:
- Film yourself from the front to observe the bar path
- Mark your grip width on the bar with chalk or tape
- Use tempo reps (slow the pull, control the top, slow the lowering) to make asymmetry visible
- Add dumbbell rows — unilateral work forces each side to work independently
- Start each set with the weaker side if doing unilateral work
A 2025 grip-width study from Northumbria University observed limb differences during bent-over barbell rows, suggesting that asymmetry is common enough in trained populations to monitor, particularly in young active lifters. (northumbriajournals.co.uk)
How to Track Barbell Row Progress With Stronger
Barbell rows are easy to fool yourself on.
You add 5 kg. You feel like you're progressing. But your torso angle crept up two degrees every session for three months, your range of motion shortened, and what you are now rowing is a different exercise from what you started with. The weight went up. The barbell row didn't.
That is why tracking the right variables matters — not just load.
Track all of these:
- Which variation (standard, Pendlay, reverse-grip, etc.)
- Grip orientation and approximate width
- Sets, reps, and weight
- Rest time between sets
- Whether you used straps
- RPE or reps in reserve for the hardest sets
- Notes on form (torso angle consistent? bar path close? reps touched?)
- Any left-right asymmetry you noticed
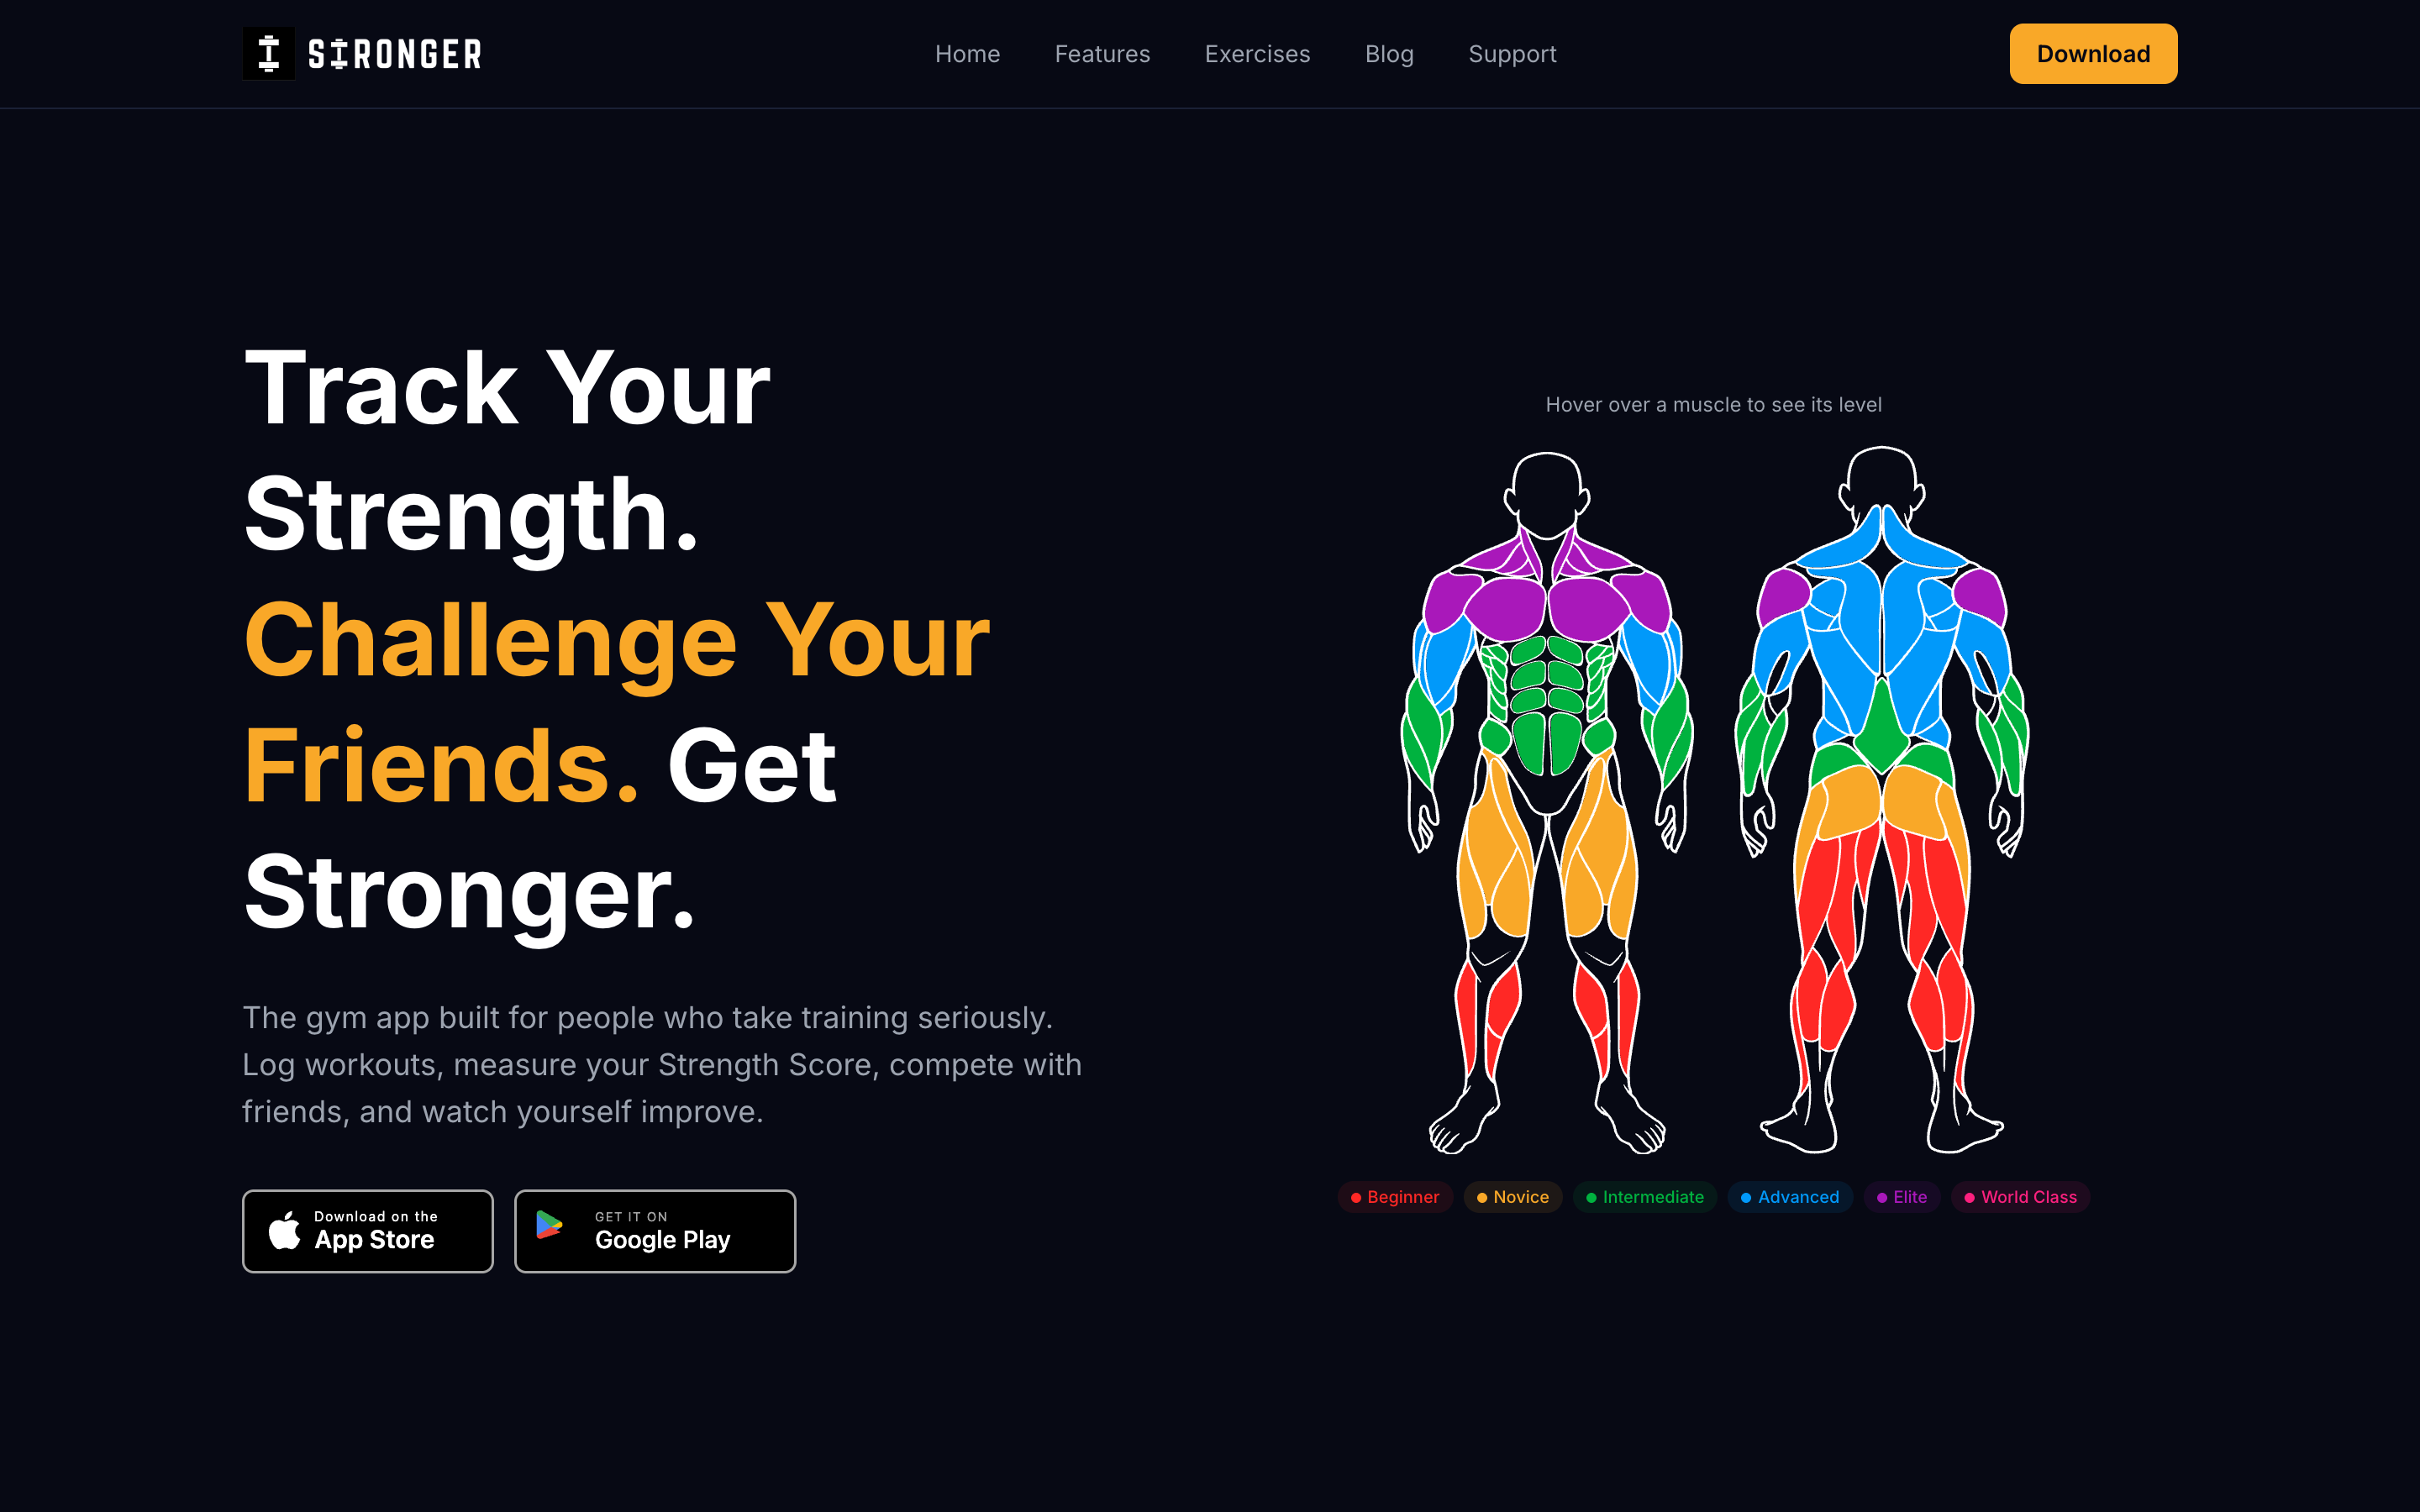
In Stronger, you log sets, reps, and weight, track PRs per exercise, use the built-in rest timer, and see your previous session's performance at a glance before you start working sets. Stronger's 400+ exercise library includes specific entries for the Barbell Row, Pendlay Row, Reverse Grip Barbell Row, T-Bar Row, Barbell Inverted Row, and Dumbbell Row — so you can track each variation separately instead of lumping everything into one messy entry.
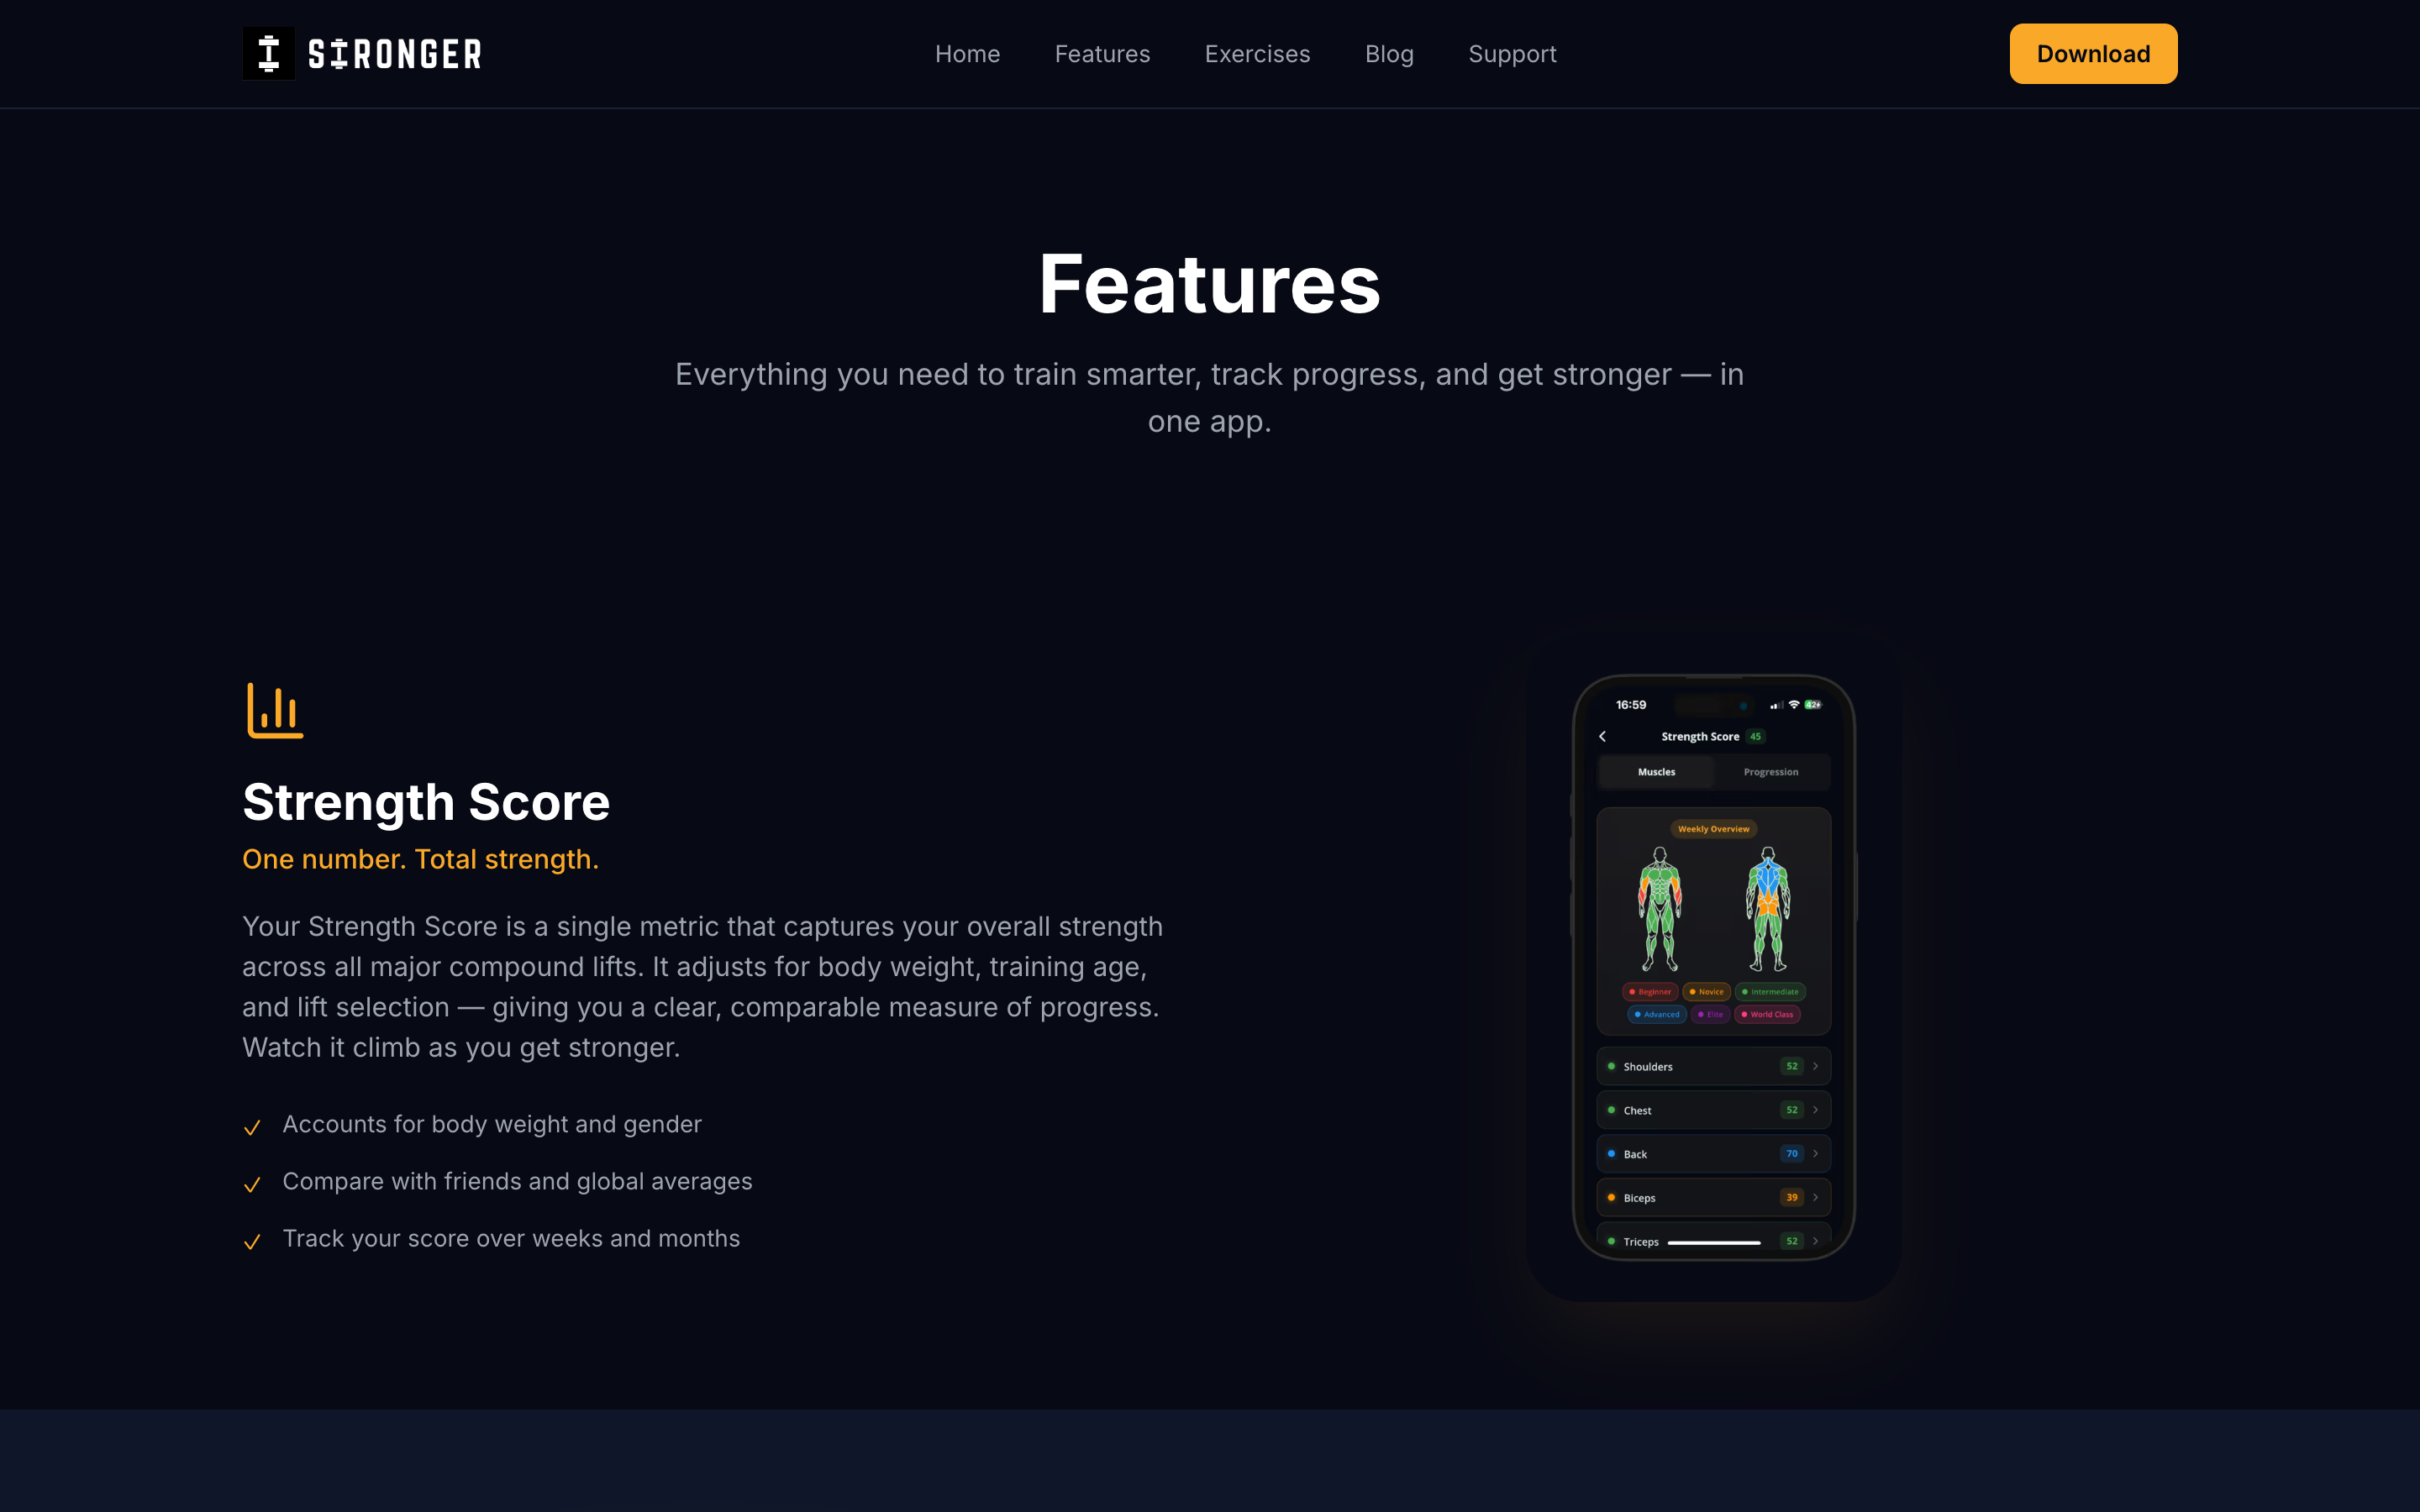
The Stronger features page shows what your training data unlocks: Strength Score benchmarked across muscle groups, PR tracking, adaptive routines, and the full 400+ exercise library — all in one place.
You can also log RPE per set, which gives you a consistent effort record over time even when life, sleep, or fatigue affect absolute performance.
What tracking this way does: it makes your progression honest. You are not guessing whether last Tuesday's 72.5 kg set was clean or sloppy — you can see the notes. You are not wondering which variation you were using six weeks ago — it's in the history. When your strength score for rows climbs in Stronger, it reflects actual progress, not creative accounting.
Track every row. Beat your last session. Build a back you can measure.
Start logging your barbell rows in Stronger.
Ready to Get Stronger?
Join 2,000,000+ lifters tracking their workouts with Stronger. Available on iOS and Android.
Barbell Row vs Other Row Variations: Which Should You Do?
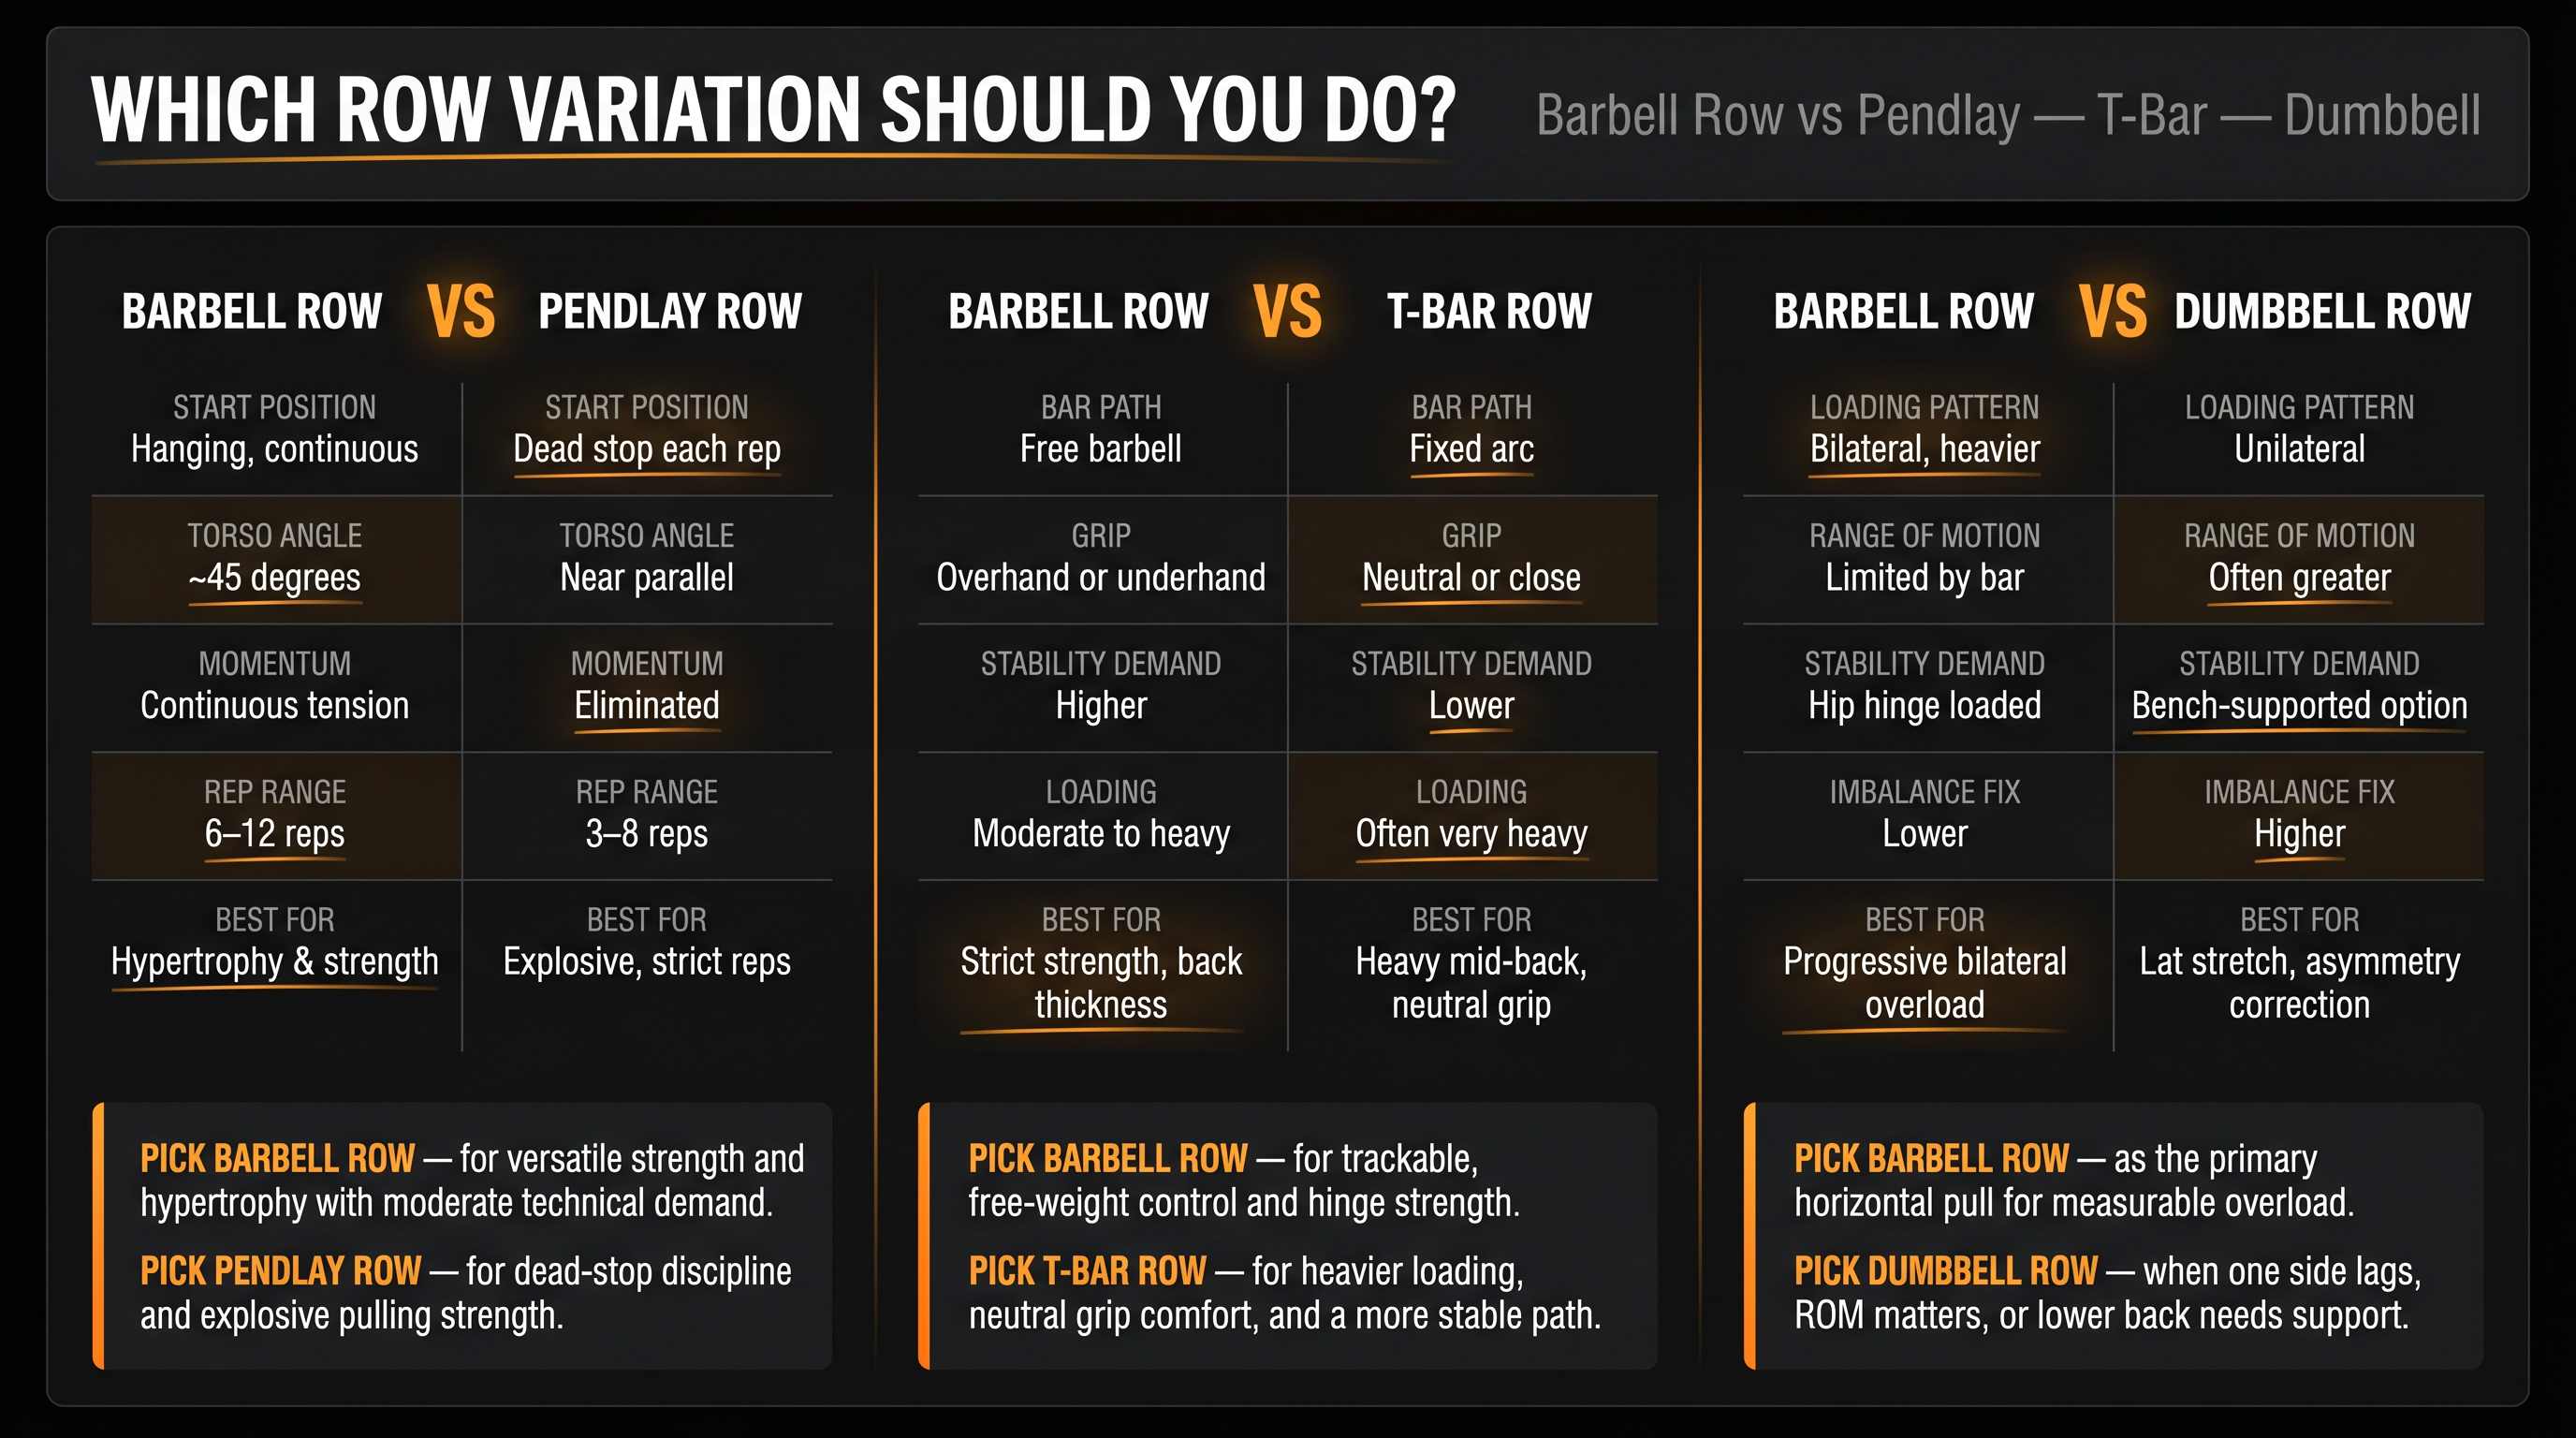
Barbell Row vs Pendlay Row
| Feature | Barbell row | Pendlay row |
|---|---|---|
| Start position | Hanging from arms | Dead stop on floor each rep |
| Torso angle | Usually about 45° | Nearly parallel to floor |
| Momentum | Some continuous tension | Minimal stretch reflex |
| Best for | Hypertrophy and general strength | Explosive strength and strict reps |
| Lower-back demand | Moderate to high | High — particularly at setup |
| Rep range | 6–12 common | 3–8 common |
Choose the barbell row if you want a versatile hypertrophy and strength builder with moderate technical demand.
Choose the Pendlay row if you want strict dead-stop reps, explosive intent, and can maintain a strong parallel torso position. Stronger's Pendlay row page specifically emphasizes resetting each rep, preventing torso rise, and eliminating momentum between reps. (Stronger)
Barbell Row vs T-Bar Row
| Feature | Barbell row | T-bar row |
|---|---|---|
| Bar path | Free barbell | More fixed arc/path |
| Grip | Usually overhand or underhand | Often neutral or close |
| Stability demand | Higher | Usually lower |
| Loading | Moderate to heavy | Often heavy |
| Best for | Strict strength and back thickness | Heavy mid-back and lat work with neutral grip |
Choose the barbell row when you want free-weight control, hinge strength practice, and a standardized lift you can track cleanly.
Choose the T-bar row when you want a heavier, more stable row with a neutral grip and less complexity managing bar path around your legs.
Barbell Row vs Dumbbell Row
| Feature | Barbell row | Dumbbell row |
|---|---|---|
| Loading pattern | Bilateral, heavier | Unilateral |
| Range of motion | Limited by bar and torso | Often greater |
| Stability demand | More spinal and hip-hinge loading | Can be bench-supported |
| Imbalance correction | Lower | Higher |
| Best for | Strength and bilateral back loading | Lat stretch, asymmetry correction, supported work |
Choose the barbell row for measurable progressive overload with a barbell as the primary horizontal pull in your program.
Choose the dumbbell row when one side lags, you want more range of motion, or your lower back needs support. Stronger's dumbbell row guidance highlights unilateral imbalance correction, greater range of motion, and reduced lower-back stress when bench-supported. (Stronger)
Barbell Row FAQs: Common Questions Answered
What is the best grip for barbell rows?
The best default grip is a slightly wider-than-shoulder-width overhand grip. It is easy to standardize and works well for overall back development. Use underhand grip for more lat and biceps emphasis, wide overhand grip for more upper-back and rear-delt emphasis, and a neutral-grip T-bar row if straight-bar rows irritate your wrists or shoulders.
Are barbell rows better than dumbbell rows?
Neither is universally better. Barbell rows are better for bilateral loading, measurable progressive overload, and training the movement as a primary compound lift. Dumbbell rows are better for unilateral range of motion, correcting left-to-right imbalances, and reducing lower-back stress when bench-supported. Most serious programs include both.
Should my torso be parallel to the floor?
Only for Pendlay rows or similarly strict horizontal variations. For a standard barbell row, a torso angle around 45 degrees is the recommended starting position. If you go too horizontal and cannot maintain a neutral spine, raise your torso slightly rather than rounding your lower back.
Should I row to my chest or stomach?
For standard overhand rows, pull toward the lower chest, lower ribs, or upper abs. For underhand and Yates rows, pulling toward the lower abdomen often feels more natural and allows a fuller range of motion. The correct target is whichever allows you to maintain a stable torso and full range of motion for your grip and goal.
Are underhand barbell rows dangerous?
They are not automatically dangerous. They do increase biceps involvement, and the biceps tendon can be vulnerable under heavy load with jerky reps. Use controlled reps, avoid explosive yanking from the bottom, and do not overload them the way you would a deadlift. If you feel irritation in your elbows or biceps tendons, switch to overhand rows, neutral-grip T-bar rows, or dumbbell rows.
Do barbell rows build lats?
Yes. Barbell rows train the lats, particularly when you use a controlled pull, full range of motion, and an elbow path closer to the torso. For complete lat development, combine rows with vertical pulling movements like pull-ups or lat pulldowns — ACE research found vertical pulls produce greater lat activation than horizontal rows alone. (ACE Fitness)
Why do I only feel barbell rows in my lower back?
Because your lower back is doing its job — stabilizing your torso in the hinge position. Some erector spinae work is normal and unavoidable in unsupported rows. But if your lower back is the limiting factor, the weight is likely too heavy, your torso too horizontal, or you need a supported row variation to separate back-muscle training from spinal loading.
Should I use straps for barbell rows?
Use straps if your grip fails before your back. Do not use straps if grip development is part of your training goal. Many lifters benefit from doing warm-ups and first working sets without straps, then adding straps for the heaviest or most demanding sets where the goal is back stimulus rather than grip training.
How many sets of barbell rows should I do?
Most lifters do well with 3–5 working sets, performed 1–2 times per week. For strength, use lower reps (3–6) with longer rest. For hypertrophy, use 6–12 reps with double progression. Adjust total back volume based on recovery and what else is in your program. Our guide to building overall strength covers how to structure pulling volume across a full week.
Can barbell rows replace pull-ups?
No. Rows and pull-ups train overlapping muscles, but they are fundamentally different movement patterns. Rows are horizontal pulls (shoulder extension, scapular retraction). Pull-ups and pulldowns are vertical pulls (shoulder adduction, scapular depression). Use both for complete back development — they complement rather than replace each other.
Key Barbell Row Takeaways
A barbell row is only as useful as it is repeatable.
The form, the grip, the variation, the load — none of it matters if it changes week to week based on how you feel. The lifters who build real back thickness and strength from barbell rows are the ones who treat it like what it is: a performance lift with trackable variables, not an exercise to grind through until their back "feels it."
The key points from this guide:
- Use a stable hip hinge and neutral spine. This is the platform for everything else.
- Start with a slightly wider-than-shoulder-width overhand grip.
- Pull with your elbows, not your hands.
- Keep your torso angle consistent across every rep of every set.
- Lower the bar under control.
- Choose grip based on your goal, but prioritize elbow path and form over hand orientation.
- Use standard rows for general development, Pendlay rows for strict explosive work, reverse-grip rows for lat emphasis, and supported rows when your lower back needs a break.
- Progress with reps first, then load — double progression.
- Track the variation, grip, sets, reps, weight, and form quality. Not just the weight.
Walk into the gym with those principles. Track your sessions. Hold the form honest. Your back will grow.
Log your barbell rows in Stronger and build a back you can actually measure.
Sources & Evidence Notes
This article was reviewed on April 21, 2026. Exercise technique fundamentals are relatively stable, but current programming recommendations and app references were checked against 2026 sources where available.
- Stronger Exercise Library, Barbell Row, accessed April 21, 2026: form steps, muscles worked, sets and reps. (Stronger)
- Stronger Exercise Library, Pendlay Row, accessed April 21, 2026: dead-stop setup, torso position, programming. (Stronger)
- Stronger Exercise Library, Reverse Grip Barbell Row, accessed April 21, 2026: underhand grip setup, pull target, muscles worked, straps guidance. (Stronger)
- Stronger Exercise Library, T-Bar Row, accessed April 21, 2026: setup, benefits, neutral-grip row context. (Stronger)
- Stronger Exercise Library, Barbell Inverted Row, accessed April 21, 2026: beginner-friendly setup, scalability. (Stronger)
- Stronger Exercise Library, Dumbbell Row, accessed April 21, 2026: unilateral work, imbalance correction, range of motion. (Stronger)
- Stronger, Features page, accessed April 21, 2026: 400+ exercise library, PR tracking, rest timer, RPE logging. (Stronger)
- ACSM, March 2026, updated resistance-training position stand: individualization, strength and hypertrophy recommendations. (ACSM)
- Swann & Barry, February 2025, Northumbria University Graduate Journal: grip-width comparison in bent-over barbell row using surface EMG. (northumbriajournals.co.uk)
- Fischer et al., Journal of Electromyography and Kinesiology, August 2025, prone barbell row range-of-motion study. (ScienceDirect)
- ACE-sponsored research, April 2018, back-exercise EMG comparison (older but foundational for multi-muscle row comparison). (ACE Fitness)
- Healthline, medically reviewed, April 2022, bent-over row form, muscles worked, and alternatives. (Healthline)
- Fenwick, Brown & McGill, Journal of Strength and Conditioning Research, 2009, rowing exercises and lumbar loading (older study; used for general spinal loading context). (backfitpro)
- Stronger, Progressive Overload Guide: double progression, tracking, and form-quality progression. (Stronger)
- Stronger, Rep Ranges Guide: strength, hypertrophy, endurance rep ranges. (Stronger)
- Stronger, Rest Between Sets Guide: rest periods by goal and exercise type. (Stronger)
- Stronger by Science, rowing grip and elbow path review: grip changes shoulder and elbow motion, not muscles directly.
Exercises in this guide

Stronger Editorial Team
Certified strength & conditioning specialists with 10+ years of coaching experience
The Stronger editorial team produces evidence-based training content for lifters of all levels.
Ready to Get Stronger?
Join 2,000,000+ lifters tracking their workouts with Stronger. Available on iOS and Android.